TimeTonic WP Sync Documentation
⚠️ NOTA IMPORTANTE
TimeTonic WP Sync is a ONE-WAY SYNC – from TimeTonic to WordPress ONLY!
Changes made in WordPress will NOT be synced to TimeTonic, so make sure to manage your data from TimeTonic to ensure everything is updated properly.
Instalación y configuración
Para instalar nuestro TimeTonic WP Sync en WordPress, siga los pasos que se indican a continuación:
- Descargue el archivo zip del plugin en su ordenador.
- Inicie sesión en el panel de control de WordPress.
- En el panel de control de WordPress, vaya a Plugins > Añadir nuevo plugin.
- Haga clic en Subir plugin en la parte superior de la página.
- Haga clic en Elegir archivo y seleccione el archivo del plugin que descargó en el paso 1.
- Haga clic en Instalar ahora botón.
- Espere a que se instale el plugin y haga clic en el botón Activar Plugin botón.
After installing and activating the plugin in WordPress, it will appear in the admin menu and will allow access to the connection and configuration settings.
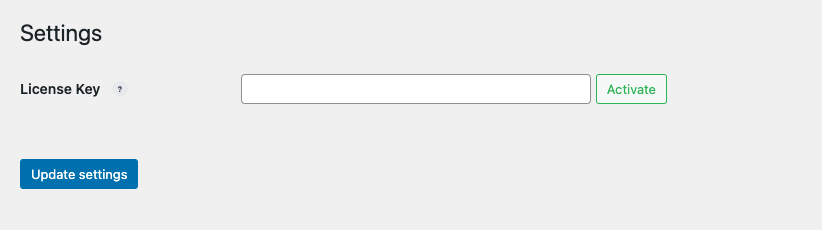
Before creating a connection, you are prompted to enter your license key to validate the plugin installation. To activate this license key, go to TimeTonic WP Sync > Settings.
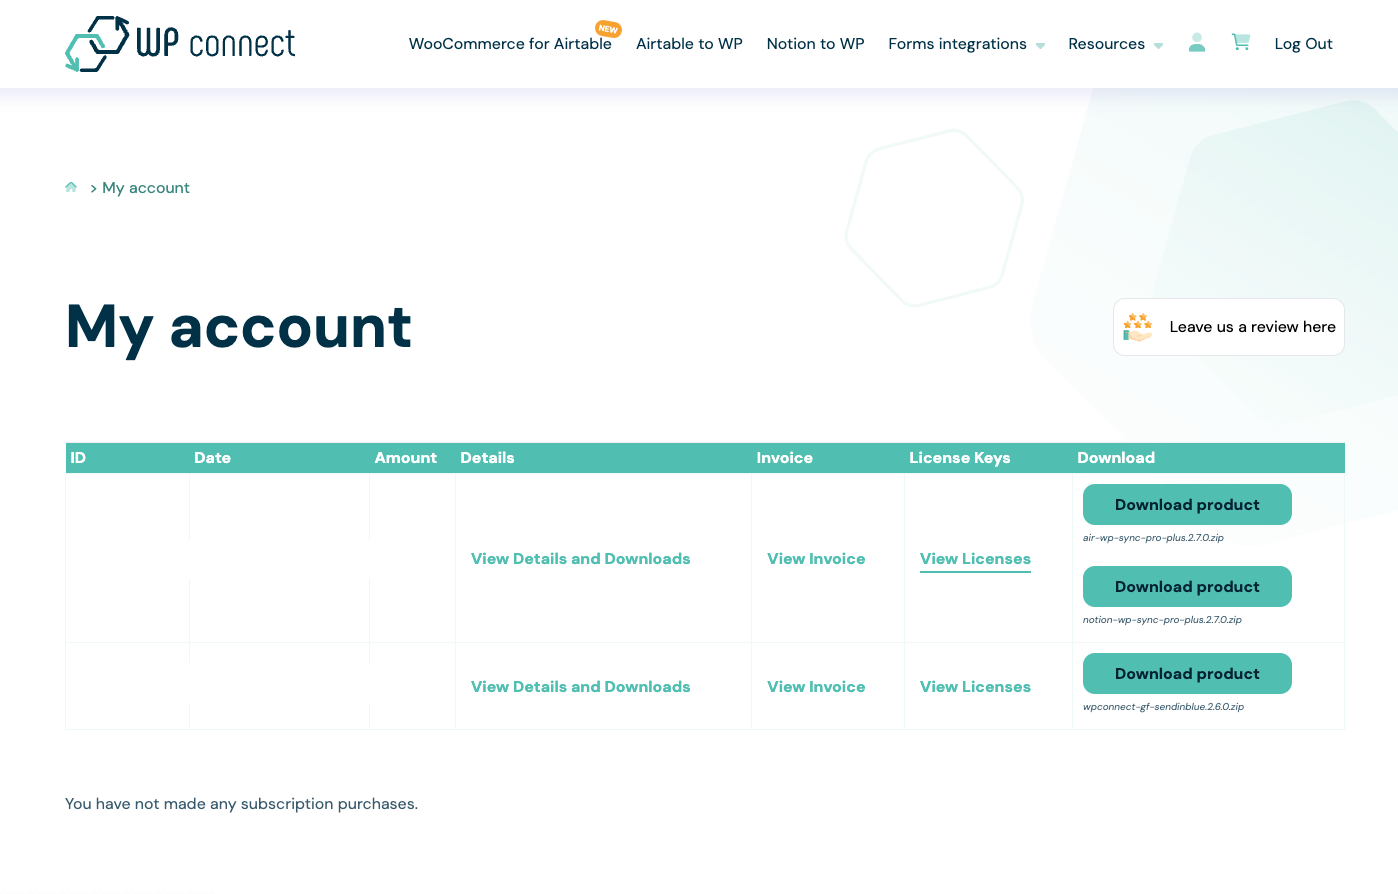
The license key is available in your purchase confirmation email, as well as on wpconnect.co > My Account > License Keys, View Licenses.
You will then be redirected to your product purchase page. Click on the key icon to see the license number appear and copy and paste it into your TimeTonic WP Sync Clave de licencia campo.
Una vez copiada la clave de licencia en el TimeTonic WP Sync settings, make sure to click the Activar button. If your license key is valid, a green check mark will appear and you will simply need to save the settings by clicking the Update Settings botón.
You can then start creating your connections.
Crear una conexión
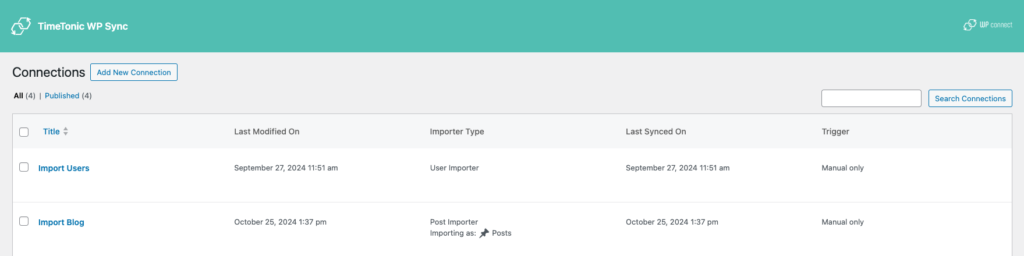
To create a new connection to your TimeTonic account, go to TimeTonic WP Sync > All Connections, click on the Añadir nuevo Connection button, and enter a Título para su conexión.
An API key will be required to connect your account. We recommend retrieving this key from this enlace. Go to your TimeTonic Account > Ajustes page, click on the Add New API key botón.
Once the token is generated, copy and paste it into the designated field Clave API, then also add your User ID in the corresponding field.
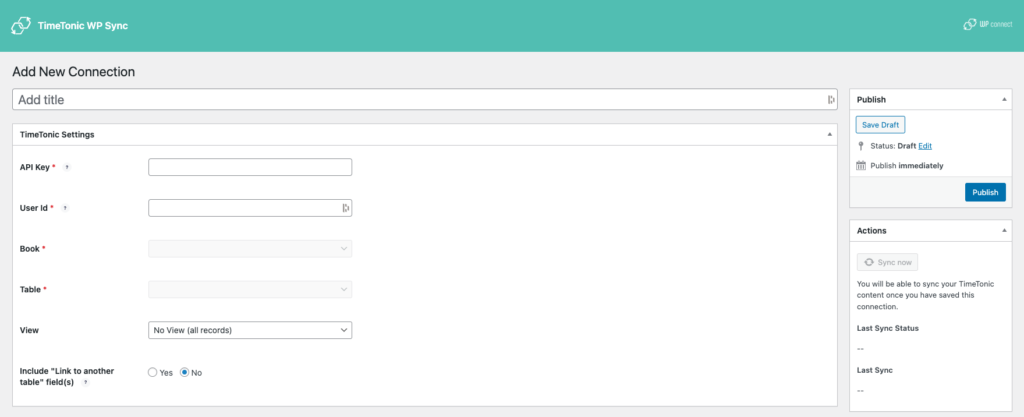
After entering your token, select the Book (Workspace) to import, as well as the Tables o Ver you want to synchronize. In the near future, you’ll also be able to add formula filters to views to adjust imported data, as in TimeTonic.
⚠️ Reminder: to use a table, you must own it or have admin rights.
Configuración de importación
You can import your content into multiple formats: Post, Users, or Taxonomies.
Here’s an overview of each type.
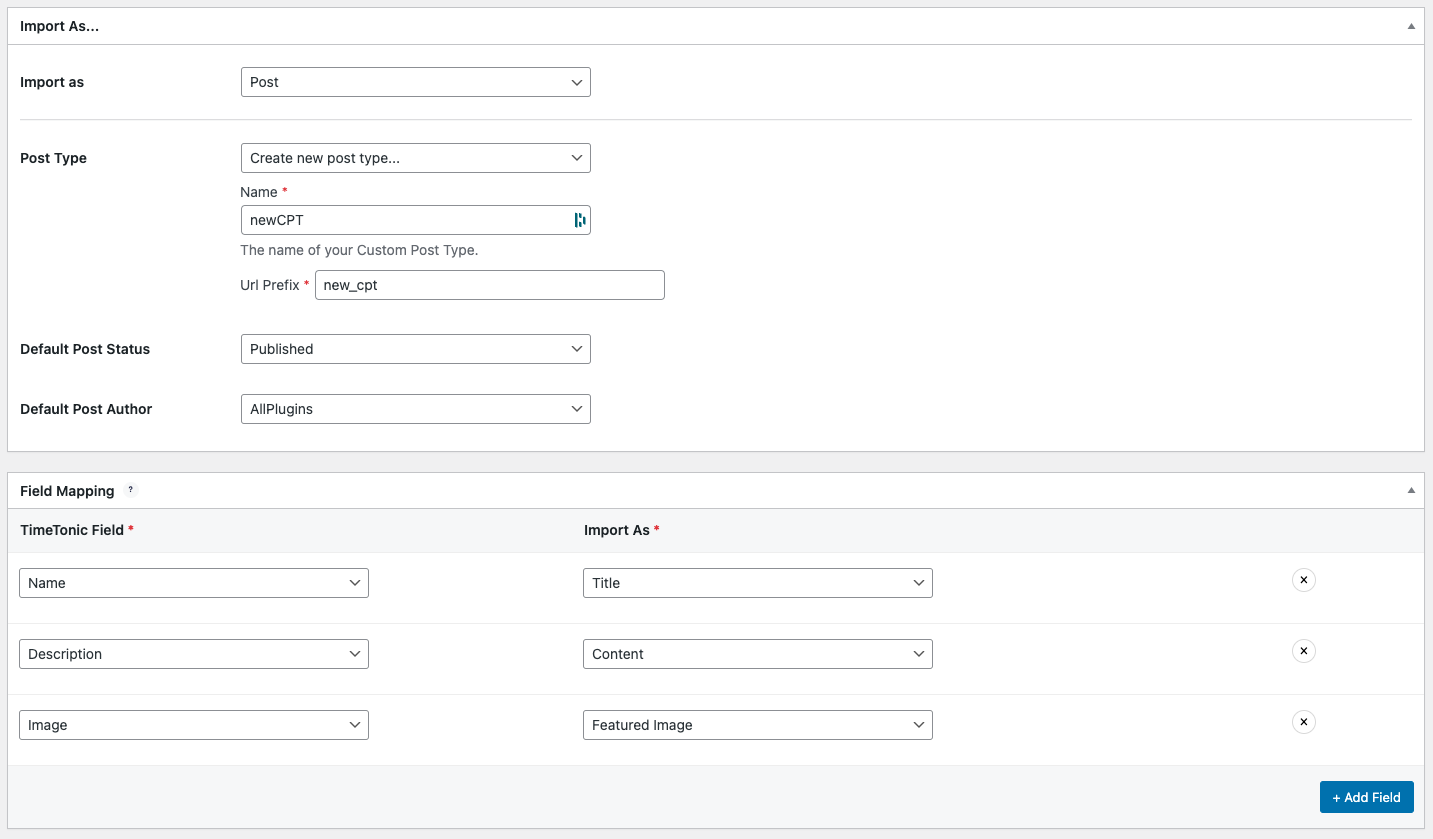
Tipo de puesto
You can import your content in several ways: post, page, or custom post type.
Here’s how these three elements work.
Publicar en
A post is content that can be published on a blog or website. Typically used for sharing news or information, posts are displayed chronologically. You can create and manage them in the Puestos del panel de control de WordPress.
Página
A page is static content that is usually part of the site navigation menu. Pages are used to display long-term content, such as “About" o “Contact" pages. You can manage them in the Páginas del panel de control de WordPress.
Tipo de entrada personalizado (CPT)
A Custom Post Type (CPT) is a specialized content type created by WordPress plugins or themes. CPTs allow you to add structured content like events, products, portfolios, etc.
They are generally used to extend the capabilities of WordPress and add structured content to your site. They are similar to posts and pages in that they can be published on your site and viewed by users, but they have unique tags and characteristics that set them apart.
There are several types of CPTs:
– CPTs created by plugins or themes installed on your WordPress site.
– CPTs that you have created via plugins like Interfaz de usuario personalizada o Conjunto de herramientas.
– CPTs created manually by custom developments.
Con el TimeTonic WP Sync plugin, you can create your own Custom Post Types (CPTs) on the fly for imported data.
📌 While the WooCommerce Product CPT appears in the list, it is only available for basic mapping configurations. For full compatibility, check out our Air WP Sync for WooCommerce.
Creación de Post Type Personalizados
Para el tipo de entrada personalizado que creará a partir del archivo TimeTonic WP Sync plugin, you will find the possibility to map the following WordPress fields: Title, Content, Slug, Custom Field.
También le permite crear sus propios campos personalizados.
⚠️ CAUTION: if you decide to change the configuration and no longer use the Custom Post Type created specifically via the TimeTonic WP Sync plugin, this CPT created on the fly will no longer exist in WordPress and the imported content will also no longer be available.
Estado del puesto
Like in WordPress, imported content from TimeTonic can have different status: Publicado en, Borrador, Programado, Pending, Private.
Cada uno de estos estados comprueba las siguientes condiciones:
PRIVADO el contenido sólo es visible para los usuarios registrados con los permisos adecuados
PUBLICADO el contenido es visible públicamente en su sitio web
PROYECTO el contenido se guarda como trabajo en curso y no es visible para el público
PROGRAMADO el contenido se publicará en una fecha y hora determinadas en el futuro
PENDIENTE el contenido está a la espera de revisión o aprobación antes de ser publicado
📌 If you change the status later in the configuration, the status of already imported content will depend on the import strategy you defined (see Estrategias de importación section).
Post Author
During the import process, you must choose an author who will be assigned to each imported post. The author must be an existing WordPress user with access to the admin panel, regardless of their role.
⭐️ You can also import users from TimeTonic and assign them as authors
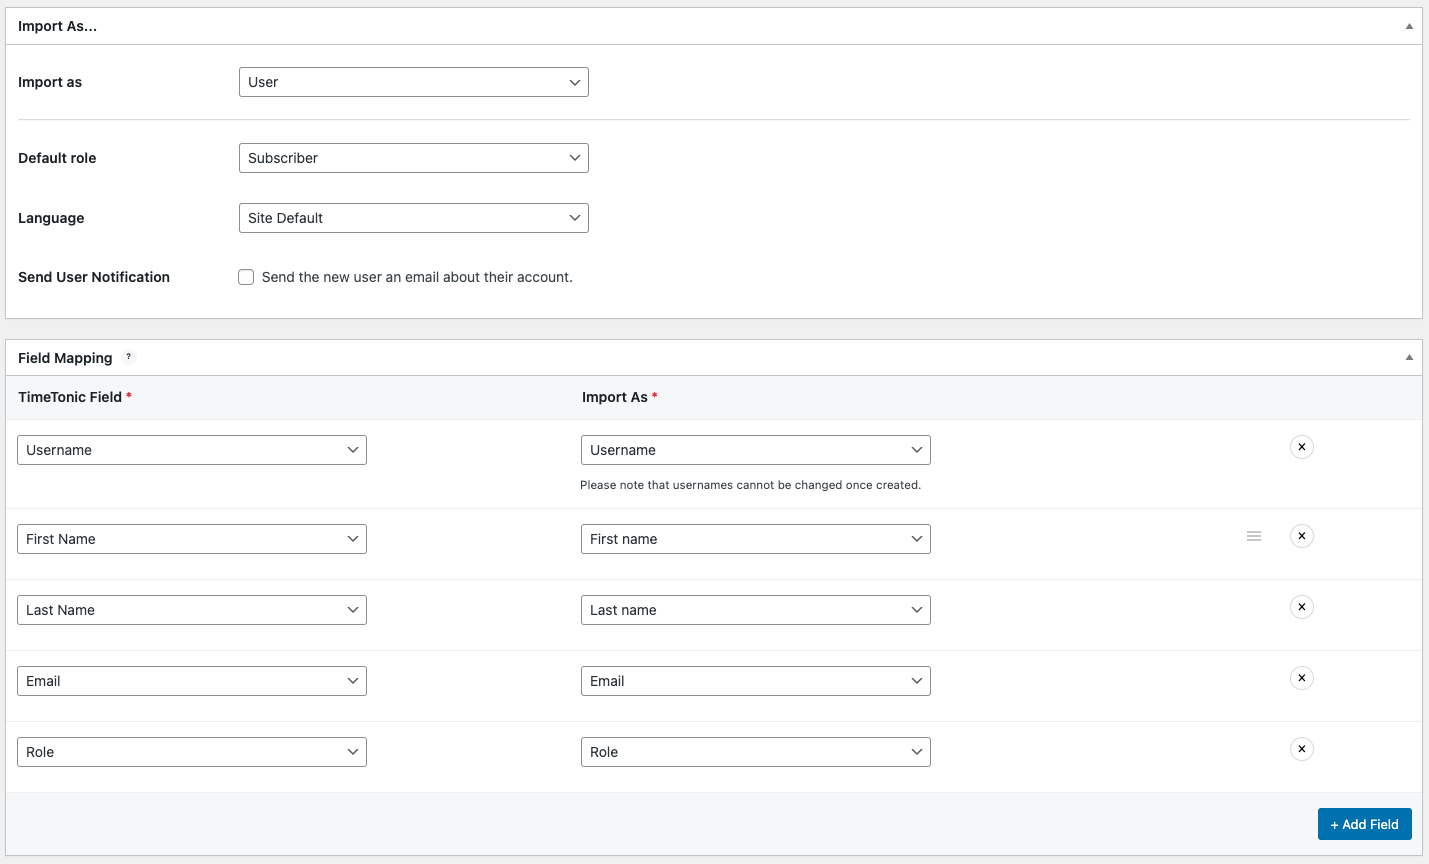
Users Import
TimeTonic WP Sync also allows you to import users directly into WordPress. You can map your TimeTonic fields to user attributes such as:
• Username
• First Name
• Last Name
• Email
• Website
• Biography
• Role (admin, editor, contributor, etc.)
• Language
• Custom Fields
This is particularly useful for team management or membership sites.
Término taxonómico
You can import taxonomies (categories, tags) to organize your content. By mapping TimeTonic fields to WordPress taxonomies, you can create filters and groups for your posts or CPTs.
Compatible fields for taxonomies:
• Name
• Slug
• Taxonomy Type
• Description
• Parent Category (only for hierarchical taxonomies)
• Custom Fields (e.g., project type, location)
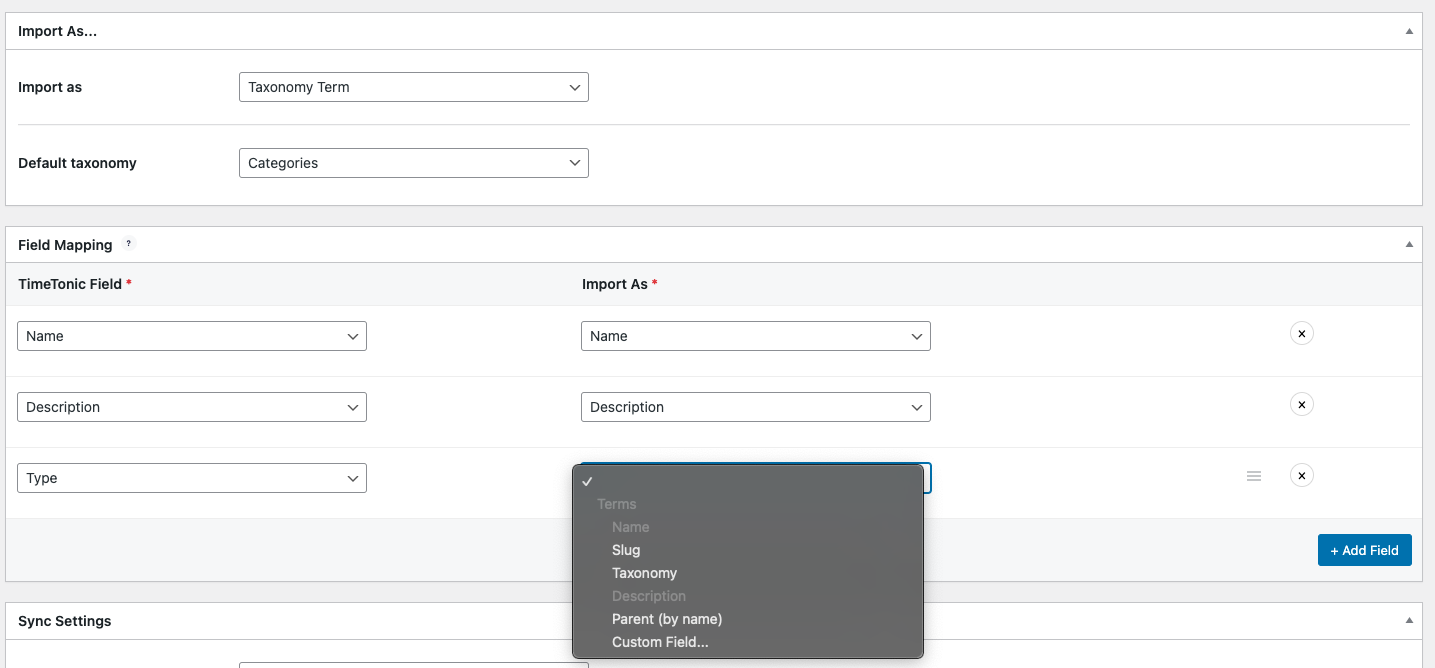
📌 However, for custom taxonomies, only those based on text fields are currently supported. Other field types will be added in future versions of the plugin.
Configuración de mapas
You can now link the fields of your TimeTonic database with the WordPress fields.
To do this, click on the Añadir un campo button. Two drop-down lists will appear: one containing the fields of your TimeTonic database and the other the WordPress fields with which you can associate them.
Publicar en
For posts, you can map the following WordPress fields:
Title, Featured Image, Content, Excerpt, Slug, Tags, Categories, or Custom Field.
Página
For pages, you can map the following WordPress fields:
Title, Featured Image, Content, Slug, or Custom Field.
Tipo de entrada personalizada existente
For existing Custom Post Types (CPTs), meaning those created by installed plugins or WordPress themes, you can map:
Title, Content, Slug, Taxonomies, or Custom Fields.
Taxonomies allow grouping similar content across multiple CPTs. They can be used to create filters or search functions.
Example for a “Real Estate” CPT:
• Title
• Content
• Slug
• Property Type (taxonomy)
• City (taxonomy)
• Custom Fields
Campos personalizados
You can also add specific fields to your content imported from TimeTonic by associating a TimeTonic field with a custom field that you can name. You will find this field in the imported content once the synchronization is complete.
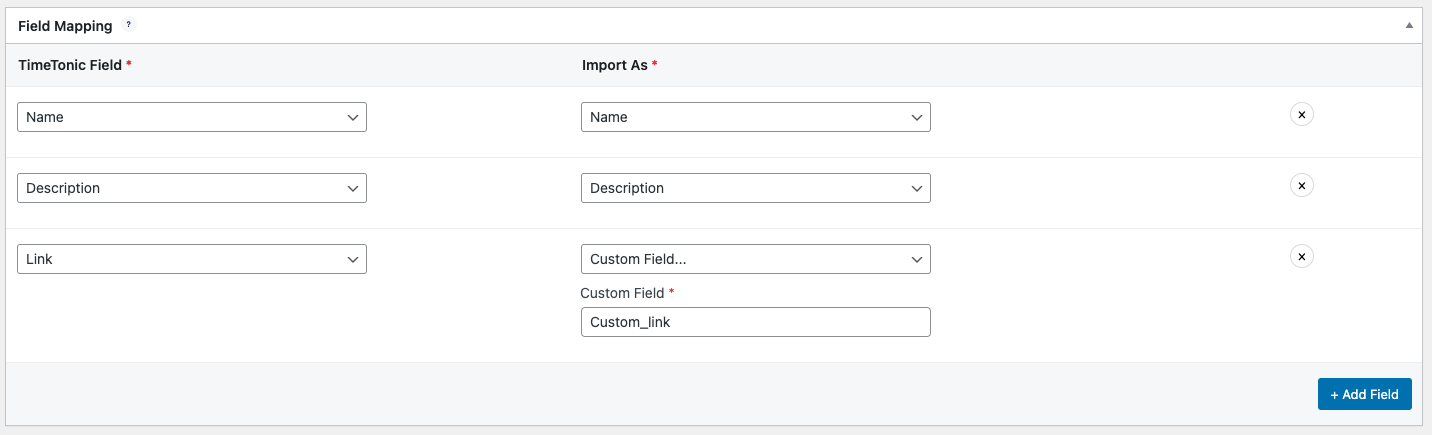
⚠️ If you modify the configuration and delete a custom field created via TimeTonic WP Sync, you will no longer find it in any of the imported content.
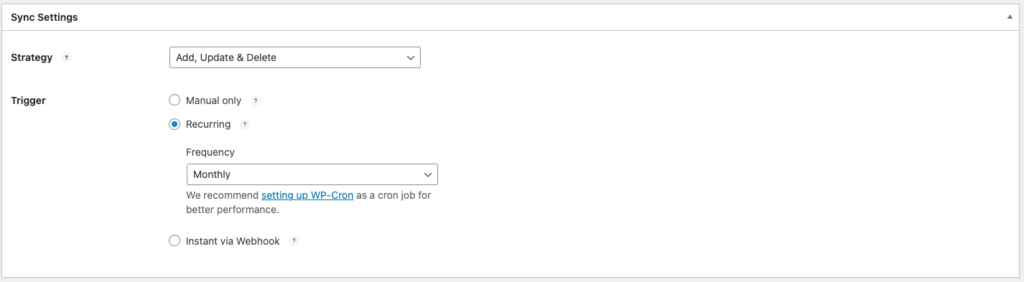
Ajustes de sincronización
You can choose the synchronization settings of the TimeTonic WP Sync plugin.
Haciendo clic en Synchronize, you can perform your first synchronization, even if you have not selected the Manual only gatillo.
Estrategia
There are three import strategies for importing TimeTonic content into WordPress:
• AÑADE: only adds new content without modifying existing ones.
• AÑADIR/ACTUALIZAR: adds new content and updates existing ones if they have been modified in TimeTonic.
• AÑADIR/ACTUALIZAR/BORRAR: adds new content, updates existing ones, and deletes any removed from TimeTonic.
Disparador
Triggers allow you to control when data is imported from TimeTonic to WordPress. There are three options available:
- MANUAL: Le permite importar manualmente los datos haciendo clic en el botón "Sincronizar ahora". Esto es útil si necesitas importar datos ocasionalmente o quieres tener más control sobre cuándo importar.
- RECURRENTE: It allows you to schedule the import of data at regular intervals. You can choose how often the import should occur, such as every 5 minutes, hourly, daily, or weekly. This is useful if you want to regularly update your WordPress site with the latest data entered into TimeTonic.
Para un mejor rendimiento, puede establecer un cron job usando WP-Cron: vea nuestro tutorial aquí. - INSTANT: It allows you to import data as soon as it is added or updated in TimeTonic (depending on the selected import strategy). This is useful if you want your WordPress site to be in real-time sync with TimeTonic, but it can also be resource-intensive if you have a large amount of frequently updated data. To do so, you’ll have to create an automatización.
Publicación
Una vez configurados todos los parámetros, no olvide publicar su conexión haciendo clic en Publique o Actualización button in the case of a configuration modification. And, voilà !
Si ha elegido una sincronización manual, no dude en pulsar el botón Sincronizar ahora para sincronizar sus primeros contenidos y verlos aparecer en WordPress.
Soporte para Elementor, Divi, Beaver Builder y otros Page Builders
If you use Elementor, Divi, Beaver Builder or any Page Builder to create and manage your site, you can use directly the content imported by TimeTonic WP Sync. You will find all the synchronized posts including the existing Custom Post Type and your Custom Post Type created with TimeTonic WP Sync.
Refer to your page builder documentation to enable, use your Custom Post Types and add them to posts loops or single templates.
Del mismo modo, puede utilizar los campos personalizados para mostrar sus datos en páginas, cajas, widgets o cualquier elemento dinámico como botones o etiquetas, ¡lo que le proporciona un alto nivel de personalización!
Campos admitidos
TimeTonic supported fields:
WordPress supported fields:
- Single line of text
- Multiline Text
- Smart Text
- Número
- Selección
- Casilla de verificación
- Fecha
- Phone Number
- Correo electrónico
- Archivos adjuntos
- URL
- Fórmula
- Enlace a otra tabla
- Selection (List from another table)
- Automatic Number
- Título
- Contenido
- Extracto
- Babosa
- Publication Date
- Imagen destacada
- Campo personalizado
- Term Taxonomies
- Estado
- Autor
Not Supported Fields & Views:
Here is what is not yet supported by our plugin:
TimeTonic Fields:
- Color Selection
- Text Color Selection
- Linked Table Column
- Conditional Text (Text from Another Table)
- Conditional Selection (List from Another Table)
- Comentarios
- Change History
- Automatic Numbers
- External Form
- Permalink
- QR Code
- Encrypted Field
- Last Modified
- Automatic Document
- Máscara
- Contact Information
- Registro URL
TimeTonic Views:
- Kanban
- Calendar
- Planner
- Gantt
- Cart
- TCD
Solución de problemas
Make sure you have created your databases and TimeTonic columns names before adding a new connection. If you don’t see it, wait 15 minutes. For performance reasons, your TimeTonic elements are cached for 15 minutes.
Si es necesario, puede acceder a los registros de un servidor FTP en esta carpeta:
/wp-content/uploads/tmtwpsync-logs
Problemas de sincronización
Pueden aparecer algunos problemas al sincronizar. Algunos proveedores de alojamiento desactivan algunas funciones de PHP para garantizar el rendimiento de los servidores.
Tiempo de espera del servidor
Si tiene que importar una gran cantidad de contenidos, el proceso de sincronización tardará algún tiempo en sincronizar todos los datos, especialmente si se trata de la primera sincronización. Es posible que se produzca lo que se denomina un "tiempo de espera del servidor". Dependerá del número de filas que desee importar, del tamaño y del número de imágenes, pero también de la configuración del servidor. Es más probable que esto ocurra si has optado por una oferta básica de alojamiento.
Consulte con su proveedor de alojamiento y aumente el tiempo de ejecución, el tamaño de memoria permitido y el tamaño de archivo al máximo si es necesario.
Autenticación básica
En caso de que haya configurado una Autenticación Básica para proteger el acceso al sitio o a alguna información del sitio, la llamada a WP Cron es entonces imposible, imposibilitando la sincronización recurrente e instantánea.
Problemas de caché con WP-Cron
WP-Cron necesita que se cargue la página para activarse y por lo tanto sincronizarse. En caso de utilizar un sistema de caché (WP Rocket o WP Super Cache por ejemplo), es necesario utilizar un cron de servidor.