Email reste l'un des canaux offrant le meilleur retour sur investissement pour les entreprises, quelle que soit leur taille. Mais faire communiquer vos WordPress avec Brevo n'est pas toujours simple. Entre la compatibilité des plugins, la configuration de l'API et le mappage des champs, la mise en place peut rapidement devenir un véritable casse-tête.
Ce guide vous accompagne pas à pas pour créer un formulaire d'abonnement Brevo fonctionnel sous WordPress, le relier à vos email et automatiser la collecte de prospects dès le premier jour.
Points clés à retenir
Dans ce guide, nous vous expliquons étape par étape comment créer un formulaire d'abonnement Brevo sous WordPress, de la configuration du plugin à la synchronisation des prospects et à l'automatisation.
- La connexion WordPress à Brevo s'effectue en quelques étapes, sans aucune connaissance en programmation.
- Les formulaires vous permettent de collecter automatiquement des prospects et de les synchroniser avec vos listes de contacts Brevo.
- Le bon plugin permet une intégration rapide et évolutive, à mesure que vos besoins se développent.
- Gravity Forms, associé à Gravity Forms to Brevo », constitue une solution fiable et flexible pour se lancer.
Guide étape par étape pour créer votre formulaire d'abonnement Brevo dans WordPress
La création d'un formulaire d'abonnement Brevo dans WordPress que quelques minutes. Ce guide vous accompagne tout au long d'un processus simple en 6 étapes, à l'aide de Gravity Forms et de Gravity Forms to Brevo » de WP connect.
Étape 1 : Installer et activer Gravity Forms

Gravity Forms est l'un des générateurs de formulaires les plus utilisés pour WordPress, et ce n'est pas sans raison. Il vous offre un contrôle total sur la structure de vos formulaires : types de champs, logique conditionnelle, formulaires en plusieurs étapes et intégrations avec des outils tiers tels que Stripe, HubSpot ou Zapier. Créer un formulaire est aussi simple que de glisser-déposer des champs à l'endroit souhaité, sans aucune connaissance en programmation.
Gravity Forms est un plugin premium qui vaut largement son prix. Pour commencer, achetez une licence sur le site web de Gravity Forms, puis installez et activez le plugin sur votresite WordPress .
Étape 2 : Installer Gravity Forms to Brevo »
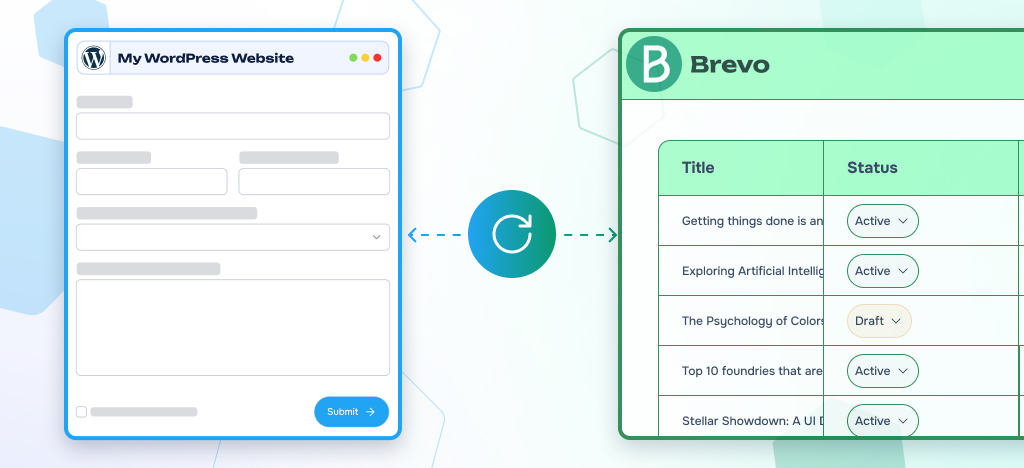
Gravity Forms to Brevo « Gravity Forms to Brevo » de WP connect vous permet de synchroniser vos WordPress avec Brevo. Elle vous permet d'ajouter automatiquement chaque formulaire envoyé à une ou plusieurs listes de contacts Brevo. Tout cela sans avoir à exporter manuellement les données ni à utiliser de code personnalisé.
Au-delà de la simple synchronisation, cet extension vous offre de véritables fonctionnalités d’automatisation marketing. Associez les champs de formulaire aux attributs Brevo et appliquez une logique conditionnelle pour segmenter vos prospects dès leur enregistrement. À partir de là, déclenchez des e-mails transactionnels ou des séquences de suivi automatisées en fonction des formulaires remplis. Si vous gérez une boutique WooCommerce, cette extension s’intègre naturellement à votre flux de travail WordPress existant.
Vous pouvez télécharger Gravity Forms to Brevo » directement depuis WP connect. Notez qu'une version gratuite est disponible, mais qu'elle ne prend en charge que email de base email . Pour bénéficier d'un mappage complet des champs et de toutes les fonctionnalités d'automatisation, vous devrez opter pour la version premium. Une fois l'extension installée, rendez-vous dans Formulaires > Paramètres > Brevo, collez votre clé de licence, puis cliquez sur « Activer ».

Optimisez votre marketing en connectant Gravity Forms to Brevo
Transformez chaque envoi de formulaire Web en actions automatisées dans Brevo pour optimiser votre email , vos campagnes SMS et vos workflows CRM.
Étape 3 : Connectez-vous à votre compte Brevo
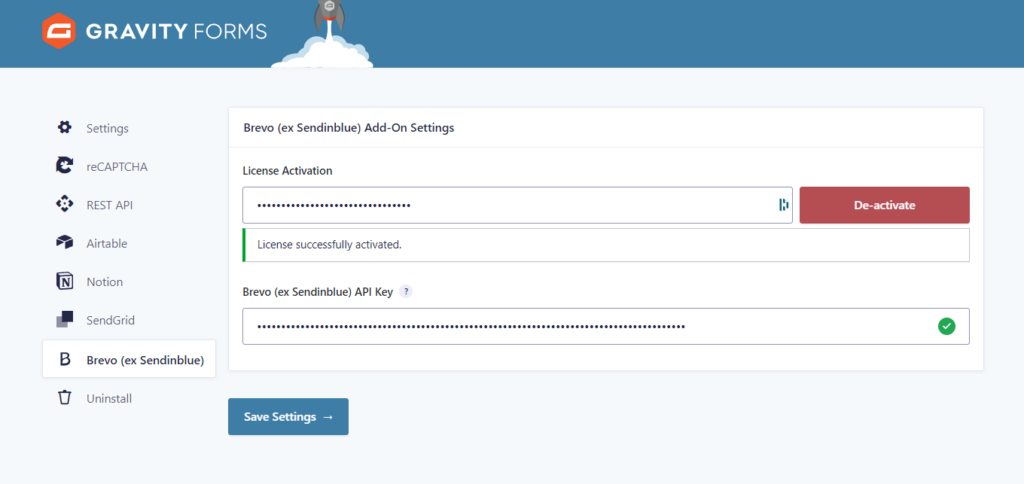
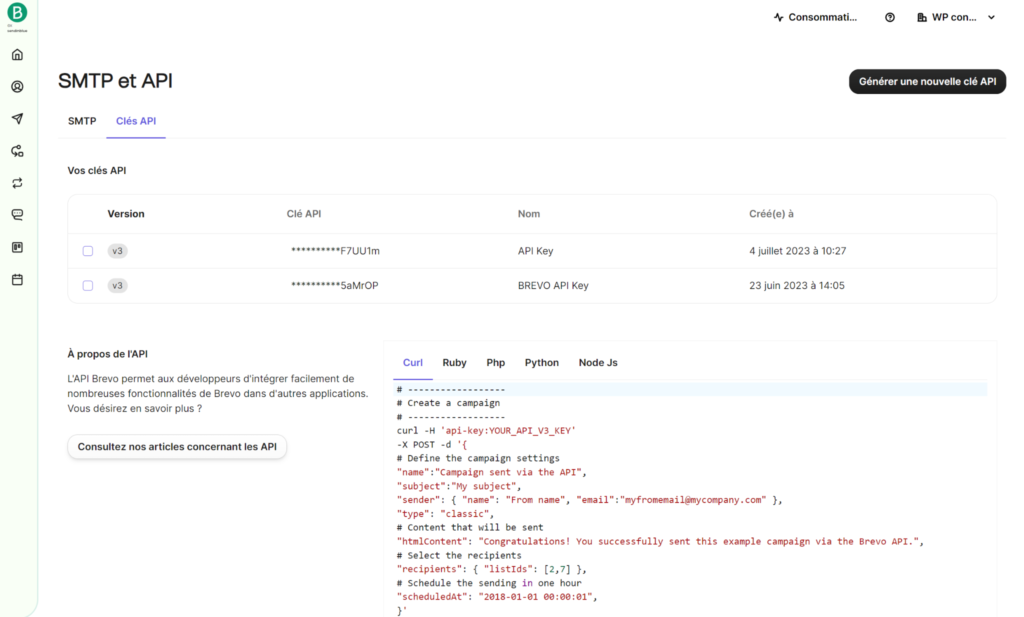
Pour connecter Brevo, vous avez besoin d'une clé API. Dans votre compte Brevo, ouvrez le menu déroulant accessible depuis l'icône de votre profil (en haut à droite) et sélectionnez « SMTP & API ». Générez une nouvelle clé et copiez-la immédiatement. Pour des raisons de sécurité, elle ne s'affichera plus par la suite.
De retour dans votre WordPress , rendez-vous dans Formulaires > Paramètres > Brevo, collez votre clé API, puis enregistrez. Votresite WordPress site désormais connecté à Brevo.
Étape 4 : Créez votre formulaire d'abonnement
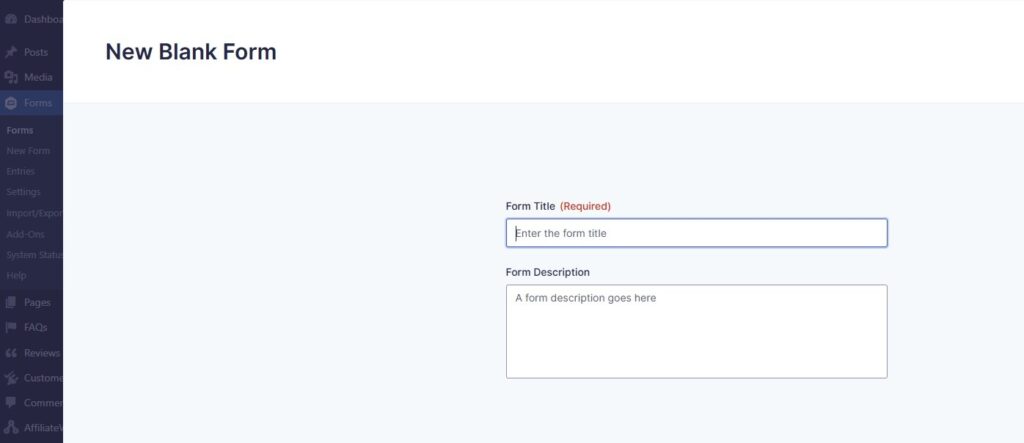
Dans votre WordPress , rendez-vous dans Formulaires > Nouveau formulaire. Pour un formulaire d'inscription, deux champs suffisent : Email et Prénom. L'éditeur « glisser-déposer » de Gravity Forms vous permet d'ajouter et d'organiser facilement vos champs en quelques secondes.
Veillez à ce que votre formulaire soit court. Chaque champ supplémentaire réduit le taux de remplissage. Limitez-vous aux informations dont vous avez réellement besoin pour segmenter et personnaliser vos campagnes Brevo.
Étape 5 : Associer les champs du formulaire aux listes Brevo
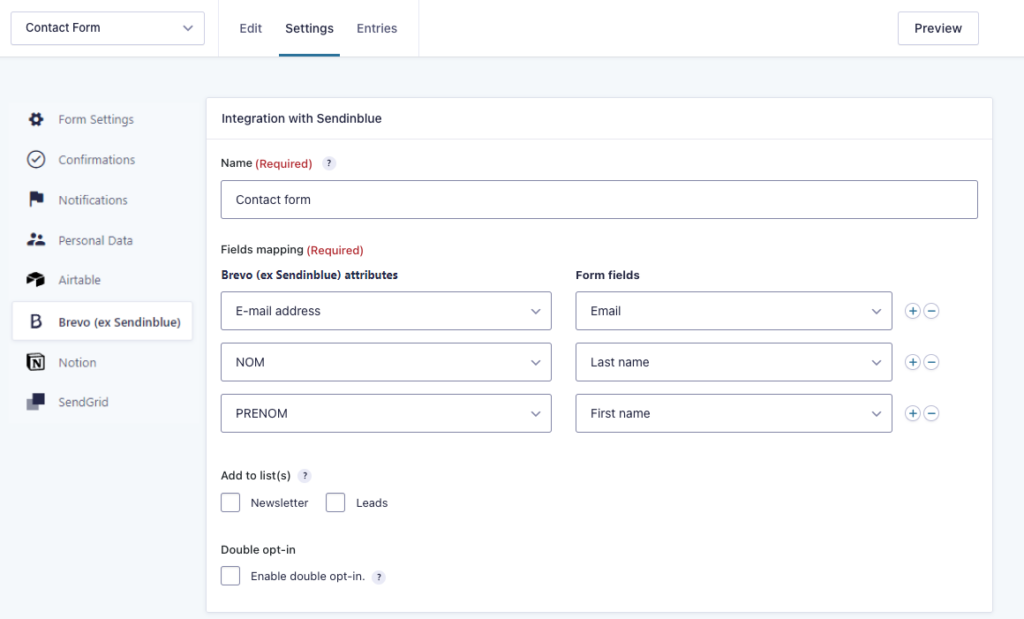
Dans les paramètres du flux Gravity Forms to Brevo », sélectionnez la liste Brevo vers laquelle vous souhaitez synchroniser les prospects, puis associez chaque champ du formulaire à l'attribut correspondant du contact Brevo. Par exemple, associez Email email » de Brevo, et le champ « Prénom » à l'attribut « prénom ».
C'est au niveau de la logique conditionnelle que le système prend toute sa puissance. Vous pouvez créer des flux distincts et définir des règles pour acheminer les prospects vers différentes listes en fonction de leurs choix ou des informations qu'ils ont fournies. Un prospect intéressé par un produit se retrouve ainsi dans une liste différente de celle d'un prospect intéressé par un autre produit. La segmentation s'effectue automatiquement, dès la saisie des données.
Étape 6 : Testez votre formulaire et votre automatisation
Avant la mise en production, testez votre intégration. Envoyez une entrée test et ouvrez votre compte Brevo. Vérifiez que le contact a bien été ajouté à la bonne liste et que tous les attributs Brevo sont correctement renseignés. Vérifiez également le format et le type des données afin d'éviter toute perte d'informations.
Si vous avez configuré des automatisations Brevo, assurez-vous qu'elles se déclenchent et s'exécutent comme prévu. Un test rapide avant la publication vous évitera de perdre de véritables prospects.
Bonnes pratiques pour créer des formulaires d'abonnement à fort taux de conversion
WordPress bien configurée ne représente que la moitié du travail. Le formulaire lui-même doit générer des conversions, et les petits choix que vous faites à ce niveau ont un impact direct sur vos résultats.
Limitez vos champs à ce dont vous avez réellement besoin. Avant d'ajouter un champ, demandez-vous si vous utiliserez ces données dans vos campagnes ou vos flux de travail. Avez-vous vraiment besoin du nom de famille si vous ne faites qu'envoyer des newsletters ? Chaque champ superflu est une raison de plus pour un visiteur de quitter le site.
Rédigez un appel à l'action (CTA) qui reflète votre offre. « S'abonner » ne donne aucune indication au visiteur. « Recevez WordPress hebdomadaires WordPress ou « Recevez notre guide sur l'automatisation » lui donne une raison concrète de remplir le formulaire.
Laissez le design respirer. Une forme épurée, avec suffisamment d'espaces blancs, est plus efficace qu'un design surchargé. C'est votre offre qui doit convaincre, pas l'esthétique.
Placez votre formulaire là où il attirera le plus l'attention. La fin d'un article de blog, une barre d'en-tête fixe ou une fenêtre contextuelle qui s'affiche lorsque l'utilisateur s'apprête à quitter la page sont autant d'emplacements très efficaces. Évitez de perturber l'expérience de lecture. Un formulaire bien placé sur une pageWordPress pertinente sera toujours plus efficace qu'un formulaire générique noyé dans une barre latérale.
Problèmes courants lors de l'intégration WordPress Brevo
Même avec une configuration correcte, certains problèmes surviennent régulièrement. Une clé API invalide ou mal configurée est l'une des causes les plus courantes de dysfonctionnement. Si la synchronisation de vos formulaires cesse de fonctionner ou échoue de manière inattendue, commencez par là : vérifiez votre clé et mettez-la à jour dans les paramètres de votre extension si nécessaire.
Un mappage incorrect des champs est un autre problème fréquent. Si certains contacts apparaissent dans Brevo avec des attributs manquants ou vides, retournez dans les paramètres de votre flux et vérifiez attentivement chaque mappage.
Assurez-vous également que votre flux est bien actif. Les flux Gravity Forms peuvent être désactivés par inadvertance, ce qui mettra fin à la synchronisation de vos prospects sans que vous en soyez averti. Il est également conseillé de vérifier s'il n'y a pas de conflits entre les plugins. Si votre formulaire se comporte de manière inattendue après une WordPress , désactivez temporairement les autres plugins afin d'identifier d'éventuels problèmes de compatibilité.
Autres méthodes pour connecter WordPress Brevo
Tout au long de ce guide, nous avons expliqué comment créer un WordPress relié à Brevo à l'aide de Gravity Forms to Brevo ». Il s'agit d'un moyen simple et pratique d'optimiser vos flux de travail grâce à l'automatisation sans code. L'ensemble de la configuration s'effectue depuis votre WordPress , à un coût maîtrisé.
Cela dit, il existe d'autres options pour configurer Brevo sur WordPress. Chacune présente ses propres avantages et limites.
Plateformes d'automatisation: Zapier Make des plateformes d'automatisation qui permettent de connecter des centaines d'outils, notamment WordPress Brevo. Elles sont particulièrement adaptées aux flux de travail complexes impliquant plusieurs applications, mais la mise en place d'automatisations avancées peut nécessiter un certain temps d'apprentissage si vous débutez avec ces plateformes. Elles impliquent également une dépendance vis-à-vis d'un service tiers, un coût mensuel supplémentaire susceptible d'augmenter rapidement en fonction de l'utilisation, ainsi que des flux de travail nécessitant une surveillance régulière pour éviter toute interruption.
Module complémentaire natif: le module complémentaire natif Gravity Forms pour Brevo couvre les fonctionnalités de base relatives aux formulaires et aux listes. Il convient à des cas d'utilisation simples, mais vous risquez rapidement de vous heurter à des limites en termes de flexibilité, de prise en charge des champs personnalisés et de configuration du flux de synchronisation.
Développement sur mesure: le recours à une API et à un code personnalisés est une option envisageable si vous avez des besoins très spécifiques que les solutions prêtes à l'emploi ne peuvent pas satisfaire. Cela vous offre un contrôle total sur votre intégration et permet de répondre à pratiquement tous les besoins spécifiques. Notre équipe propose également des services de développement sur mesure « sans code » si vous avez besoin d'une intégration personnalisée. Cela dit, cette option nécessite des ressources techniques, un délai de mise en place plus long et une maintenance continue.