Are you looking for a way to speed up and automate the creation of user accounts on your WordPress website? You’ve come to the right place!
In this article, we will discuss how managing your user database in Airtable and syncing it to WordPress can help you save time and reduce errors.
Let’s go!
Why should you consider managing your WordPress users in Airtable?
Have you ever searched how to manage your WordPress users in an Airtable database ? If so, you’re not alone. There are many questions in the Airtable community forum, opened by people who were searching how to do so.
And if you have never thought about this option, let’s explain why you should consider it.
Managing users in WordPress is time consuming
Creating, managing and updating user accounts on WordPress can be challenging.
Especially if :
- You have lots of user with different roles on your website ;
- You want to import WordPress accounts from another software ;
- You need to automate WordPress user account creation ;
- You need to create WordPress users in bulk ;
- The person in charge of creating users is not supposed to access to your WordPress backoffice
- etc.
On the other hand, adding people to an Airtable database is ridiculously simple.
You can edit a field of add a new entry so easily, just like in a Excel table.
You can import your user list from Excel to Airtable or even copy-paste it.
You can add people to your Airtable database automatically from a web form or from another tool.
Not to mention the fact that filtering and searching people in an Airtable database is much more easier that doing it in your WordPress backoffice (sorry WordPress).

You need a single source of truth for your user database
Let’s assume you already use Airtable to manage and keep up to date a list of people.
They could be :
- Attendees or speakers to an event
- Members of an online community
- People enrolled in a training course
- Members of an association
- Coworking space members
- Company employees
- Contributors to a blog or magazine
- etc.
Now, you need to create these individuals as users on your WordPress site for various reasons.
They may need to log in to write articles on your blog, manage and update their personal data, access premium content, or for any other purpose.
If you manually create users in WordPress, any changes you make to your Airtable database will not be automatically reflected in your WordPress account. Whenever you need to add or edit someone’s data, you will have to make the change in Airtable and manually report it to WordPress. This process is not efficient.
On the other hand, syncing your Airtable database with WordPress will help you to:
- Save hours of your precious time
- Avoid mistakes and inconsistencies
- Maintain your user database always clean and up to date (a matter of security).
How to import and sync WordPress users from an Airtable database
So, what are the solutions if you want to manage your WordPress users in Airtable?
The answer is simple. There is only one way to do so: use the Air WP Sync plugin.
If you don’t know Air WP Sync, it is a plugin that connects your WordPress website to your Airtable account.
With Air WP Sync, you can :
- Import pages, articles from an Airtable database
- Sync data automatically between Airtable and WordPress
- But also, import and sync user accounts from an Airtable database.
Just follow a few steps to get it done!
1- Download Air WP Sync
First, you’ll need you download Air WP Sync and and install it to your website.
You can download Air WP Sync free on the WordPress repository ; you are limited to only one active connection. It’s OK if you have only one Airtable database that you want to sync with your WordPress website.
If you want to sync several databases to WordPress (for instance, to import articles and pages in addition to users), you’ll need to by Air WP Sync Pro on our website. The amount of time it will save you makes it well worth the investment, you’ll see ($199/year).
2- Create your Airtable database
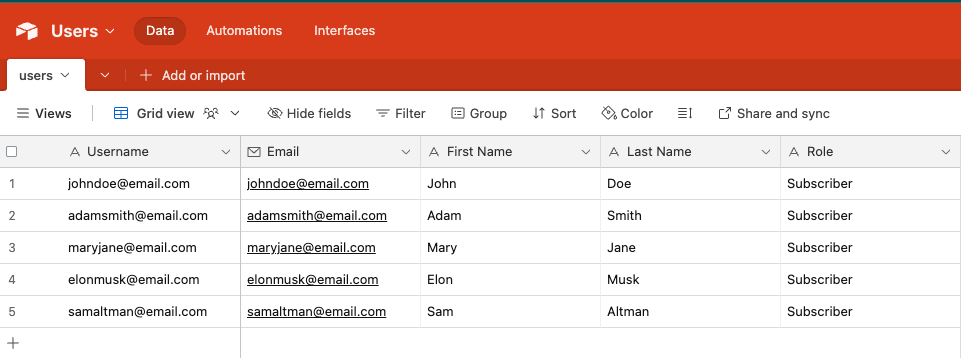
Once the plugin is downloaded and activated on your website, you need an Airtable database with all the users your need to create on your website.

There is only one mandatory column: the email adress.
But you can add other columns that you want to import in WordPress:
- username (if you want it to be different from the email adress)
- first name
- last name
- user role: it must be written exactly like it is on WordPress (subscriber, administrator, author…). You can also choose a default user roles for all imported users.
- custom fields
- etc.
3- Set up the connection between WordPress and Airtable
Once your database is ready in Airtable, jump to your WordPress backoffice and go to the Air WP Sync settings.
You can find all the information you need to set up the connection between WordPress and Airtable in the Air WP Sync documentation.
You can also read this documentation article that focuses on the user import feature. But don’t worry, it’s super easy.
You just need to
- obtain your Airtable token
- select the database/table/view where your users are located
- map the WordPress user fields with your Airtable columns
- and you’re all set!
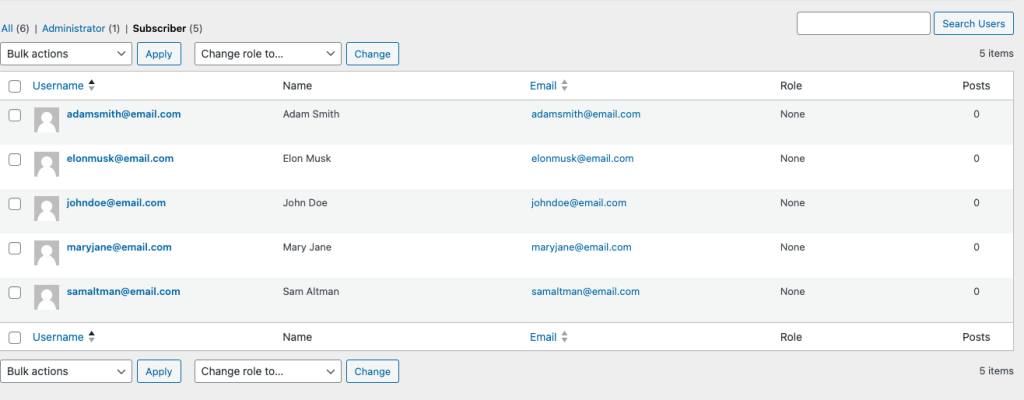
Once you have launched your first synchronization, you will find your users in WordPress.

Last but not least: if you want, you can choose to send an automatic email to your users after creation.


