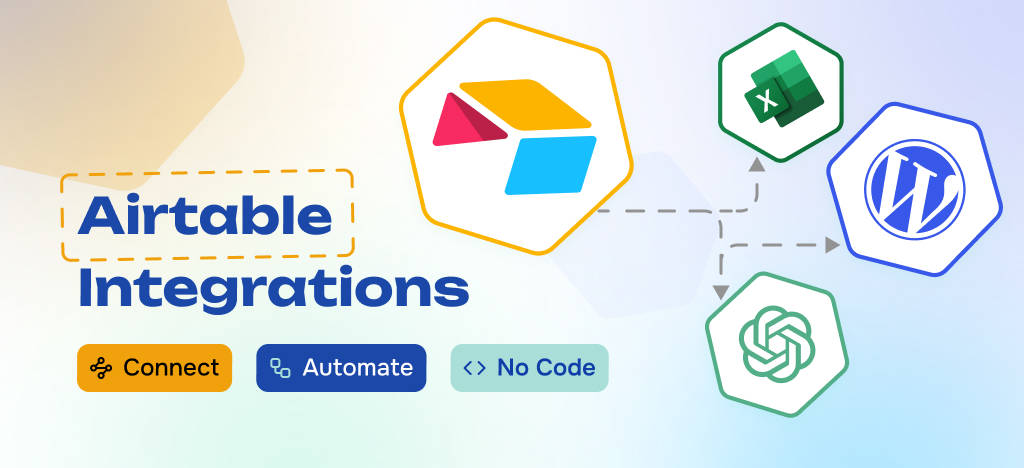
Efficient data collection and management are crucial for business growth and success. Integrating custom Airtable forms into WordPress offers a powerful solution for this task. You can make your data collection and workflow more efficient by using Airtable with WordPress.
This guide will teach you how to create and integrate your Airtable forms into your WordPress site without relying on Zapier. Ready to explore the benefits and optimize your workflow? Let’s dive in!
Why create custom Airtable forms for WordPress?
Airtable is a tool that combines a relational database with the simplicity of a spreadsheet. This makes it easy to create strong systems for managing data and business processes.
The applications are numerous and diverse. Airtable is great for managing projects and customer relationships (CRM). It also offers many options for automating tasks and creating custom solutions within your organization.
You may still wonder where the connection with WordPress lies. We understand. In reality, websites are highly strategic and powerful tools for collecting relevant and useful data for business development.
Adding forms to your website is a great way to gather information for various purposes. This includes marketing, product improvement, customer loyalty, and inventory management.
But here’s the issue: Airtable helps manage data, while a lot of valuable data is lost through your WordPress forms. This is where the power of integrating website forms with Airtable comes into play. Learn how to integrate Airtable with your existing tools to unlock its full potential.

WPForms and Airtable: seamless integration to improve your workflow
Automatically send and organize your WPForms submissions in Airtable, simplifying workflow and collaboration. Leverage your web forms data while enjoying Airtable’s flexibility. Easy and no-code integration.
What are the advantages of creating custom Airtable forms for WordPress?
Creating custom Airtable forms for WordPress offers many advantages for streamlining your data collection and management process. Here are some practical advantages to consider.

- Automation possibilities: Forms integration opens up countless Airtable automation possibilities. You can automatically trigger actions such as sending emails or updating a database upon form submission. This simplifies your workflow, streamlines your data flow management, and offers you more productivity and efficiency.
- Improved data management: On Airtable, you’ll find it easy to manage your data. For example, you can easily filter, organize, and analyze responses to your web forms. Our guide on data automation explains how to go even further.
- Simplified and transparent integration: Just follow our simple and transparent guide, and you’ll be all set in just a few steps. Moreover, this improves the experience of your visitors and your data collection and management process.
- Evolution and flexibility: Custom Airtable forms provide flexibility and evolution for your WordPress site. You can adapt to growth and user needs, from event registrations to managing your e-commerce store in Airtable.
- Ergonomics and user experience: Custom Airtable forms seamlessly integrate with your site’s branding. Take advantage of aesthetically pleasing and highly user-friendly forms. This way, you provide a better user experience and increase your chances of conversions.
Now that you understand the reasons for creating Airtable forms in WordPress and their advantages, let’s dive into the main topic.. How to create a custom Airtable form for WordPress?
You have two options:
- Use a third-party automation service like Zapier to connect your Airtable account to WordPress.
- Use add-ons such as WPForms to Airtable or Gravity Forms to Airtable to seamlessly connect your custom Airtable forms with WordPress.
Many online tutorials will suggest using Zapier. However, this option has several disadvantages and limitations.
Disadvantages of using Zapier to integrate a custom Airtable form into WordPress
Zapier is a widely acclaimed automation solution that offers a wide range of integrations. However, using Zapier to create custom Airtable forms for WordPress exposes you to several constraints and limitations.
Extra costs
Using Zapier to connect your custom Airtable forms to WordPress can incur additional expenses. Of course, there is a free plan. However, remember that Zapier’s prices can increase quickly. The prices can double or even more depending on your number of automated tasks.
Configuration complexity
Connecting a custom Airtable form to WordPress via Zapier is complex and time-consuming. It requires a thorough understanding of Zapier’s functioning to implement automation effectively. The Airtable to WordPress connection via Zapier involves multiple steps that demand careful attention. Moreover, a technical error in automation may lead to data loss or outliers.
Dependency on a third-party platform
Using Zapier to integrate your WordPress forms with Airtable makes you reliant on a third-party service. Otherwise, any malfunction on Zapier’s end could disrupt the functioning of your automation and business processes. Additionally, you grant access to your data flow to a third-party platform.
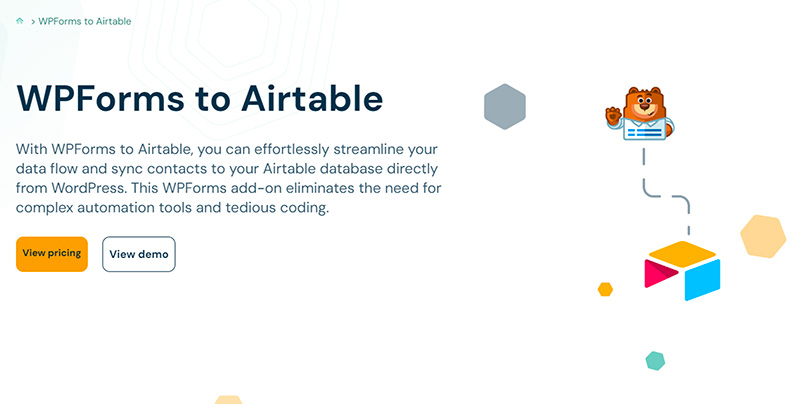
So, how can you integrate your WordPress forms with Airtable without encountering these risks? The answer is quite simple: use the WPForms to Airtable plugin.
How to create a custom Airtable form in WordPress without Zapier?
Integrating custom Airtable forms into WordPress is a breeze with the WPForms to Airtable plugin. Just follow these simple steps to see how easy it is. To complete this tutorial, you will need:
- An Airtable account with the database you want to connect to your WordPress site
- A WPForms to Airtable license
- The WPForms plugin installed on your site
That being said, here are the 6 steps to integrate custom Airtable forms into WordPress in a few minutes.
Step 1: Install the WPForms plugin and create your form
WPForms is an excellent WordPress form creation plugin, very intuitive and easy to use. With drag-and-drop functionality, you can create all kinds of forms with this plugin. You can install and activate WPForms on your WordPress site by simply going to the official plugin directory. WPForms offers several pricing plans: a Lite version and premium versions. Note that our WPForms to Airtable add-on works perfectly with the free version of the WPForms plugin.
Note: Already using Gravity Forms for your WordPress forms? Use our Gravity Forms to Airtable add-on to integrate Airtable and WordPress in just a few clicks.
Step 2: Install, activate, and configure the WPForms to Airtable add-on
WPForms to Airtable is an add-on that allows you to connect your WPForms to your Airtable base to easily manage your data. With this extension, you can easily integrate custom Airtable forms into your website. To install WPForms to Airtable:
- Visit the WPForms to Airtable page on WP connect website, choose your pricing plan, and download the plugin to your computer
- Log in to your WordPress dashboard and click on “Add New Plugin” in the plugin menu
- Choose the plugin file (downloaded in step 1) and click on “Install Now”
Wait a few seconds for the plugin to be installed. Once the installation is complete, activate your plugin and proceed to activate your WP connect license.
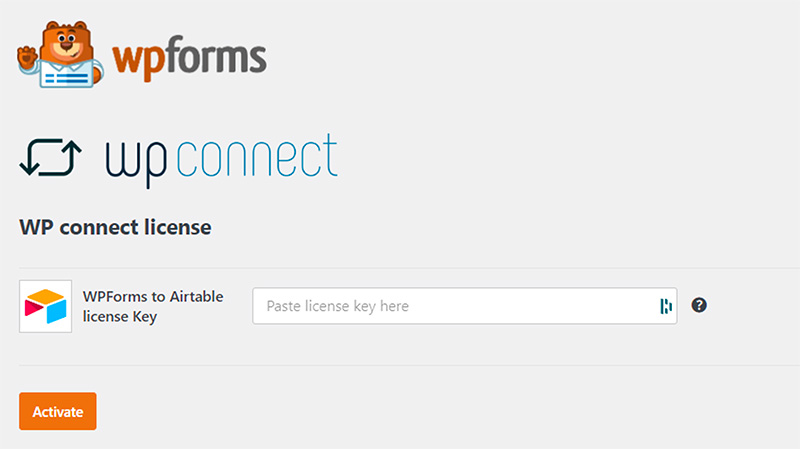
Activating your WPForms to Airtable Add-On license is a two-step process:
- In your WordPress dashboard, go to the WPForms section in the left menu. Then click on “WP connect”.
- Copy your license key and paste it into the designated field. Once entered, click on the “Activate” button to complete the process.
Step 3: Generate an access token for your Airtable account
To integrate custom Airtable forms into your WordPress site, you will need an Airtable access token. Follow these steps to create one:
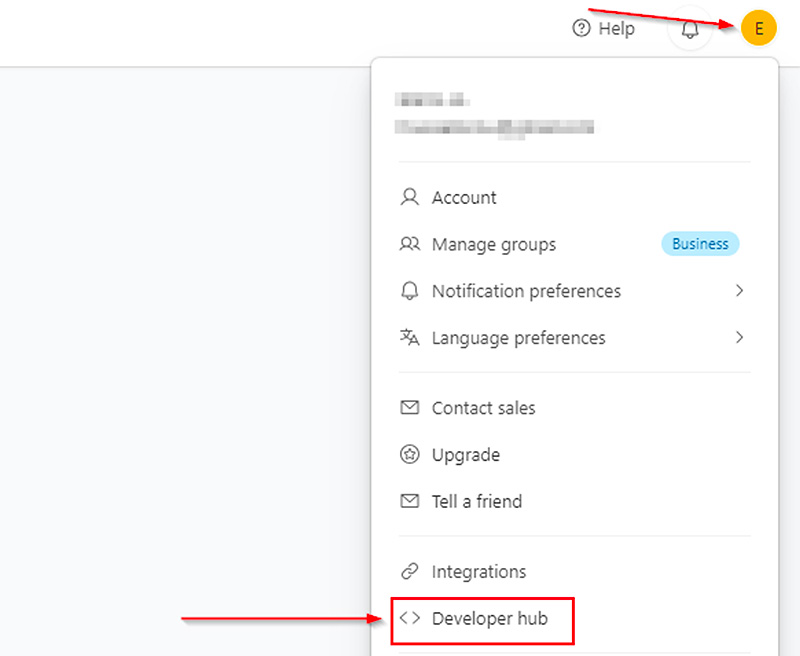
- Access your Airtable account and click on the account icon at the top right of the screen.
- In the menu that appears, click on “Developer Hub”.
- Click on “Personal access tokens” and then on “Create token”.
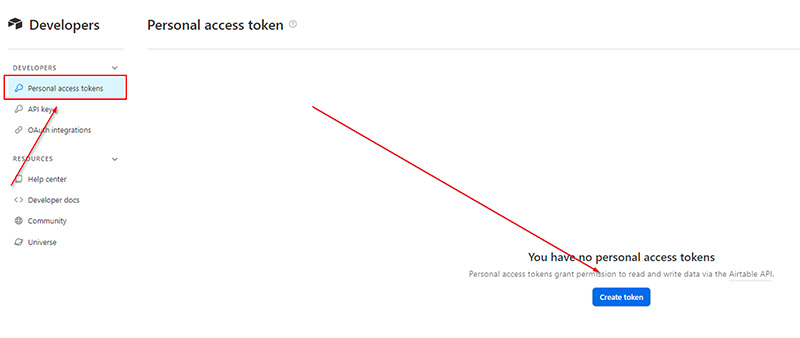
- Add a name for your token.
- Right below, click on “add Scope” and add the following 3 records:
- “data.records:write”
- “schema.bases:read”
- “Data.records:read”
- Next, click on “add base” and add the table you want to connect to your WordPress form.
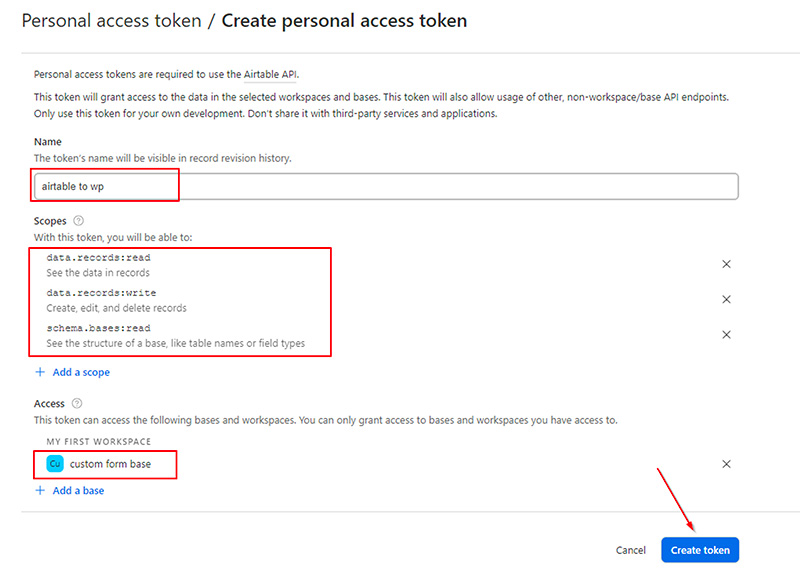
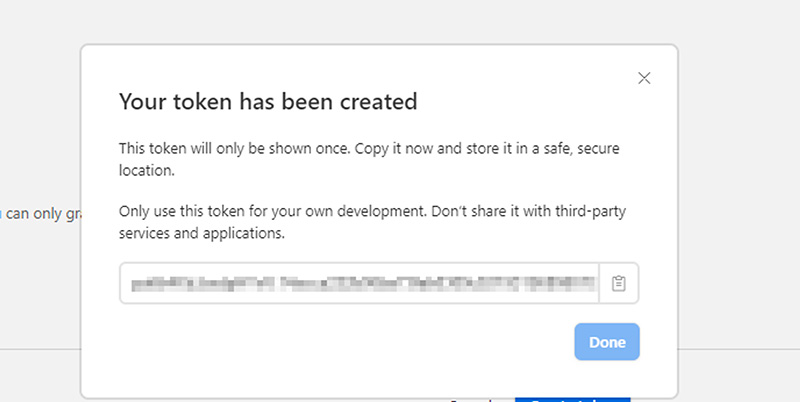
- Click on the “Create token” button. In the dialog box that opens, copy your Airtable access token.
Step 4: Add your Airtable access token to WPForms
Now that you’ve created your Airtable access token, it’s time to integrate it into your WPForms plugin.
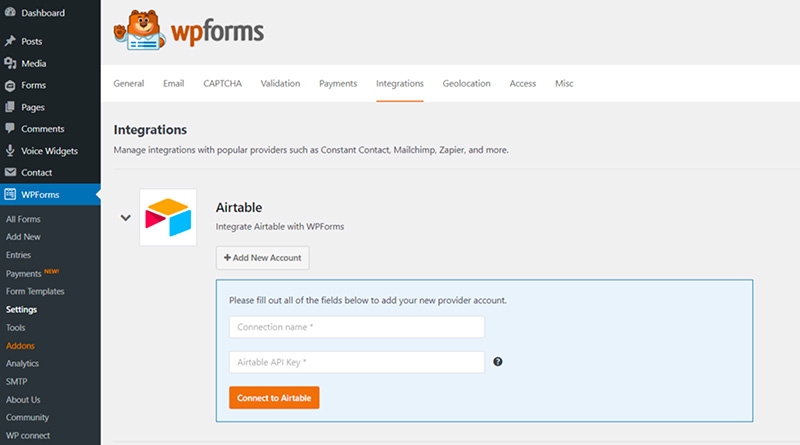
To do this:
- In the left-hand menu of WPForms, click on “Settings”.
- In the top tabs, click on “Integrations”.
- Scroll down and click on “Airtable”.
- Click on “Add New Account”.
- Enter an account name.
- Paste your Airtable access token into the “Airtable API Key” field.
- Click on “Connect to Airtable”.
Step 5: Create the connection between Airtable and your WordPress form
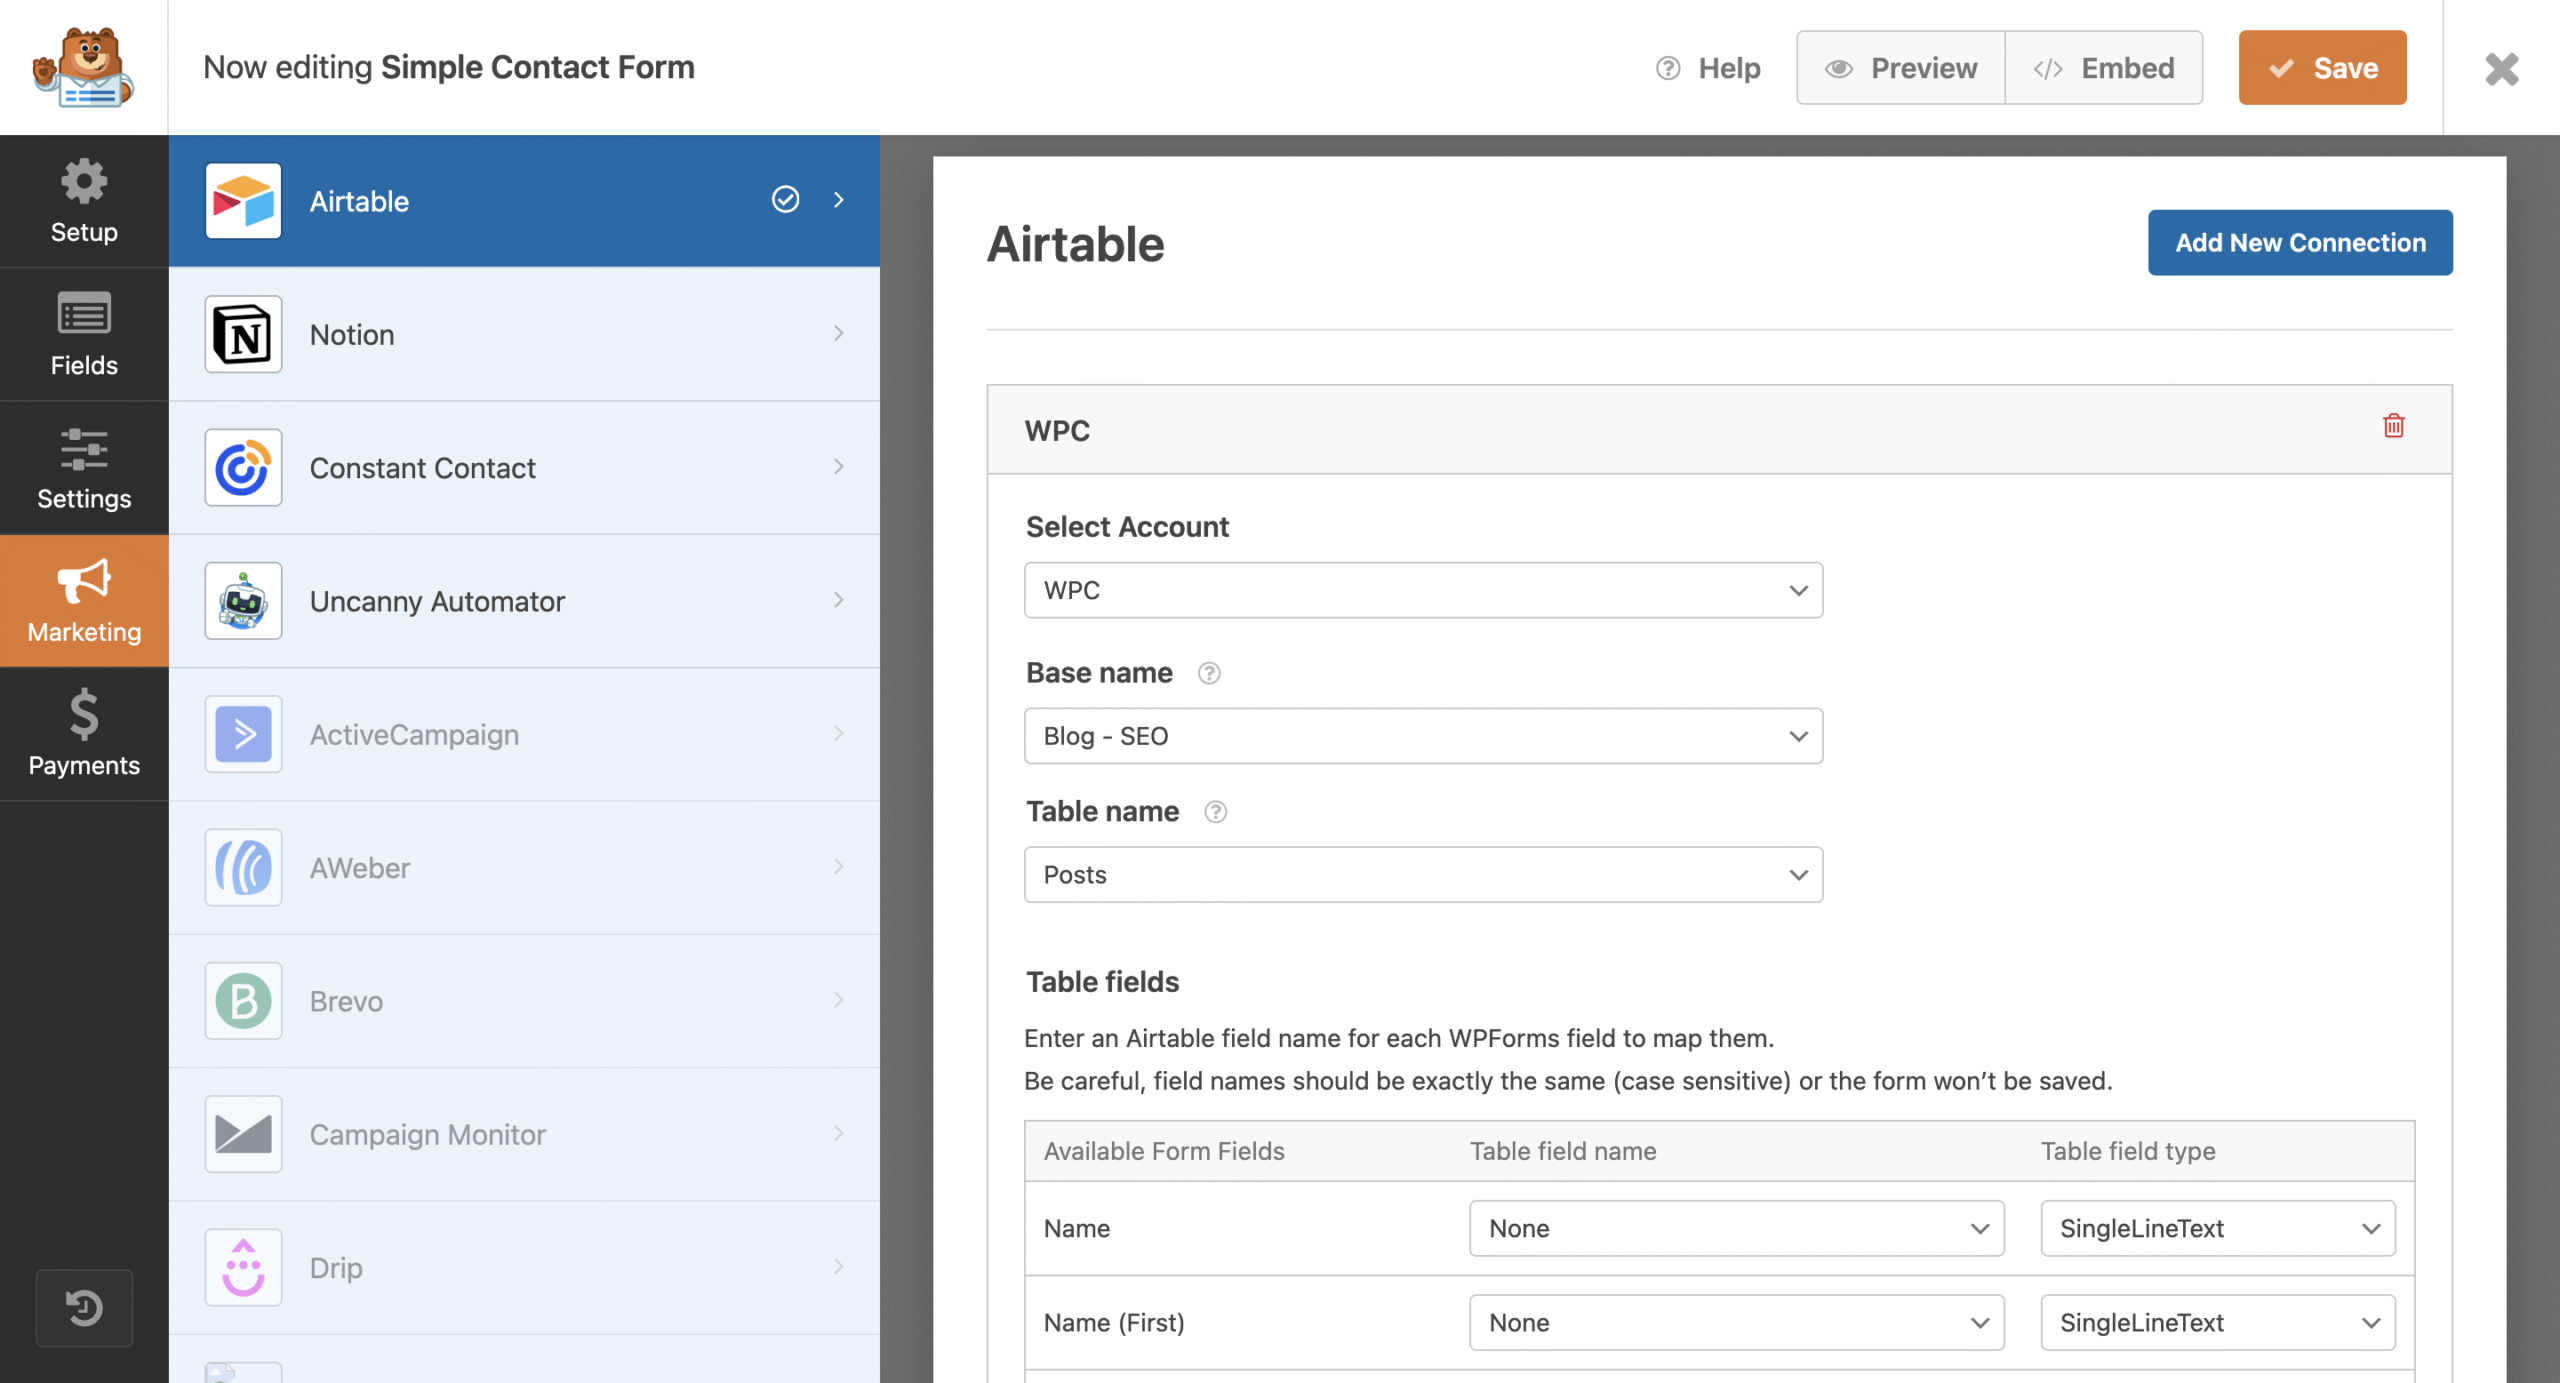
You’re almost done. At this step, you’ll connect your WPForms form to your Airtable base. Follow these steps to do so:
- In the left menu, click on “Marketing”.
- Click on “Airtable”.
- Click on “Add New Connection”.
- Enter a connection name.
- Select your account
- Use the drop-down menus to select your Base and Table.
- Save and reload the page
In the next step, you’ll match the different fields between your Airtable table and your WPForms form, and you’ll be done.
WPForms and Airtable: seamless integration to improve your workflow
Automatically send and organize your WPForms submissions in Airtable, simplifying workflow and collaboration. Leverage your web forms data while enjoying Airtable’s flexibility. Easy and no-code integration.
Step 6: Map fields between WPForms and Airtable
Once the connection with your Airtable table is established, you need to map the fields from your WPForms form to the corresponding fields in the Airtable table. This will transfer the data entered into the form to the correct fields in your Airtable database and in the correct formats.
In the Table Fields section of your connection, you will see the list of available form fields, which are the fields present in your form.
- In the “Table Field Type” column on the right side, select the Airtable field type that matches the form field.
- In the “Table Field Name”, enter the exact name of the corresponding Airtable field.
- Repeat steps 1 & 2 for each form field you want to sync.
- Click “Save” in the top-right corner to apply your changes.
Congratulations! You have just connected your WPForms form to your Airtable table, all without needing to use a third-party service like Zapier.
If you want to go further by sending your data only if certain conditions are met, you can take the next step. But know that this is optional.
Step 7 (Optional): Add conditional logic
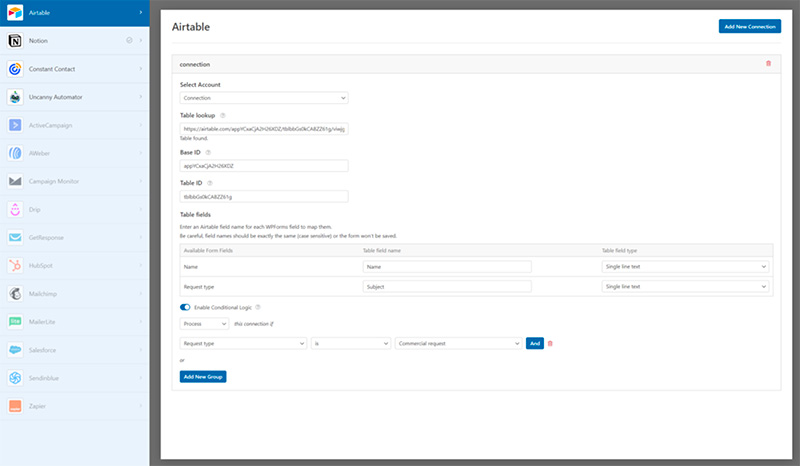
In earlier steps, you set up your WPForms form to work with an Airtable table by making basic configurations. You can use conditional logic if you want to send data to Airtable only for certain conditions met in your form. To do this, follow these steps:
- To create a condition, click “Enable Condition”.
- On the left, you can choose a field from your form and select the criteria that will activate sending to Airtable, for example:
- → Request type IS “Commercial request”
- Once you configurated your condition, click on “Save Settings”
When you’ve finished integrating your Airtable custom form into WordPress, be sure to test it before going live.
Benefits of using WPForms to Airtable to create custom Airtable forms for WordPress
The WPForms to Airtable Add-On is made specifically for WordPress. It allows you to link your custom Airtable forms to your WordPress site. Let’s explore some advantages of this solution.
Custom solution
The WPForms to Airtable plugin seamlessly integrates with the WordPress ecosystem. It incorporates all the latest WordPress best practices, ensuring optimal compatibility and a smooth user experience. The same applies to the security of your data.
A dedicated team of experts
A team of WordPress solutions and automation specialists oversees the WPForms development to Airtable add-on. You thus benefit from the support of a team of experts in automation, no-code solutions, and WordPress. Our team is actively improving the plugin’s features to provide you with more flexibility and advantages. Also, note that the team provides technical support and personalized advice.
Simplicity of configuration and use
WPForms to Airtable Add-On has a simple interface, making it easy to configure and use. You can fully control the settings to customize the Airtable connection to WordPress based on your needs.
Cost savings and controlled expenses
The WPForms to Airtable plugin offers transparent and predictable pricing. Zapier, on the other hand, charges based on the number of tasks per month. This can lead to unexpected costs. Save money and enjoy automation benefits by using Airtable and WordPress together with WPForms to Airtable add-on.
WPForms and Airtable: seamless integration to improve your workflow
Automatically send and organize your WPForms submissions in Airtable, simplifying workflow and collaboration. Leverage your web forms data while enjoying Airtable’s flexibility. Easy and no-code integration.
Examples of how to use Airtable custom forms for WordPress
Using custom Airtable forms in WordPress opens up a range of possibilities to enhance operational efficiency and productivity. Here are some concrete examples of how this integration can be beneficial for your business.
Lead and Customer Management
You can gather information from your WordPress form and keep it organized in Airtable using custom Airtable forms in WordPress. This allows for effective prospect tracking and quick follow-up alerts to your sales team. With all customer information in Airtable, you can track interactions, personalize communications, spot real-time sales opportunities, and facilitate team collaboration.
Customer satisfaction survey
Many businesses use customer satisfaction forms to improve their products and services. These forms can be on your WordPress website. By connecting your forms to Airtable, you can automatically collect feedback and even get alerts for unhappy customers. This way, you can address problems quickly.
Airtable also lets you see all the feedback in one place, so you can easily spot trends. This helps you make better decisions to keep your customers happy.
Job application form
Integrating your WordPress job application form with Airtable simplifies the hiring process. All managers can access applications that are automatically stored in one place when they submit them. Plus, you can automate personalized responses to applicants and notify HR instantly about new submissions. With Airtable, tracking each candidate’s status becomes effortless, from submission to the final decision.
Final Thoughts
And there you have it! You’re now equipped to seamlessly integrate custom Airtable forms into your WordPress site, without relying on Zapier.
We trust that our WPForms to Airtable Add-On will empower you to collect, organize, and analyze data effortlessly, driving productivity and enhancing customer engagement.
If you’re a fan of WordPress plugins, feel free to check out our other fantastic extensions :
- Gravity Forms to Airtable Add-On: Seamlessly integrate your Gravity Forms submissions with Airtable, enabling effortless data management directly within Airtable’s interface.
- Contact Form 7 to Airtable: With our free integration, easily connect Contact Form 7 submissions to Airtable, allowing for efficient organization and management of form entries.
Our solutions offer seamless workflow automation directly from your WordPress Admin panel, eliminating the need for complex automation tools like Zapier or Make.