
Your store creates valuable data every time someone buys, edits an account, updates stock or applies a discount. The challenge is not creating that data; the challenge is sending it to the right tool without copy-paste, delay or manual reconciliation. Event-based automation helps your WooCommerce store become an active part of your operations, not just a checkout system. With the right setup, orders, products, customers and marketing signals can feed Airtable, Brevo, Odoo or internal workflows with far less technical complexity.
This guide explains what store event notifications are, which events matter most, how to configure an outgoing notification, and when a dedicated WP connect synchronization plugin is more reliable than a generic automation chain. The goal is simple: connect, map, sync, and keep control.
What are webhooks?
A webhook is an automatic message sent by one application when a specific event happens. Instead of asking WooCommerce every few minutes whether something changed, the store sends a notification as soon as the event occurs. This is why webhooks are often described as event-driven automation. They help your tools react to live business activity without waiting for a manual export.
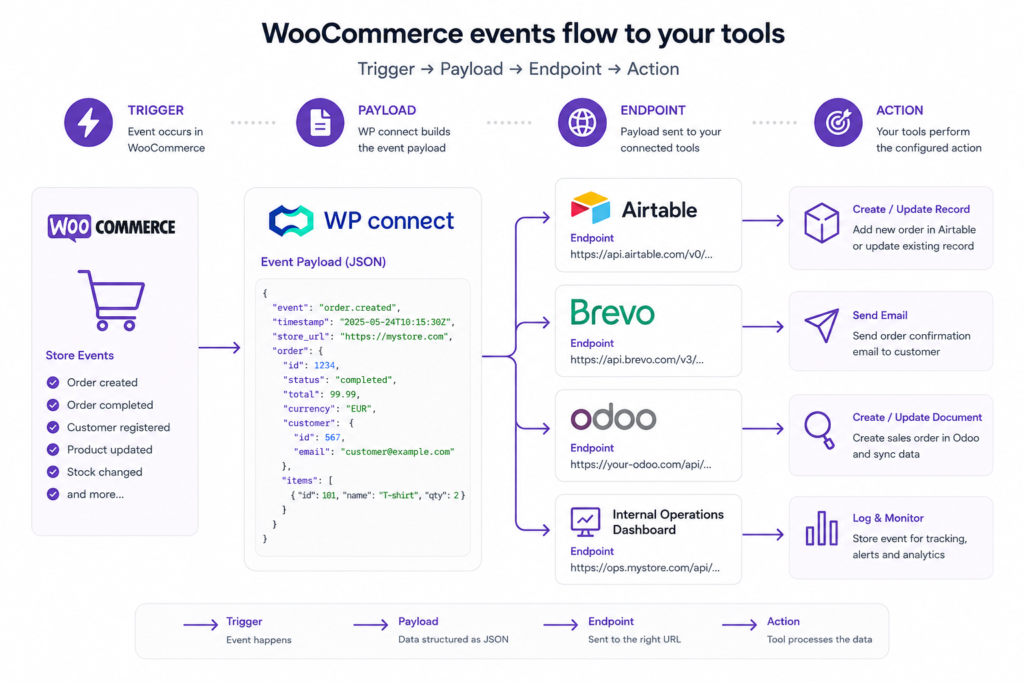
The principle is straightforward. A source application detects an event, prepares a data package, and sends it to a destination URL. That URL is usually called an endpoint, because it is the place where the receiving application listens for incoming data. For an online store, the source may be an order update, a product change, or a new customer profile.
The data package is called a payload. It normally contains structured information such as an order ID, billing details, line items, prices, status, timestamps and related metadata. The receiving tool can then create a record, update a dashboard, launch an email workflow or notify an operations team. No manual entry is required, and the risk of missing a business event is much lower.
For WordPress and WooCommerce users, this matters because the store often sits at the center of several workflows. Sales teams need customer details, operations teams need order information, marketing teams need segmentation signals, and finance teams may need invoicing data. A webhook creates a bridge between the store and those systems. It does not replace a complete synchronization strategy, but it is a useful automation layer.
The main limitation is that a raw webhook is technical by nature. You need to know where to send the payload, how the receiving system expects the data, and how to handle failures. For simple notifications, this can be enough. For structured catalog management, inventory, orders or multi-tool workflows, a no-code connector often saves time and reduces maintenance.
Why store event triggers matter for automation
Store automation works best when it starts from real business events. A completed purchase, a refunded order or an updated product is more precise than a generic scheduled export. The trigger tells your workflow why it should run, which data it should process, and what action should happen next. This makes automation more predictable and easier to monitor.
In practice, event triggers help you move from administrative work to operational flow. Your team no longer waits for someone to download a CSV file, clean columns, and upload the result elsewhere. The store sends the signal, and your stack responds. This is the foundation of reliable no-code automation.
From manual exports to live data flows
Manual exports are useful for occasional reporting, but they quickly become a bottleneck. They depend on a person, a schedule, and a file that may already be outdated when it is opened. If order volume grows, this process becomes slower and more error-prone. A live data flow removes that repetitive step.
For example, an order can create a row in Airtable, trigger a preparation task, and update a stock dashboard. The same event can also feed customer segmentation in a marketing platform. This gives every team the same operational reality. No copy-paste, no duplicated spreadsheet, no hidden delay.
Triggers, payloads and destination URLs
Three elements define a store notification. The trigger is the event that starts the process. The payload is the structured data sent by WooCommerce. The destination URL is the endpoint that receives the payload and decides what to do with it.
These elements must be consistent. If the destination expects an email field but receives only a customer ID, the workflow may fail or create incomplete data. That is why field mapping remains essential. A good automation is not only connected; it is structured around clean data.
When native automation is enough
Native event notifications can be enough when the workflow is narrow and predictable. For example, you may notify an internal endpoint when an order changes status. You may also send a simple alert to a middleware tool. In these cases, a lightweight setup can work well.
However, native automation reaches its limits when business logic grows. Product variations, inventory rules, customer segmentation and multi-step order handling require more control. If you need recurring synchronization, field mapping, logs and business-friendly settings, a dedicated plugin is usually easier to operate. The right choice depends on your workflow complexity.
The key WooCommerce events to know
Not all store events have the same operational value. Some are critical because they affect fulfillment, revenue recognition or customer communication. Others are useful because they keep your catalog, marketing lists and reporting tools up to date. Start with the events that remove the most manual work.
A practical way to choose events is to map them to teams. Operations usually care about orders and stock. Marketing cares about customers, coupons and purchase history. Product teams care about catalog updates. Once this map is clear, automation becomes easier to prioritize.
Order events for fulfillment and reporting
Order events are usually the first automation priority. A new order can feed an Airtable operations base, create a sales order in an ERP, or notify a fulfillment team. A status change can indicate that an order is processing, completed, refunded or cancelled. Each status has a different business meaning.
For reporting, order events help keep dashboards current. Your team can track revenue, product demand, shipping workload and customer behavior without manually consolidating exports. This is especially useful when the store is connected to tools such as Airtable or Odoo. Your order flow becomes easier to audit and faster to process.
Product events for catalog updates
Product events are valuable when your catalog changes often. Price changes, stock updates, product creation and variation edits can all affect the customer experience. If one channel has outdated information, the store may sell unavailable products or display the wrong details. Automation reduces that risk.
For large catalogs, Airtable can act as a flexible product workspace. Teams can review descriptions, prices, SEO fields and inventory from a structured interface. With Air WP Sync for WooCommerce, catalog management can be handled from Airtable and synchronized with the store. This is often simpler than editing each product manually in WordPress.
Customer and coupon events for marketing
Customer events help marketing teams keep their audience data clean. A new customer profile, an updated billing email or a repeat buyer signal can improve segmentation. Instead of exporting customers periodically, your store can feed the tools that manage campaigns and follow-ups. This keeps customer information more current.
Coupon events are also useful because they reveal intent and campaign performance. A coupon created, updated or used can support promotional reporting. Combined with purchase history, coupon data can help identify loyal customers, seasonal buyers or discount-sensitive segments. The key is to send only useful data to the right destination.
- Use order events for fulfillment, ERP sync and sales reporting.
- Use product events for catalog accuracy, stock control and pricing updates.
- Use customer and coupon events for segmentation, follow-up and campaign analysis.
How to configure an outgoing store notification
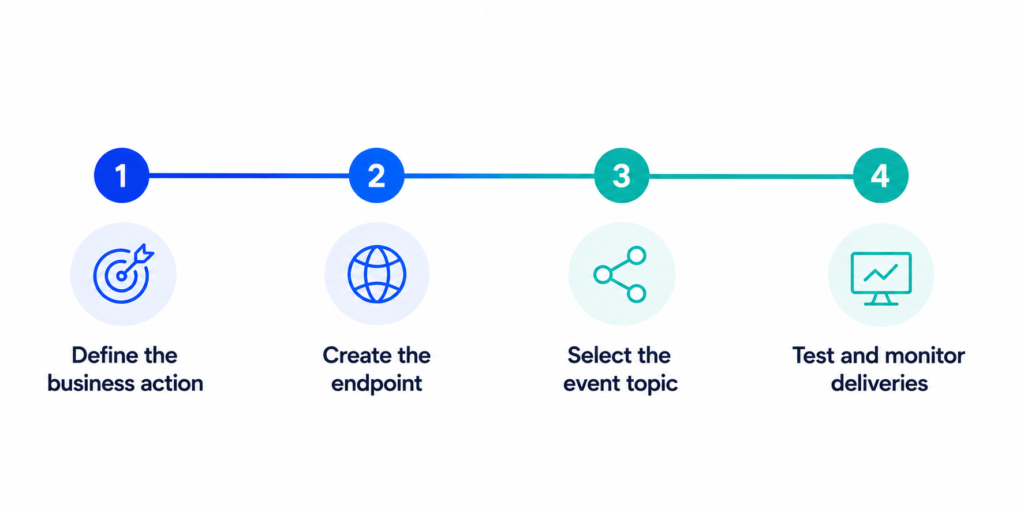
Configuring an outgoing notification is not difficult, but it requires method. You need a destination that can receive the request, a clear event topic, and a way to test the delivery. The most common mistake is connecting tools before defining the expected business result. Start by deciding what should happen when the event is received.
For example, if a new order must appear in Airtable, define the destination table, required fields, status rules and error handling first. If the event must trigger a Brevo workflow, define which contact attribute or list should be updated. This preparation makes the technical configuration easier. It also prevents messy data from spreading across your stack.
Create the endpoint in WordPress
The endpoint is the receiving URL. It can belong to a custom WordPress route, a no-code platform, an integration plugin or an external application. Its role is to listen for incoming payloads and confirm that the request was received. If the endpoint is not reachable, the workflow stops before any useful action happens.
Security matters at this stage. Use HTTPS, protect the endpoint with a secret when possible, and avoid exposing unnecessary logic. The receiving system should validate the request before creating or updating data. This keeps the workflow reliable and reduces the risk of unwanted incoming requests.
Choose the topic and delivery format
The topic defines which event will send the notification. Typical topics include order created, order updated, product updated or customer deleted. Choose the most specific topic possible. A broad event can create too many deliveries and force the receiving system to filter data later.
The delivery format should match the destination. Most modern tools expect JSON because it is structured and easy to parse. Still, field names and nested objects can differ from one system to another. Review the payload before going live. A clean mapping saves debugging time later.
Test, debug and monitor deliveries
Testing should happen with realistic data. Create a test order with products, taxes, shipping, customer details and the status you expect in production. Then check whether the receiving tool captured all required fields correctly. A successful delivery is not enough if important business data is missing.
Monitoring is equally important. APIs change, credentials expire, and edge cases appear when customers behave in unexpected ways. Keep logs, review failed deliveries, and define who is responsible for fixing errors. Automation should reduce operational work, not create invisible failures.
- Test with realistic order, product and customer data.
- Check both delivery success and field accuracy.
- Keep logs and retry rules for failed requests.
Connect store data to your no-code stack
A webhook is useful, but the larger opportunity is connecting WooCommerce to your no-code stack. Airtable can become an operations backend, Brevo can handle marketing follow-up, and form tools can capture service requests or customer feedback. The store then becomes part of a connected workflow. Information flows where teams actually work.
This approach is especially powerful for merchants who want control without custom development. Instead of building a complex integration from scratch, you can use WP connect plugins and add-ons to manage synchronization through WordPress. The benefit is not only speed. It is also consistency, because the integration is designed around WordPress data structures.
Send product catalogs to Airtable
Product catalog management becomes difficult when there are variations, custom fields, SEO metadata and frequent updates. Airtable gives teams a more flexible interface to organize product data. You can create views for draft products, low-stock items or products awaiting SEO review. This makes collaboration smoother.
Air WP Sync for WooCommerce is designed for this kind of workflow. It lets you manage products, orders and inventory between Airtable and WooCommerce without writing code. For teams that update catalog information often, this is more sustainable than editing every product page manually. Your product data stays structured and easier to review.
Route customers and leads to Brevo
Marketing workflows need fresh contact data. When a customer buys, submits a form or requests information, the follow-up should not depend on a manual export. Brevo can then be used for segmentation, transactional communication and automated campaigns. The important point is to send clean attributes, not just an email address.
WP connect also supports marketing workflows through Gravity Forms to Brevo. This is useful when your WooCommerce store relies on forms for newsletter signup, return requests, product inquiries or quote requests. Conditional logic can route contacts to the right list based on their answers. Your segmentation starts at the point of capture.
Combine forms, CRM and operations workflows
Real e-commerce operations rarely involve only orders. A customer may submit a support form, request a return, ask for a business quote or leave feedback after delivery. These events can feed Airtable, Brevo, Odoo or another operational tool. The value comes from connecting the full customer journey.
For example, a return request can create an Airtable record, notify support and enrich the customer profile for future campaigns. A wholesale inquiry can create a CRM opportunity and assign a follow-up task. These workflows remain no-code when the right connectors handle authentication, field mapping and delivery. Your team keeps control without maintaining custom scripts.
- Airtable centralizes catalog, order and operational data.
- Brevo activates follow-up, segmentation and email workflows.
- Forms capture service, lead and support signals from WordPress.
Choose the right synchronization approach with WP connect
The right approach depends on the job you want automation to perform. A simple outgoing notification is useful when one event must trigger one action. A synchronization plugin is better when data must remain structured over time, with predictable mapping and a clear operational interface. This distinction prevents overengineering.
For WooCommerce stores, product and order data are too important to treat casually. Prices, stock levels, customer information and order lines must be accurate. A broken automation can create fulfillment delays or wrong reporting. That is why dedicated WordPress integrations often provide a safer path for growing stores.
Air WP Sync for WooCommerce
Air WP Sync for WooCommerce connects your store with Airtable so you can manage products, orders and inventory from a central base. It is built for merchants who want to reduce manual updates and keep catalog data consistent. The plugin supports a workflow where Airtable is the working backend and WooCommerce remains the storefront.
This is useful for teams managing product descriptions, stock, variations and SEO-related fields. Instead of jumping between tools, they can structure their work in Airtable and synchronize changes according to their process. The result is a more controlled workflow. You save time while keeping visibility on store data.
When plugins beat generic automation tools
Generic automation platforms are useful for simple chains. They connect many apps and help teams prototype workflows quickly. However, they can become harder to maintain when scenarios multiply, when data objects are complex, or when pricing depends on task volume. E-commerce workflows often reach that point quickly.
A dedicated plugin is more direct because it runs inside the WordPress ecosystem. It understands WooCommerce data better and reduces the need for middleware. It also gives non-technical users a clearer interface for configuration. For recurring store operations, this usually means less friction and fewer dependencies.
A practical decision framework
Use native event notifications when you need a lightweight signal, a simple alert or a custom endpoint managed by your team. Use a no-code automation platform when the workflow is experimental or connects tools that do not yet have a dedicated connector. Use a WP connect plugin when the workflow is core to your business and should be stable, visible and easy to manage.
A practical framework is to start with the business risk. If a failed workflow only delays an internal notification, a simple webhook may be enough. If it affects product accuracy, order fulfillment, inventory or customer follow-up, choose a dedicated synchronization layer. Automation should make your store more reliable, not more fragile.
The broader perspective is clear: WooCommerce is no longer just a sales interface. It is a data source for operations, marketing, reporting and customer experience. By connecting store events with WP connect products, you can build workflows that scale without adding unnecessary technical complexity. The best automation strategy is the one your team can understand, monitor and improve over time.