To begin your journey into WordPress plugin development, it’s essential to check the latest guidelines and best practices in the field. Our team at WP Connect has compiled a comprehensive handbook to get you started. This tutorial will guide you through different stages of creating your own plugin, from setting up your local environment to understanding the intricacies of WordPress hooks and shortcodes. With instructions and a list of necessary tools, you’ll be well-equipped to begin to create, upload, and save changes to your plugin. Dive into the world of WordPress plugin development with us and explore the vast possibilities it offers.
If you’re not a developer, developing a WordPress plugin can be like navigating a complex maze – it requires an intricate knowledge of the code, along with an understanding of the various functions, hooks and filters. With so much to learn, it can be difficult to know where to start. That’s why this article aims to provide a comprehensive overview and guidelines for anyone interested in learning about WordPress Plugin development. If you’re a junior developer of brand new to plugin development, we’ll give you the information you need to begin your journey of WordPress plugin development.
Why and what are the benefits of developing a WordPress plugin?
Developing a WordPress plugin offers many benefits. Firstly, it allows you to customize and extend the functionality of a WordPress site, addressing specific needs that are not covered by existing plugins. By developing a plugin, you can improve the user experience, automate repetitive tasks, and create unique features for your website.
In addition, creating a plugin can be a source of income if you decide to sell it or offer related services. It can also strengthen your reputation in the WordPress community and allow you to share your solutions with other users.
Finally, developing a plugin is an opportunity to improve your technical skills and stay updated with the latest developments in WordPress.
What skills are necessary for WordPress plugin Development?

Developing a WordPress plugin requires certain skills, many of which go beyond basic web design and development knowledge.
Indeed, creating a WordPress plugin demands a good understanding of how the PHP language works. PHP is the main programming language used in the development of WordPress Core and, consequently, WordPress plugins.
In addition to this, it is important to have a solid foundation in HTML and CSS. These two languages will enable you to control how your plugin’s content is displayed.
Depending on your needs and the specifics of your plugin, you may also need to use JavaScript. Therefore, you should have some proficiency in the JavaScript programming language.
You’ll also need to know SQL if you want to interact with the database. Even though this isn’t a technical skill in the strict sense of the word, you should have a good knowledge of how a WordPress site works: themes, plugins, child themes, etc.
While you don’t need to be a web programming guru to create a WordPress plugin, you do need to have the necessary skills to create custom blocks, widgets, functions, or hooks. That said, let’s take a closer look at the basic concepts you need to know to develop your first WordPress plugin.
4 fundamental concepts to know for successful WordPress plugin development
For successful plugin development, there are some basic concepts related to the WordPress ecosystem that you need to know. Here are 4 that we believe are fundamental.
Hooks
Hooks are entry points in WordPress that allow you to add custom code at specific moments in the WordPress lifecycle. They let you modify or extend the core functionalities of WordPress without directly altering the core software.
There are two main types of hooks: actions and filters.
Actions: Action hooks allow you to execute custom code at specific times, such as when loading a page, before or after saving a post, or during theme initialization. You can link a function to a specific action using add_action().
Filters: Filter hooks allow you to modify data before it is displayed or saved. For example, you can modify the content of a post before it is displayed to the user. To use a filter, register a callback function with add_filter().
Blocks
Blocks are a fundamental aspect of modern WordPress plugin creation, introduced with the Gutenberg editor in WordPress 5.0. Blocks allow users to easily interact with your plugin by inserting specific content or creating new features using your plugin.
Additionally, custom blocks can evolve, adapting to your needs and those of your users.
Depending on the needs of your plugin, you will likely want to use blocks. However, this requires technical skills, including knowledge of JavaScript, Node.js, or handling the WordPress Block API.
Shortcodes
Shortcodes allow you to create custom functionalities that users can easily insert into their posts or pages. They are represented by short tags within brackets, such as [my_shortcode].
Shortcodes can interact with WordPress themes, adding custom features to the user interface.
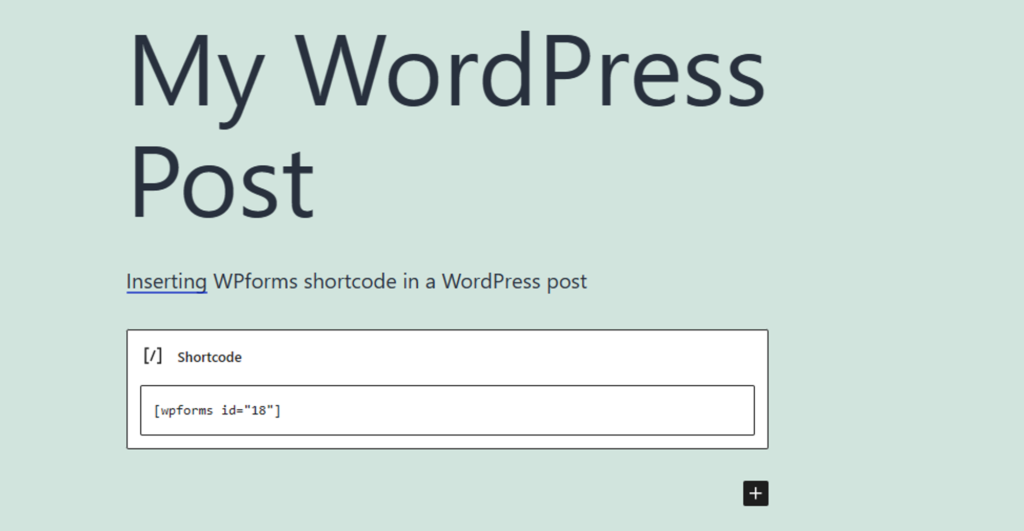
It is important to note that Gutenberg editor blocks are gradually replacing shortcodes to provide a more visual and modern experience for users. However, shortcodes remain useful in certain cases, particularly for interacting with themes and providing custom functionalities.
Widgets
Widgets are modular components that allow developers to add functionality or content to specific areas of a WordPress theme, such as sidebars, footers, or other theme-defined areas.
Notes: Editing blocks are increasingly seen as a better option compared to widgets. They offer more flexibility and are less likely to slow down the site.
Contact us for WordPress Plugin Development
Are you in need of a custom plugin to enhance your website’s functionality?
Do you have an existing plugin that needs improvement?
From performance optimization to adding new features, we’ve got you covered.
How to create WordPress plugin?
Now we’re going to show you how to develop your first WordPress plugin in a very simple 7 step guide.
Step 1: Understand the requirements
Before you start developing the plugin, it’s important to have a clear understanding of what the plugin needs to do and what features it should have.
You’ll need to determine your target audience so you can adapt the features and user interface accordingly. Similarly, identify the specific problems your plugin needs to solve to add value to the WordPress experience.
At this stage, you should also list the features you need to achieve your goals. Prioritize them to guide development and maximize your plugin’s impact.
Finally, consider compatibility with current and future versions of WordPress, as well as with popular themes and plugins. Also consider ease of use, updates, and user support to ensure the longevity of your WordPress plugin.
In the next steps of this tutorial, let’s suppose you want to develop a plugin that displays text on a page of a WordPress site.
Step 2: Choose a unique name for your WordPress plugin
Give your plugin a unique name that hasn’t been used by any other plugin. This helps avoid conflicts with other plugins.
If you wish to commercialize or publish your plugin in the official WordPress directory, know that the name holds significant importance. Therefore, you should choose a distinctive name that makes it easy to identify your plugin among the thousands in the WordPress ecosystem.
A concise and memorable name can also improve the visibility and reputation of your plugin. This also makes it easier for users to find and install your WordPress plugin.
Ensure that the name you choose is not already used by another plugin in the official WordPress directory or protected by copyright. You can search the directory to check the name’s availability. Additionally, verify your plugin’s name on platforms like Envato Elements.
In our example, here’s a name we could give our plugin: “Simple Message Display”.
Step 3: Create the plugin directory
To develop a WordPress plugin, you need to set up an appropriate folder structure. This is essential for better organization of your plugin files and for future developments. Follow the steps below:
- Navigate to the “wp-content/plugins” directory of your WordPress installation.
- Create a new folder and give it the same name as your plugin.
In our example, our folder is called “simple-message-display”.
Step 4: Create your WordPress plugin files
Create a new PHP file with the same name as your plugin folder and add the plugin header information at the top of the file. This header information is used by WordPress to display information about the plugin in the backend.
In our folder “simple-message-display,” we will create a new PHP file named “simple-message-display.php.” In this file, we’ll first add the header metadata, which contains information such as the plugin name, the plugin author name, and a brief introduction to what the plugin does. The header information might look like the following:
<?php
/*
Plugin Name: Simple Message Display
Plugin URI: https://example.com
Description: This plugin displays a simple message on the frontend of the site
Version: 1.0
Author: John Doe
Author URI: https://example.com
*/
Note: For a more complex plugin, the structure of your plugin directory may vary. It can be helpful to separate different types of files for better readability and easier editing later on. For example, you may have a folder named assets for CSS and JavaScript files, as well as other directories for templates and widgets.
Step 5: Write the code for your WordPress plugin
This is where you need to bring your plugin to life. It’s time to write the code for the custom plugin you want to develop.
Inside the plugin file, create the functions that will be used to execute the plugin’s features. These functions should be hooked to a specific WordPress action or filter so that they run at the appropriate time.
In our example, we’ll create a very simple function called “simple_message_display” which will be used to display the text in the content section of the frontend page.
The code in the main file of our example plugin looks like this:
function simple_message_display() {

    return "<p>Hello, this is a simple message displayed by the plugin.</p>" ;

}

add_filter('the_content', 'simple_message_display' ) ;
If you have followed all the steps, you should currently have in your plugins folder :
- A folder called “simple-message-display”
- In this folder, you have the file “simple-message-display.php”.
The code in this file should look something like the following image.
Note: To deepen your knowledge, the plugin developer handbook offers many essential resources for creating custom functions and successfully developing your plugin.
Step 6: Create the plugin settings
If your plugin requires settings that users can configure, you can create a new PHP file to handle these settings and add it to your plugin folder. This allows you to manage the settings separately from your main plugin file and keeps your code organized.
As mentioned above, you can consult the Plugin Handbook to understand how the WordPress Settings API works and to learn how to use it.
Step 7: Test your new WordPress plugin
After creating your plugin, test it to make sure it works as expected and that there are no errors.
To do this, activate your plugin in the WordPress dashboard. Check the basic functionality and make sure everything works as expected.
If you’ve created a settings page, you need to access it to modify the options and check that the changes are saved and correctly reflect your original development logic.
Also, you should test your plugin’s compatibility with other plugins and themes to avoid conflicts. Consider the errors and warnings in your server’s error logs. It’s a good idea to test different use cases to identify undesirable side effects.
Once you’ve thoroughly tested your plugin and are satisfied with it, you can submit it to the WordPress plugin repository for others to use. In the following section, you’ll discover different ways to distribute your WordPress plugin.
Note: These are general guidelines for developing a WordPress plugin. The complexity of the plugin and the specific requirements will affect the steps and complexity of the development process.
How Can I Share my WordPress Plugin With Others?
When you’ve created your plugin, note that there are several ways to share it with others. Here are three common options for distributing your WordPress plugin: the official WordPress directory, distribution on your website, and distribution on third-party platforms.
Publishing your plugin on the official WordPress directory

Publishing your plugin on the official WordPress directory is a great practice because it allows your plugin to reach millions of users worldwide through the official plugin page. This is a very popular option among plugin developers.
The process for distributing your plugin via the WordPress directory can be summarized in three steps:
- Submission: You will need an account on WordPress.org to submit your plugin for review. Make sure to follow best practices and plugin developer guidelines before sending your code.
- Review: The WordPress team will review your plugin to ensure it meets current security and quality standards.
- Approval: Once your plugin has been reviewed and approved, you will need to add it to the Subversion repository.
After completing these steps, your plugin will be available and accessible directly to all users on the official WordPress plugin directory.
Sharing the plugin on your own website
Alternatively, you can distribute your plugin on your own website. This model allows you to have full control over the distribution and pricing of your plugin. You can use a dedicated page on an existing site, as we do at WP connect, or create a site solely for your plugin.
On your plugin’s page or site, you can add documentation, plugin tutorials, support information, and even links to other products you have developed. In general, plugin developers use their own site to promote premium plugins.
Many of them also publish a free version of the plugin in the WordPress directory and promote paid features on their site.
This option has the advantage of encouraging the discovery and adoption of your plugin by the millions of users via the WordPress directory before upgrading to paid features. This is the model we use, for example, for our Air WP Sync plugin or Notion WP Sync plugin.
Moreover, some developers opt to offer free versions of their plugins that support donations or monetize using affiliate links.
Using a third-party platform
In addition to the two previous options, you can make your plugin open source or sell it on marketplace platforms such as CodeCanyon or Envato Elements. On these marketplaces, you can gain increased visibility with potential buyers. You can also potentially access marketing tools to promote your product.
Note, however, that the submission process and requirements may vary from one platform to another. Also, keep in mind that marketplaces generally charge commissions on your sales. So make sure you understand the terms and conditions before choosing a platform.
What Resources Are Available To Help With WordPress Plugin Development?
Fortunately for aspiring plugin developers, there are plenty of free guides and resources available to help them through the process from start to finish. The plugin developer guidelines is an excellent resource for getting started.
For example, Tutorials on specific topics related to WordPress plugin development can be found online regularly posted by experts in the field. There are also numerous courses available from leading educators covering everything from beginner basics to advanced topics such as creating custom content types and theme integration.
In addition, there are frameworks like WordPress MVC that let you create custom themes and plugins for WordPress.
Developers looking for answers or discussions about the latest trends in WordPress plugin development may want to visit online forums or specialized documentation tailored for plugin developers.
What Advanced Features Can I Add To My WordPress Plugin?
Once you have mastered the basics of WordPress plugin development, you may be ready to tackle more advanced features such as custom posts, shortcodes, or the creation of custom functionality. Many of these features become even more powerful when combined with WordPress automation workflows that connect your plugin to external services and databases.
You can also integrate your plugin with existing themes by adding widgets or modifying core features like headers and footers scripts or WP-Cron.
Furthermore, you may wish to add extra functionality by utilizing JavaScript libraries or CSS style sheets as well as database interactions for security enhancements or performance optimization.
Now that you know the process of developing WordPress plugins for your needs, here are five best practices and tips from plugin development experts to guide you:
5 expert tips and best practices for successful WordPress plugin development
- Use WordPress coding standards: Follow the coding standards recommended by WordPress, including naming conventions and indentation. For example, use esc_html() to escape displayed content and wp_enqueue_script() to load scripts.
- Separate plugin logic: Organize your code by separating basic functionality, parameters, scripts and styles, and other components. For example, use wp_localize_script() to pass PHP variables to JavaScript scripts.
- Sanitize and validate user input: Sanitize and validate user input to avoid security vulnerabilities. For example, use sanitize_text_field() to sanitize text fields and sanitize_email() to validate e-mail addresses.
- Use WordPress hooks and functions: Take advantage of the actions hooks, filters hooks, and functions available in WordPress to integrate your plugin seamlessly with the system. For example, use add_action() to execute a function on a specific action and add_filter() to modify data at a particular time.
- Test and document your plugin: Carefully test your new plugin in different environments before putting it online. Also, be sure to document your plugin’s code and functionality, including detailed comments, to facilitate future understanding and maintenance by other developers or yourself.
Conclusion
As you reach the end of this WordPress plugin development tutorial, remember that the process involves more than just writing code. It’s about building solutions that work seamlessly with different domains and user needs. Keep experimenting, learning, and applying best practices. Don’t hesitate to click through our additional resources or email us for personalized guidance. Whether you’re just getting started or looking to enhance your existing skills, always stay connected to the evolving world of WordPress plugin development.
WordPress plugin development is a rewarding skill that has the potential to reach millions of web visitors around the world. It requires certain skills such as an understanding of core concepts like PHP and CSS along with knowledge of HTML coding languages and script writing techniques. Following the proper steps outlined in this article will ensure that you have created a quality product ready for distribution! There are also plenty of resources available that provide tutorials and courses that can teach even beginners how to develop a successful WordPress plugin.
Contact us for WordPress Plugin Development
Are you in need of a custom plugin to enhance your website’s functionality?
Do you have an existing plugin that needs improvement?
From performance optimization to adding new features, we’ve got you covered.