In today’s fast-paced digital world, managing data efficiently is more important than ever. Gravity Forms makes it easy to collect information from your website visitors, while Notion provides a flexible platform to organize, track, and act on that data.
By connecting Gravity Forms to Notion, you can transform form submissions into structured workflows, streamline project management, track customer requests, and centralize feedback in one organized workspace.
This article explores the benefits of this integration and provides a detailed, step-by-step guide to get your forms working seamlessly with Notion.
Discover Notion and Gravity Forms: powerful tools for modern businesses
Notion has become an iconic no-code platform used by businesses of all sizes. Notion transforms how teams organize information by combining notes, databases, and project management in one flexible workspace.
Notion offers an excellent online no-code platform for businesses. It enables companies to create custom systems for various use cases: managing projects, planning content, handling tasks, collaborating with teams, and more. All of this happens through visual databases accessible to everyone.
On the other hand, Gravity Forms excels at capturing data through WordPress forms. Gravity Forms is recognized for its numerous features and reliability. Highly praised in the WordPress ecosystem, this form builder adapts well for newsletters, quote request forms, job applications, quizzes and polls, automated payments, ecommerces, email signatures, and more.
As you can see, each platform excels in its own domain. But imagine the possibility of combining the power of these two tools to serve your business. That’s what our Gravity Forms to Notion integration offers.
The key benefits of connecting Gravity Forms to Notion
Your web form submissions contain valuable business intelligence, but they’re stuck in WordPress where teams can’t collaborate effectively. Contact requests pile up without proper follow-up. Event registrations lack organization. Survey responses never turn into actionable insights.
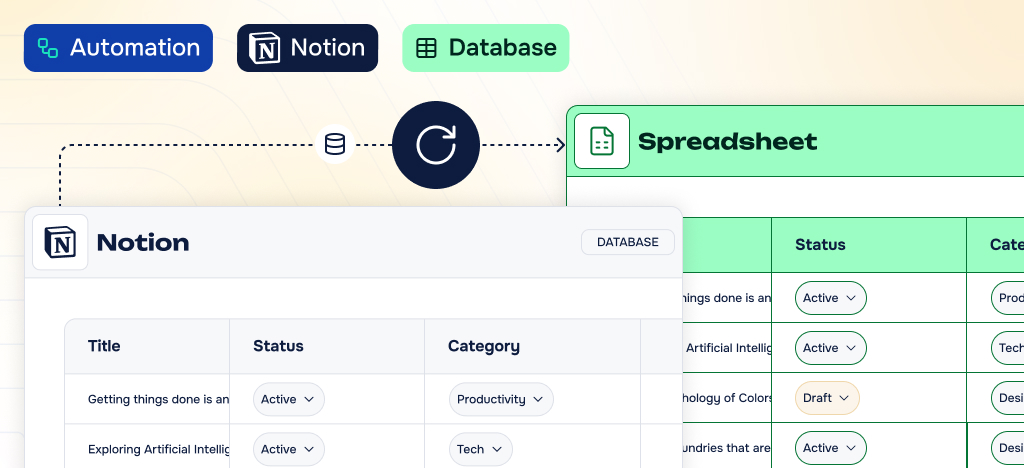
This integration solves the collaboration gap by automatically transferring every Gravity Forms submission into structured Notion databases where your team can work together immediately.
The benefits and use cases are numerous:
- Transform support requests into tasks assigned to your teams in Notion
- Turn project inquiries into structured project management workflows
- Organize event registrations into collaborative planning databases
- Collect content ideas through forms and centralize them in Notion
- Turn survey and feedback responses into actionable insights
- Turn job applications into a structured recruitment pipeline
With this integration, your WordPress forms become the starting point for organized teamwork rather than data dead ends. Each submission triggers collaborative workflows that move your business forward.
In addition, automating your Notion workflows will help you get even more out of this integration.
Connect Gravity Forms to Notion in minutes without coding
Unlock the full potential of your web form data by syncing Gravity Forms with Notion, the all-in-one workspace for notes, databases, and project management.
- Add your form submissions to Notion databases
- Trigger automation workflows
- Track your business opportunities
- Manage collected data efficiently
- Follow and manage Facebook Ads leads in Notion as your CRM
- Stay organized and centralize your data
- Collaborate effectively with your team
- And much more
How to connect Gravity Forms and Notion (without Make or Zapier)
Simply integrate Gravity Forms with Notion using our Gravity Forms to Notion Add-On. It’s a no-code add-on that works directly within your WordPress dashboard. If you want to explore what Gravity Forms can do beyond simple forms, our guide to building and automating advanced forms covers the full picture. Here’s how to set it up in a few simple steps, summarized in this guide. Best of all, you don’t need automation tools like Make or Zapier.
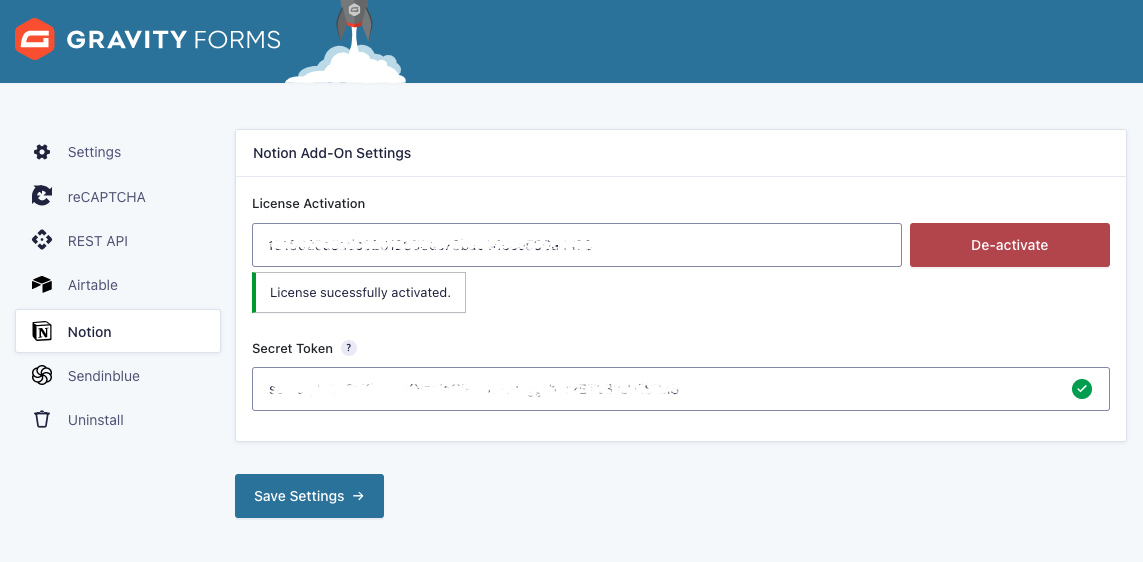
Step 1: Install and activate the Gravity Forms to Notion Add-On
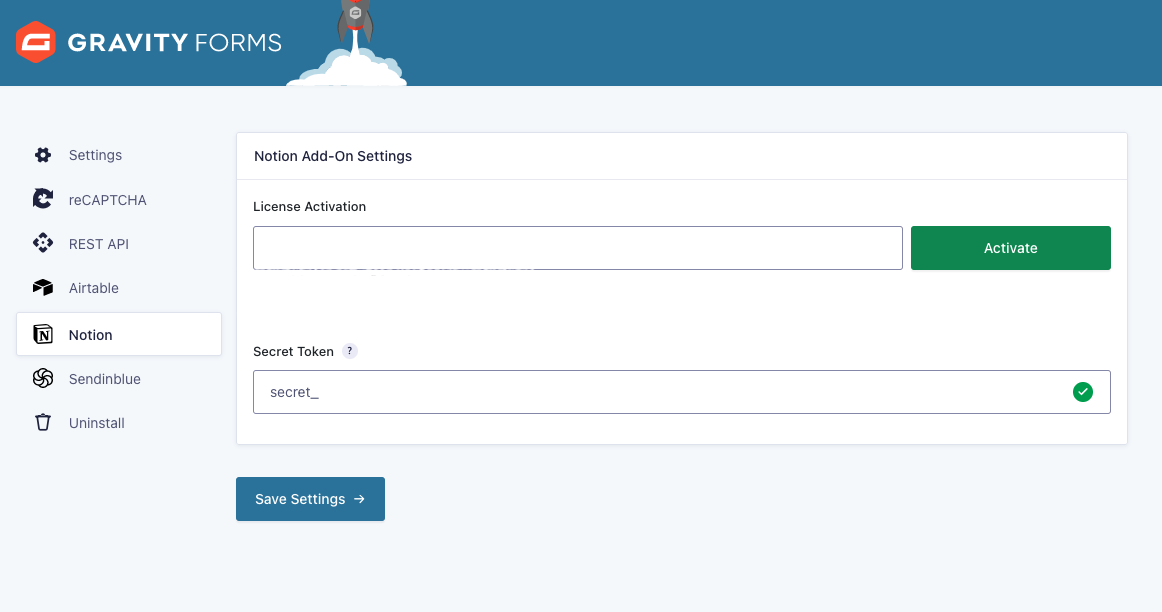
Purchase the Notion for Gravity Forms Add-On, install it on your WordPress site, and activate it. Retrieve your license key (available in your confirmation email or your account), then go to Forms > Settings in your WordPress dashboard. Select Notion from the left menu, paste your key under License Activation, and click Activate to complete the setup.
Step 2: Activate your Notion secret key
Log into your Notion account and navigate to My Integrations page. Click New Integration to create a connection between Gravity Forms and Notion.

Name your integration descriptively, such as “Gravity Forms Notion Data Sync.” Select your target workspace if you have multiple Notion workspaces. In the Capabilities section, enable “Read user information including email addresses.”
Copy the generated Internal Integration Token (starts with “secret_”) and return to your WordPress admin. Navigate to Gravity Forms > Settings > Notion and paste the token in the Secret Token field. Don’t forget to save your settings.
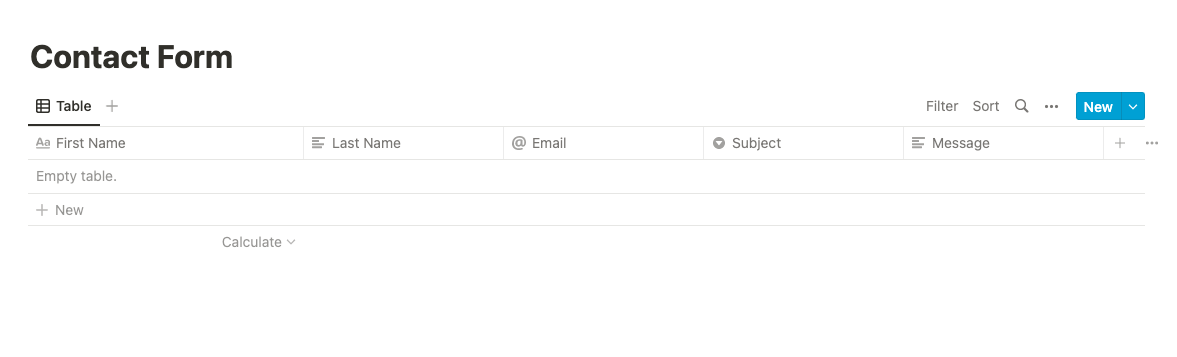
Step 3: Set up Notion database and integration feed
Create a Notion database for your form data if you don’t have one yet. Add columns that correspond to each Gravity Forms field you want to capture (name, email, message, etc.).
Once your database is ready, click the three dots at the top right of your database and select Add Connection. Choose your integration name from the list to share database access.
Only shared databases will appear in your WordPress integration settings. In your WordPress admin, select the form you want to connect and navigate to Settings > Notion.
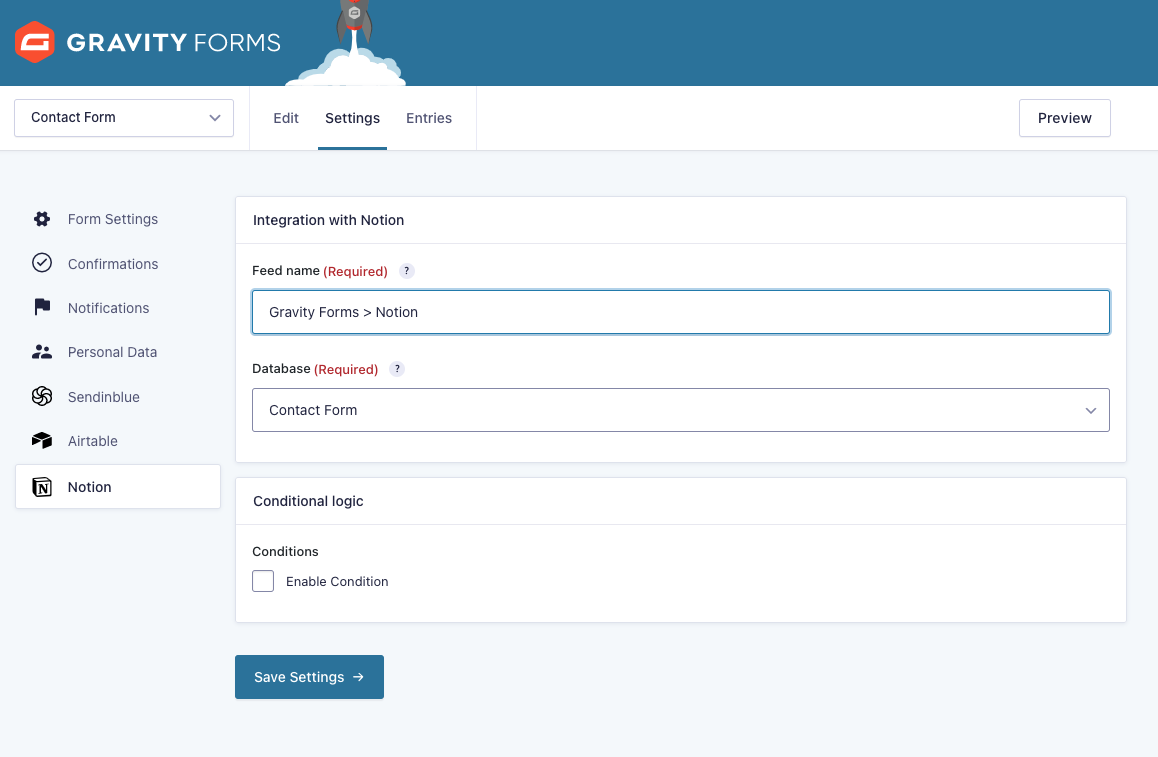
Click Add New to create your integration feed. Give it a descriptive name for easy identification, especially when managing multiple form connections.
Select your Notion database from the dropdown menu. Remember that only databases shared with your integration will appear in this list.
You then land on a page that will allow you to create connection flows between your form and Notion.
Connect Gravity Forms to Notion in minutes without coding
Unlock the full potential of your web form data by syncing Gravity Forms with Notion, the all-in-one workspace for notes, databases, and project management.
- Add your form submissions to Notion databases
- Trigger automation workflows
- Track your business opportunities
- Manage collected data efficiently
- Follow and manage Facebook Ads leads in Notion as your CRM
- Stay organized and centralize your data
- Collaborate effectively with your team
- And much more
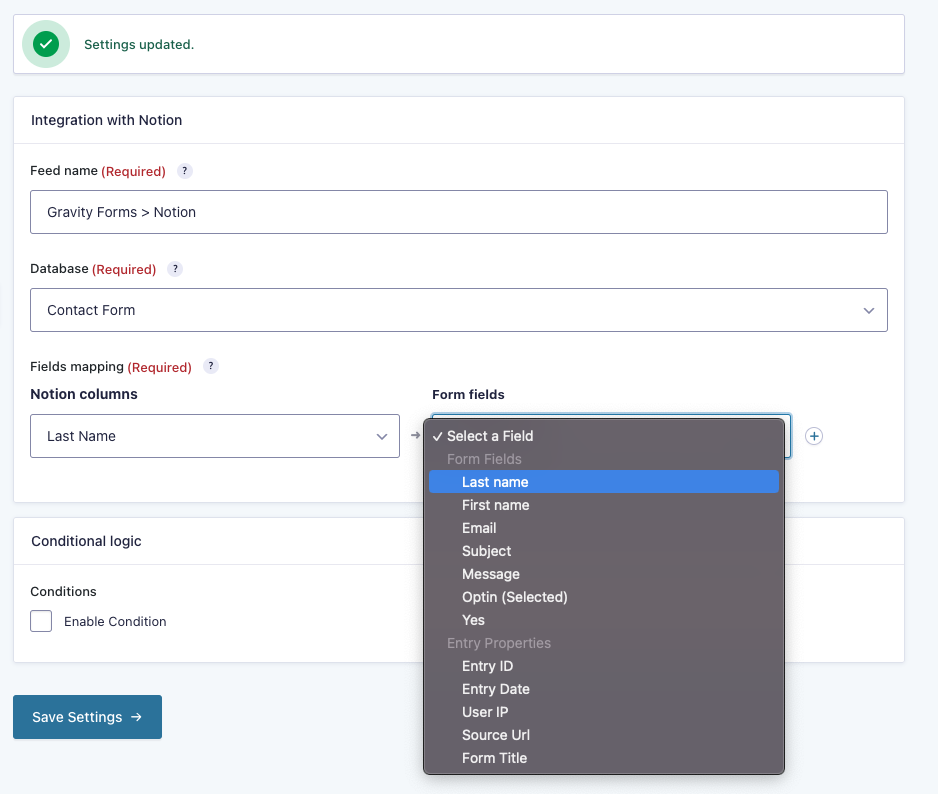
Step 4: Map Gravity Forms fields to Notion database columns
Associate your form fields with the appropriate columns in your Notion database to ensure data flows correctly between both systems.
In the field mapping section, click Select a Field under Notion Columns to choose a database column.
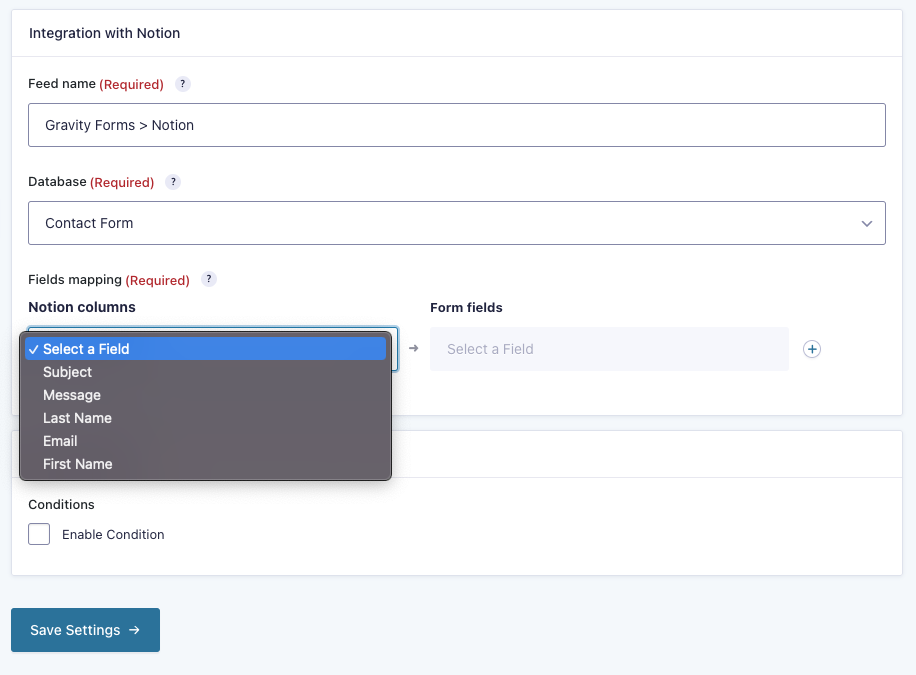
Then under Form Fields, select which form field contains the corresponding information.
Use the + button to create additional mappings for each piece of data you want to transfer. Match email fields to email columns, name fields to name columns, and so on.
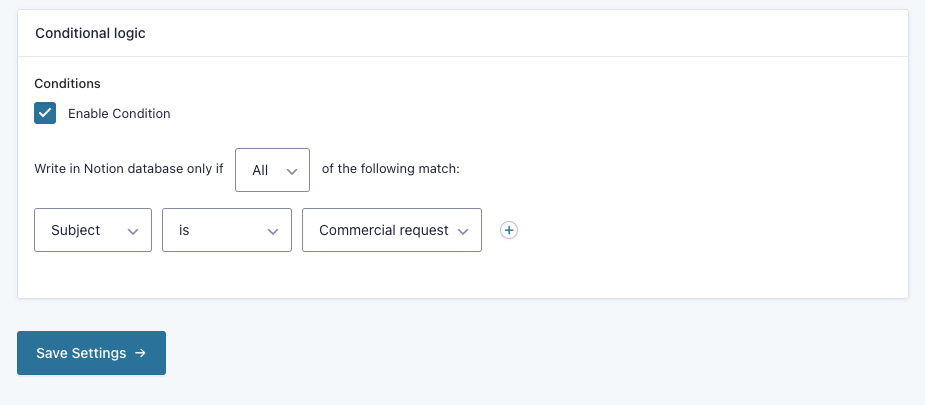
Step 5 (Optional): Add filters and conditions
Set up filters to control which form submissions get sent to your Notion database based on specific criteria.
Click Enable Condition to activate this feature. Select a form field from the dropdown, then choose the criteria that will trigger data transfer to Notion.
For example, you might create conditions like:
- Subject IS “Project Request”
- Agreement checkbox IS “Checked”
- Budget IS NOT “Under $1000”
This allows you to route different types of submissions to separate databases or filter out incomplete responses.
Save your conditional settings when configured.
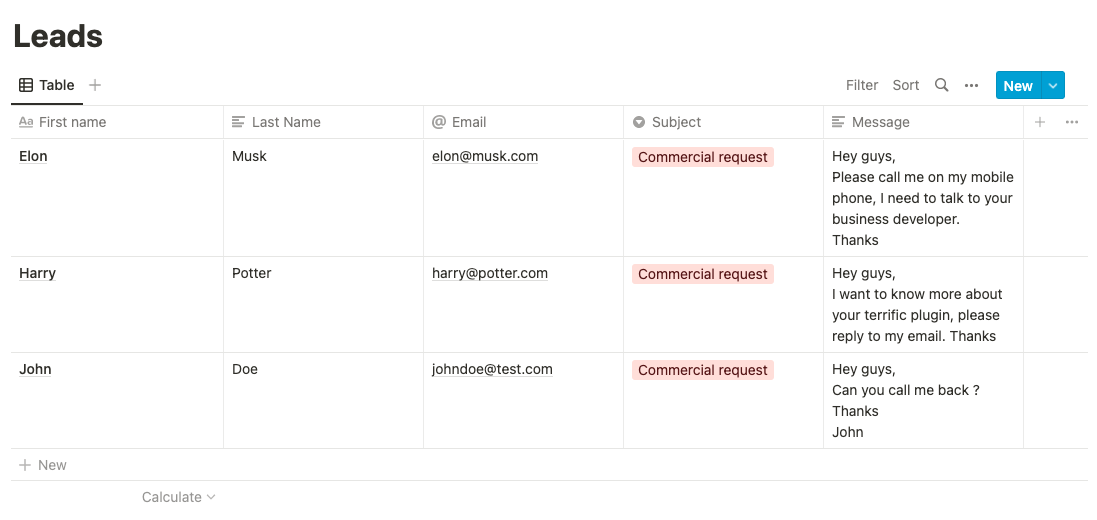
Step 6: Test your Gravity Forms Notion integration
Verify that your integration is working correctly by submitting a test entry via your connected form.
After submission, check your Notion database to confirm that the test data is displaying correctly and that all mapped information has been transferred correctly. Your Gravity Forms to Notion workflow is now up and running.
Connect Gravity Forms to Notion in minutes without coding
Unlock the full potential of your web form data by syncing Gravity Forms with Notion, the all-in-one workspace for notes, databases, and project management.
- Add your form submissions to Notion databases
- Trigger automation workflows
- Track your business opportunities
- Manage collected data efficiently
- Follow and manage Facebook Ads leads in Notion as your CRM
- Stay organized and centralize your data
- Collaborate effectively with your team
- And much more
And there you go!
Integrating Gravity Forms with Notion centralizes your data and facilitates collaboration within teams. Each submitted form is now directly transferred into organized databases where your team can track progress, assign tasks, and immediately build on each other’s work.
Your forms are now directly integrated into your team’s workspace. This transforms individual submissions into collaborative projects that generate real results for your business. Thanks to the automation possibilities that open up, you undoubtedly gain in productivity and efficiency. Plus, you get a global and clear view of your operations.
If you’re passionate about no-code, we have products and solutions that might interest you. Explore our Notion integrations or our other add-ons to integrate Gravity Forms with your business applications.