Most website forms work only once. Someone submits information, receives a basic confirmation email, then nothing. Between submission and action, opportunities slip away. Interested visitors become forgotten data points in your WordPress dashboard. For many businesses, that’s where customer relationships typically end before they begin.
To scale your approach and optimize your company’s workflows, you need to implement smart automation like integrating Gravity Forms with Brevo. Want to know more? Continue reading our article.
Gravity Forms + Brevo: transform your web data potential into marketing opportunities
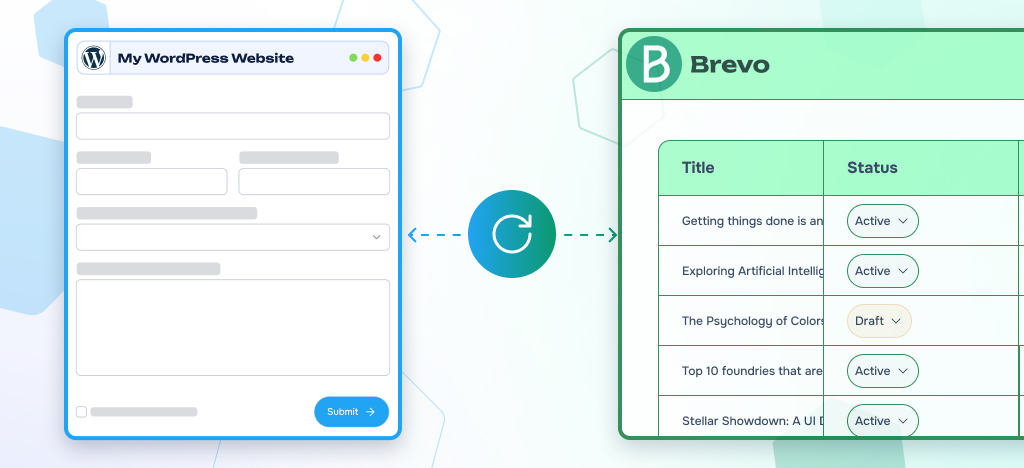
Integrating Gravity Forms with Brevo transforms your WordPress form submissions into real marketing opportunities. This French platform combines email marketing, SMS campaigns, and CRM functionality in one complete solution. If you haven’t configured Brevo on your site yet, see how to set up Brevo for WordPress first.
Brevo positions itself as a flexible platform for businesses that want to nurture prospects automatically. The platform is known for its generous free offer and affordable premium pricing, making it accessible to most businesses. We developed this integration to help companies better leverage all of Brevo’s features with their web form data.
Instead of manually exporting contact lists or copying form data, your submissions transfer directly into Brevo’s organized contact lists. From there, you can create automated email sequences for new subscribers, segment contacts based on form responses, send targeted SMS campaigns, and track every interaction through the integrated CRM.
Whether you collect newsletter signups, event registrations, or sales inquiries, this integration transforms every form submission into a marketing opportunity that works around the clock.
Your complete guide to integrate Gravity Forms to Brevo
The Gravity Forms to Brevo plugin lets you sync your WordPress form entries with Brevo in just a few easy steps. No technical skills required to create your workflows. New to Gravity Forms? Check our guide to building and automating advanced forms. Follow these steps to build and test your first automated Gravity Forms – Brevo workflow. Let’s get started.
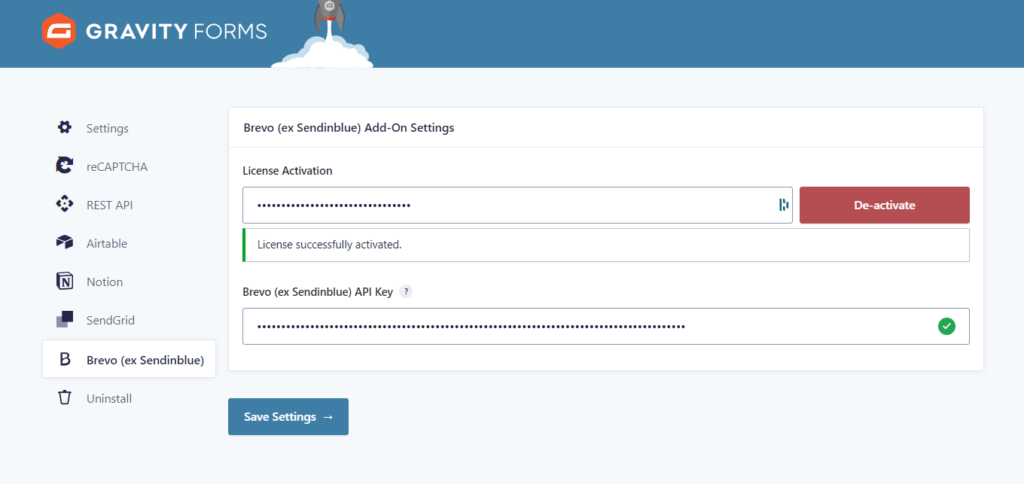
Step 1: Install Gravity Forms to Brevo Add-On and license setup
Purchase and install the Gravity Forms to Brevo Add-On on your WordPress site. A free version is available on WordPress.org, but it only syncs email fields to Brevo.
After installation, retrieve your license key from your WP connect account or email confirmation. Navigate to Forms > Settings in your WordPress admin, then select the Brevo menu option.
Paste your license key in the License Activation field and click Activate.
Step 2: Set up Brevo API access
After logging into your Brevo account, open the drop-down menu from your profile icon (top right) and select SMTP & API.
In the API keys section, generate a new key by clicking Create API key. Copy it immediately and store it securely. For security reasons, it won’t be displayed again.
Return to your WordPress admin panel and navigate to Gravity Forms > Settings > Brevo. Paste your API key in the designated field and click Save Settings to establish the connection.
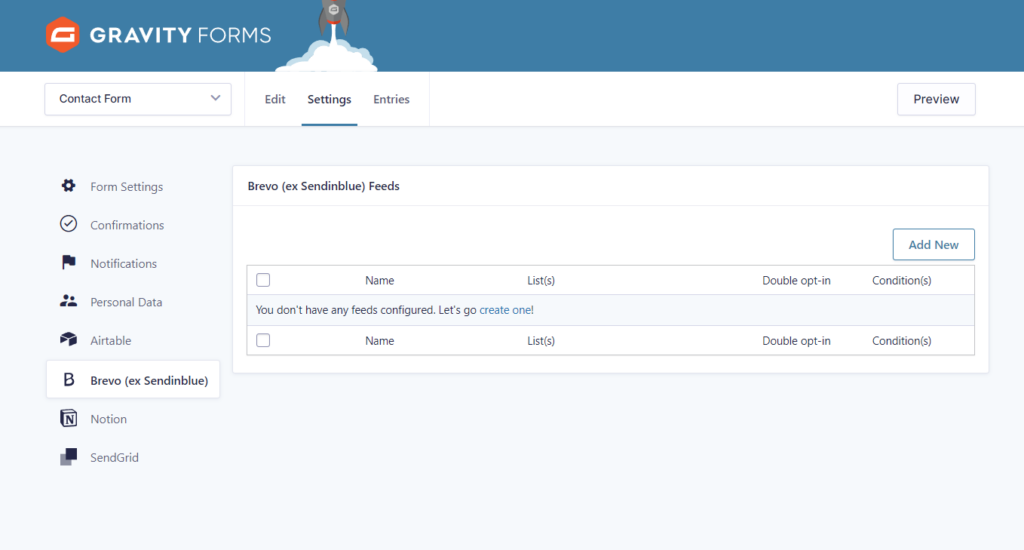
Step 3: Create your first Gravity Forms – Brevo feed
In your WordPress dashboard, select the form you want to connect to Brevo and access its configuration options. Navigate to Settings > Brevo within your chosen form.
Click Add New to create your first integration feed. Assign a descriptive name that helps you identify this connection later, especially if you plan multiple feeds.
Configure the basic feed settings and save your initial setup. This creates the foundation for mapping your form data to Brevo contacts.
You can also simply edit your form by clicking on Edit, then on the Settings > Brevo tab.

Supercharge your marketing by connecting Gravity Forms to Brevo
Get the most out of your marketing campaigns by transforming your web form submissions into automated actions on Brevo (formerly Sendinblue), the smart platform for email, SMS, and CRM.
- Send your submissions to one or more lists in Brevo
- Easily manage your leads and business opportunities in Brevo
- Simple, no-code integration
- A robust solution designed to connect Gravity Forms and Brevo
- Compatible with WordPress, WooCommerce, and more
- Free version available
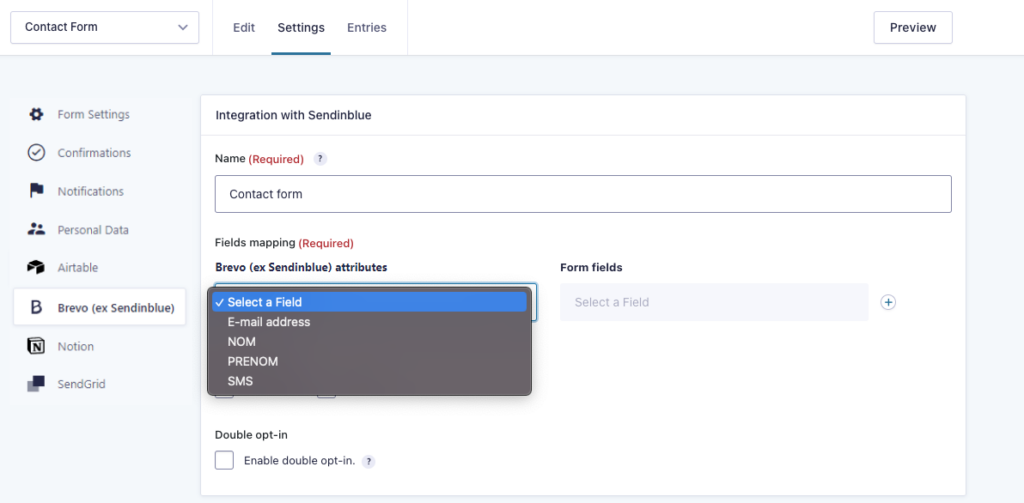
Step 4: Map Gravity Forms fields to Brevo attributes
Connect your Gravity Forms data with Brevo’s contact system by linking each form field to the appropriate contact attribute.
In the field mapping section, select a Brevo attribute from the dropdown menu (email, first name, phone number, etc.). Then choose the corresponding form field that contains this information.
Add additional mappings by clicking the plus icon and repeat the process for each data point you want to transfer. Ensure your mappings match the data types between both systems.
Save your field configuration once all necessary connections are established.
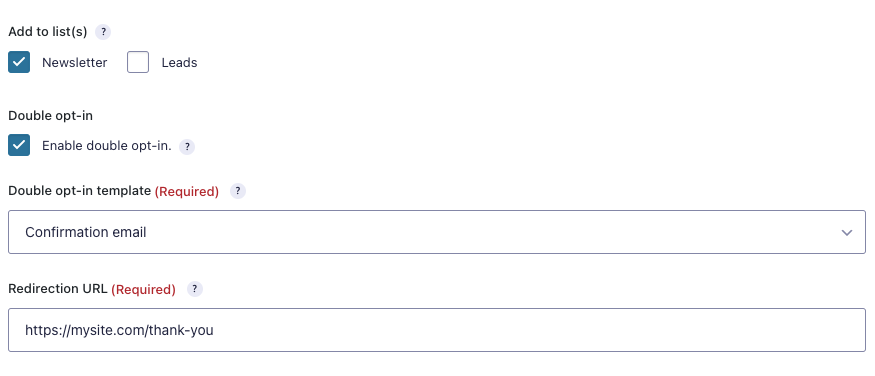
Step 6: Configure lists and additional options
Select the Brevo contact lists that will receive your form submissions. You can assign contacts to multiple lists simultaneously based on your segmentation strategy. For example, newsletter subscribers might go to a “General Newsletter” list, while product inquiries could be directed to a “Sales Prospects” list.

Double Opt-In (optional): Enable this feature to send confirmation emails before adding contacts to your lists. This ensures compliance with privacy regulations and validates email addresses. Select your preferred confirmation template and set a redirect URL for after users confirm their subscription.
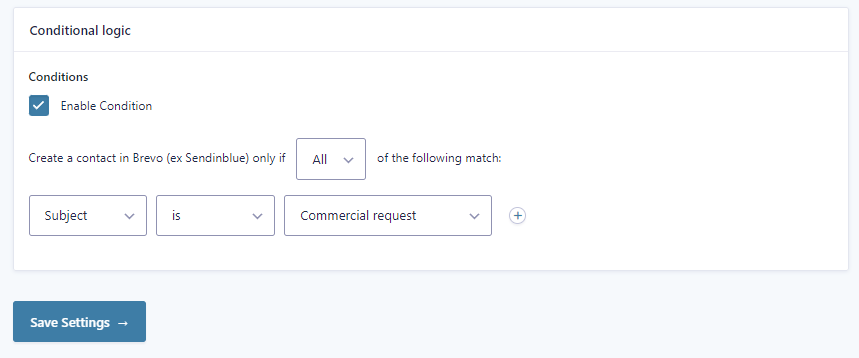
Conditional logic (optional): Create rules to filter which submissions reach Brevo based on specific form responses. For example, only add contacts who consent to marketing communications, or route different inquiry types to separate lists.
Step 6: Test your new Gravity Forms Brevo workflow
Verify your setup by submitting a test entry through your connected form. Use realistic data that matches your field mappings to ensure accurate testing.
Check your Brevo account within a few minutes. Navigate to Contacts > Lists and locate the designated list. Your test submission should appear as a new contact with all mapped information correctly transferred.
If the data appears correctly, your integration is working properly. If something seems missing or incorrect, revisit your field mappings and list configurations in the previous steps.
Supercharge your marketing by connecting Gravity Forms to Brevo
Get the most out of your marketing campaigns by transforming your web form submissions into automated actions on Brevo (formerly Sendinblue), the smart platform for email, SMS, and CRM.
- Send your submissions to one or more lists in Brevo
- Easily manage your leads and business opportunities in Brevo
- Simple, no-code integration
- A robust solution designed to connect Gravity Forms and Brevo
- Compatible with WordPress, WooCommerce, and more
- Free version available
Final Thoughts
Integrating Gravity Forms with Brevo eliminates tedious manual tasks that slow down your marketing efforts. Every submitted form is now automatically transferred to your organized contact lists, where you can segment, nurture, and convert leads automatically.
No more copying data between platforms. No more missed follow-ups because information was lost in WordPress. No more manually creating lists that waste your valuable time.
Your Gravity Forms automatically feed your email marketing platform to fuel your targeted campaigns.
If you are a fan of Gravity Forms, have a look at our other great extensions:
- Gravity Forms to Airtable – A No Code tool to replace Excel and create easy-to-use and eye-catching databases to manage orders, products, customers… and much more.
- Gravity Forms to Notion – Allows you to send data from your forms to databases created in Notion, a great project management workspace.
- Gravity Forms to SendGrid – This integration sends your form entries to Sendgrid, a platform for transactional and marketing email.