WordPress sometimes struggles with email delivery. Your forms collect leads, but confirmation emails or transactional emails land in spam folders. Contact requests disappear. Newsletter signups never receive welcome messages. And the list goes on. Your customer relationships get sabotaged and you easily lose opportunities that come your way.
Integrating Gravity Forms with SendGrid solves and simplifies your daily operations.
By synchronizing your form submissions with SendGrid, you can send reliable emails, confirmations, and automated campaigns that reach your contacts effortlessly. Learn more by reading the rest of our article.
Gravity Forms + SendGrid: a smarter way to use your form data
SendGrid is a recognized email platform known for its reliability and deliverability capabilities. Cloud-based, SendGrid processes millions of emails daily for companies worldwide with the guarantee that emails don’t end up in spam folders.
The platform offers advanced features such as detailed analytics, A/B testing capabilities, automated campaign management, and robust API integrations for businesses that need professional email delivery service.
Here’s where it gets interesting. If you use WordPress regularly, you certainly know that your emails suffer from deliverability issues by default. This proves even more true for transactional emails and automated sequences.
The Gravity Forms to SendGrid integration solves this problem. Your web form data syncs with SendGrid which handles efficient email delivery.
Gravity Forms integrations for WordPress allow you to create workflows to effectively leverage your web forms data. You can automatically transfer Gravity Forms submissions to one or more SendGrid lists. From there, you can use SendGrid to send transactional emails or automated sequences.
Note :
An official SendGrid add-on exists, but it only handles form notifications. Our Gravity Forms to SendGrid Add-On does much more. For a detailed look at how data flows from your forms to SendGrid, see how to send form data from Gravity Forms to SendGrid. Our solution provides complete contact management: multiple feed configurations, advanced field mapping, automatic list management, double opt-in verification, and conditional logic for targeted campaigns. This transforms your forms from simple notification tools into comprehensive lead generation systems that feed directly into SendGrid’s professional email infrastructure.

Connect Gravity Forms to SendGrid in minutes without coding
Unlock the full potential of your web form data by syncing Gravity Forms with SendGrid, the powerful email and automation platform.
- Add your contacts to one or multiple SendGrid lists
- Trigger automation workflows
- Track your business opportunities
- Enable double opt-in verification
- And much more
How to set up your Gravity Forms SendGrid connection?
You can integrate Gravity Forms with SendGrid using our Gravity Forms to SendGrid Add-On. It’s a no-code add-on that works directly within your WordPress dashboard. Here’s how the configuration unfolds in a few steps that we’ve condensed in this guide.
Step 1: Install and activate the SendGrid for Gravity Forms Add-On
First, you need to acquire a license for the Gravity Forms to SendGrid Add-On. Then follow the standard procedure to install and activate it on your WordPress website.
Your license activation key will be sent to you in a confirmation email after purchase. You can also find it in your account on the WP connect website.
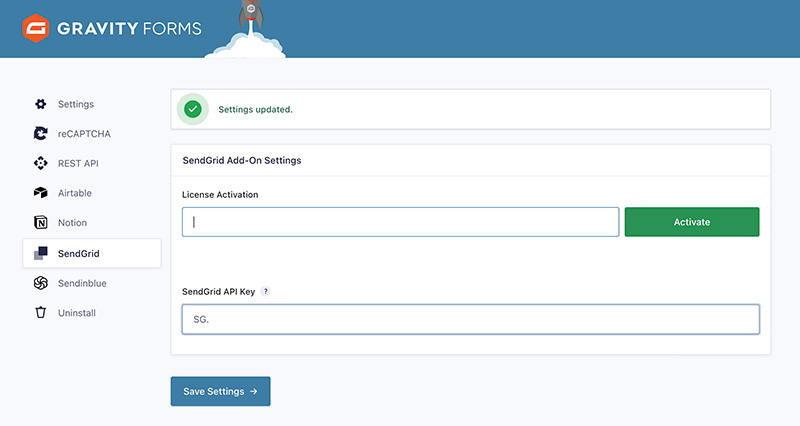
To activate your license, go to Forms > Settings and select SendGrid from the left menu in your WordPress admin panel. In the designated field, paste your license key and click Activate.
Step 2: Establish SendGrid API connection
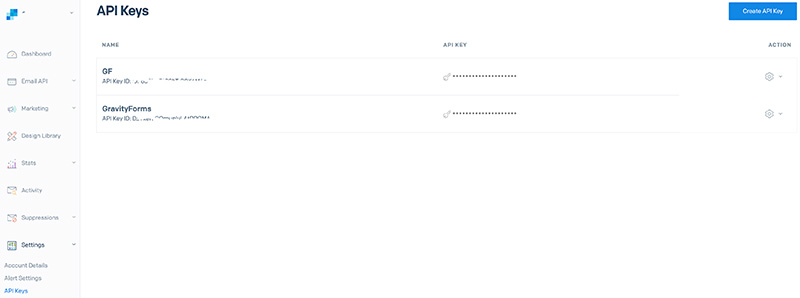
Log into your SendGrid account and navigate to the API Keys section through your account settings menu.
Create a new API key and copy it immediately. Store it securely, as SendGrid won’t display it again.
Return to your WordPress dashboard and go to Forms > Settings > SendGrid. Paste your API key in the authentication field and click Save Settings.
Step 3: Build your Gravity Foorms – SendGird integration feed
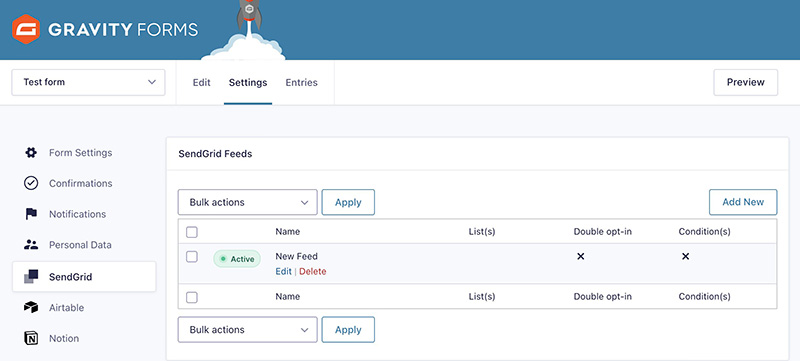
Within your WordPress dashboard, locate the specific form you want to link with SendGrid. Access the form’s configuration options and find the Settings > SendGrid tab.
Initiate a new connection by clicking Add New in the feeds section. Assign a clear, descriptive name to this feed for easy identification, particularly useful when managing multiple form integrations.
Complete the basic feed configuration and save your initial settings. This prepares your form to send data directly to SendGrid.
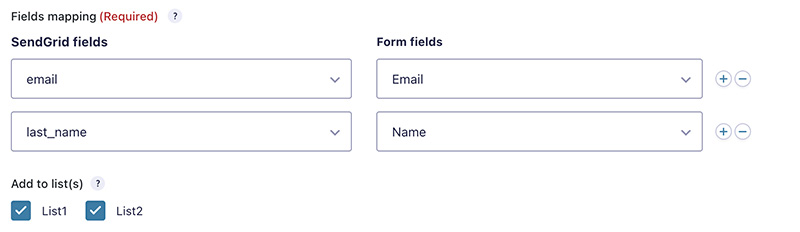
Step 4: Match Gravity Forms fields to SendGrid attributes
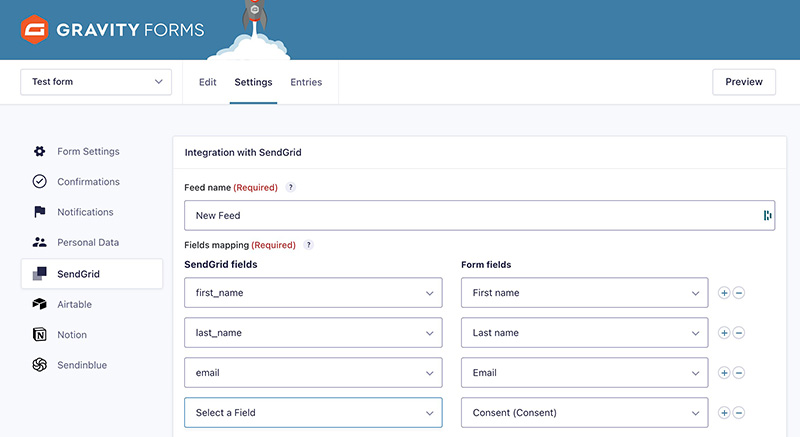
Link your form fields with SendGrid‘s contact attributes by creating mappings between both systems.
In the mapping section, choose a SendGrid contact attribute from the available options (email address, name, phone, etc.). Then select which form field contains that specific information.
Add more field mappings using the plus button and repeat this process for every piece of information you want to transfer. Verify that your mappings align correctly between form inputs and contact attributes.
Save your field configuration when complete.
Step 5: Configure SendGrid lists and additional features
This integration allows you to transfer your Gravity Forms data to one or multiple SendGrid lists. In the “Add to list(s)” section, choose from existing lists or create new ones based on your segmentation needs.
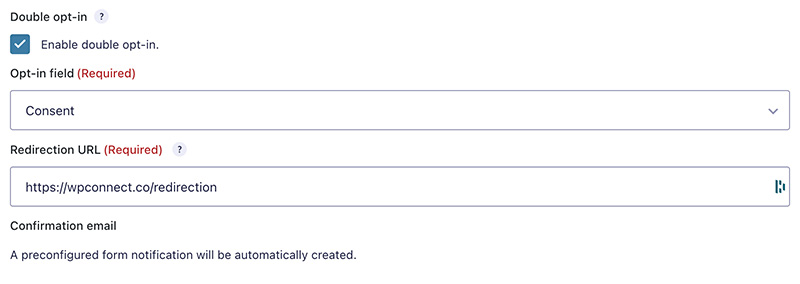
Enable double opt-in (Optional): This feature sends confirmation emails before adding contacts to your lists. It improves compliance and reduces invalid email addresses. Select your confirmation email template from SendGrid and specify a redirect URL for post-confirmation.
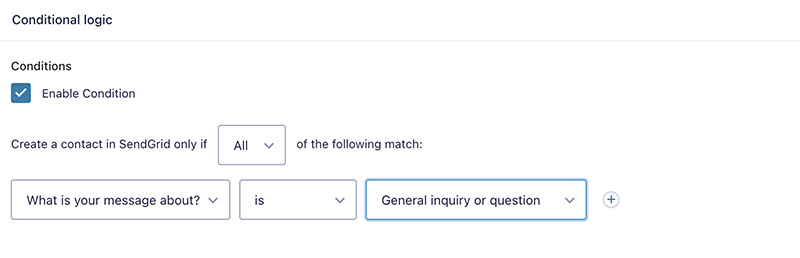
Set up conditional logic (Optional): Create rules that determine which contacts get added to specific lists based on their form responses. For example, route sales inquiries to your prospect list while directing newsletter signups to your general subscriber list.
Once your feed is finalized, click on Save Settings. That’s it! The contacts who have completed your form will be sent to SendGrid!
Step 6: Test your integration
Before enjoying your automation, make sure it works properly. To do this, you need to test the integration by submitting a test entry through your connected form.
Use realistic information that matches your field mappings to ensure accurate testing. Fill out all required fields just like a real visitor would.
After submission, check your SendGrid account by navigating to Marketing > Contacts. Look for your test contact in the designated lists you configured earlier.
If your test data appears correctly with all mapped information, your integration is working perfectly. If something seems missing or incorrect, return to your field mappings and list configurations to make adjustments.
Connect Gravity Forms to SendGrid in minutes without coding
Unlock the full potential of your web form data by syncing Gravity Forms with SendGrid, the powerful email and automation platform.
- Add your contacts to one or multiple SendGrid lists
- Trigger automation workflows
- Track your business opportunities
- Enable double opt-in verification
- And much more
Final Thoughts
Congratulations if you’ve made it this far! You just created your first workflow to integrate Gravity Forms to SendGrid. You can now enjoy a simple but highly effective workflow to better leverage your web form data. Plus, you benefit from SendGrid’s best-in-class email delivery for secure and reliable messaging.
Love this no-code integration that’s easy and practical? Our plugins and add-ons might interest you. Feel free to explore our other Gravity Forms add-ons and integrations to automate your WordPress site.