wpDataTables Airtable Add-On Documentation
⚠️ IMPORTANT NOTE
wpDataTables Airtable Add-On is a ONE-WAY SYNC – From Airtable to WordPress ONLY!
Changes made in WordPress will NOT sync back to Airtable, so be sure to manage your data from Airtable to keep everything updated correctly.
Thank you for purchasing our product!
This add-on allows you to seamlessly sync your Airtable tables into WordPress using wpDataTables. Below is a step-by-step guide to help you install, connect, and display your Airtable data.
Installation and Activation
- Download the zip archive of plugin on your computer.
- Log in to your WordPress dashboard.
- In the WordPress dashboard, go to Plugins > Add Plugin.
- Click on Upload plugin button at the top of the page.
- Click on Choose File button and select the plugin file you downloaded in step 1.
- Click on Install Now button.
- Wait for the plugin to be installed, and then click the Activate Plugin button.
Generate Airtable Access Token
You will be asked for an Access token to connect your account. We recommend that you retrieve this token using the this link.
- In Airtable, click on your profile image and go to Builder Hub.
- Click on Personal Access Tokens in the Developers section.
- Click on Create new token.
- Give your token a Name.
- Click Add Scope and select:
data.records:readschema.bases:read
- Click Add Base and select the base you want to connect.
- Click Create Token.
- Copy your token to your clipboard.

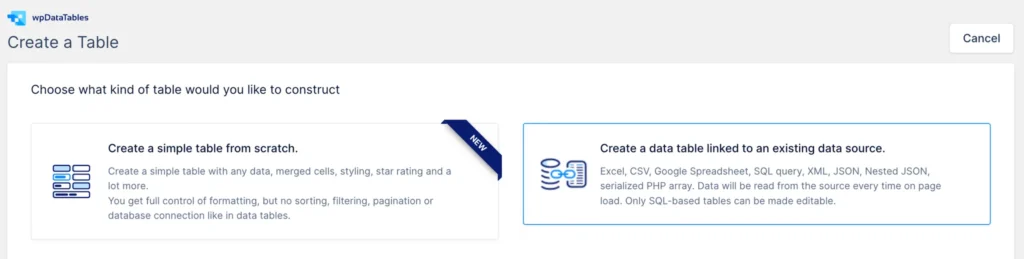
Creating a New Table in wpDataTables
- In the sidebar, go to wpDataTables menu.
- Click on Create a Table sub-menu.
- Choose Create a data table linked to an existing data source and click Next button.
- Name your table.
- Select Airtable as the Input Data Source Type.
- Paste your Access Token.
- Select the Base, Table, and View you want to connect.
- Click on Save Changes button.

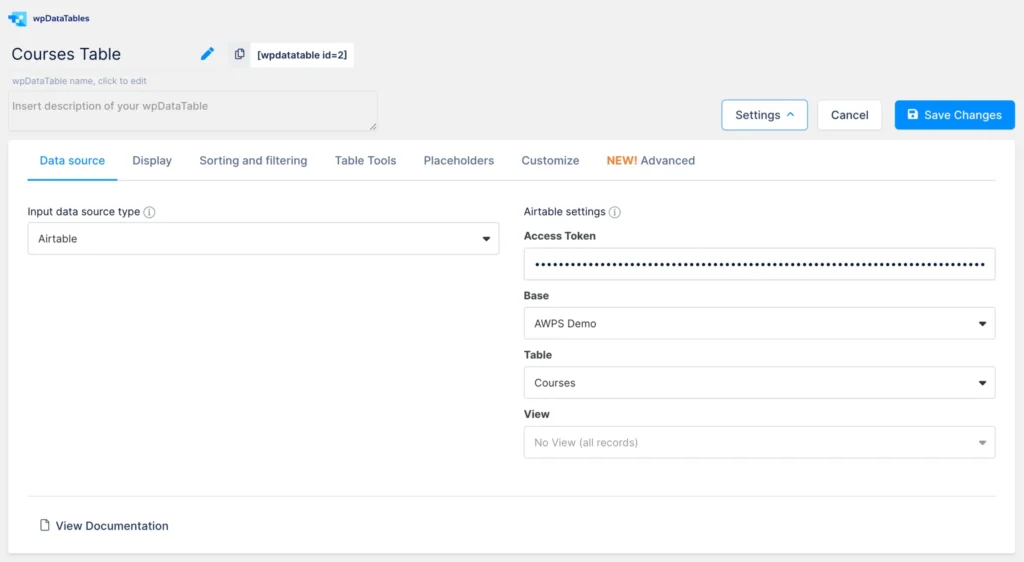
📌 Note: after saving the settings, you should see “Authentication successful”.
After saving, your Airtable table will be available in wpDataTables.
You can:
- Modify column types by clicking the settings icon of each column. Click on Save changes button to apply changes.
- To show/hide columns quickly click on Column List button in the Table preview and columns setup section and click on the eye icon for each column, then click Save.
- Customize permissions, display, sorting, filtering, and more in the table settings.
Displaying the Table on Your Pages
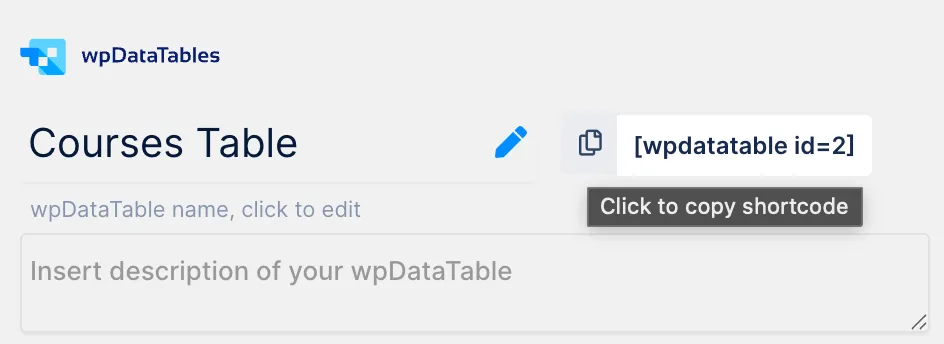
- Copy the shortcode displayed next to your table name.
- Go to the WordPress page where you want to display the table.
- Paste the shortcode into the content area.
- Click Update or Publish.
- Visit your page to see the table live.
You’re now ready to sync and display Airtable data in WordPress using wpDataTables!
Supported Airtable fields
- Single Line Text
- Long text
- Multiple select
- Single select
- Number
- Date
- Date & Time
- Phone
- URL
- Percent
- Currency
- Collaborator
Supported wpDataTables fields
- String
- Integer
- Date
- DateTime
- Time
Not supported Airtable fields and views
Here is what is not supported by our plugin yet:
Fields :
- Button
- Lookup
- Attachment (for uploading images, files, etc.)
- Checkbox
- Rating
Views :
- Calendar
- Gallery
- Kanban
- Timeline
- List
- Gantt
- New section
- Form
- URL link
- E-mail link
- Image