Gravity Forms to Airtable Documentation
Start overseeing your data more effectively by connecting your Airtable database to your Gravity Forms using our add-on.
Simply designate the Airtable tables you wish to link to a Gravity Form, map the applicable fields, and you're all set. From this point forward, all responses from your forms will be directly sent to your Airtable database, optimizing your data collection and organization. It's a convenient, practical solution for improved data management.
Installation & Settings
To install our Gravity Forms to Airtable add-on in WordPress, follow the steps below:
-
Download the plugin file to your computer.
-
Log in to your WordPress dashboard.
-
On the left-hand side menu, click on Plugins and then Add New Plugin.
-
Click the Upload Plugin button at the top of the page.
-
Click the Choose File button and select the plugin file you downloaded in step 1.
-
Click on Install Now button.
-
Wait for the plugin to be installed, and then click the Activate Plugin button.
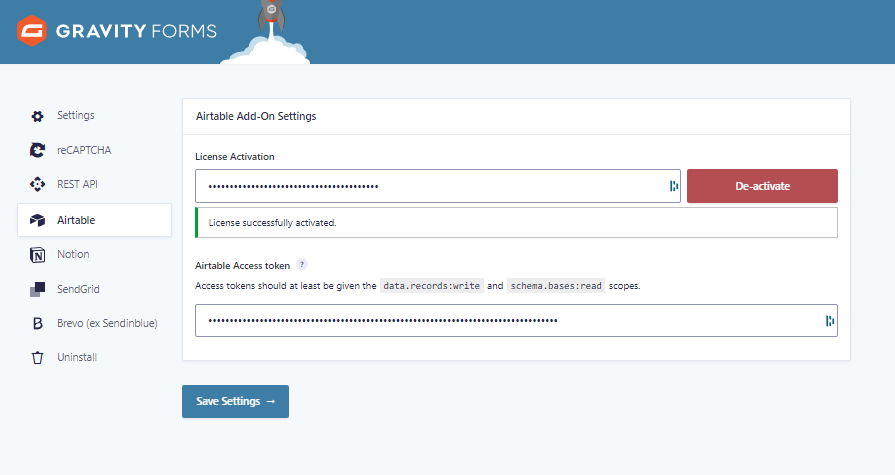
To activate your license key for the Gravity Forms to Airtable add-on, follow the steps below:
-
In the left-hand menu section of Gravity Forms, click on Settings, then click on Airtable.
-
Now, add your license key in License Activation and click on Activate button.
Generate Airtable Access token

-
In Airtable, click on your account.
-
Click on Developer hub.
-
Click on Personnal access tokens.
-
Click on + Create new token button.
-
Enter a name for your token.
-
Click on + Add a scope then add:
-
"data.records:write".
-
"schema.bases:read".
-
-
Click on + Add a base then choose the base you want to connect with your form.
-
Click on + Create token button.
-
Copy your token to clipboard.
-
Finish by clicking on Done button.
Add Airtable Access Token to Gravity Forms
-
In the left-hand menu section of Gravity Forms, click on Settings.
-
Click on Airtable.
-
Paste your access token from Airtable in Airtable Access token section then click on Save Settings button.
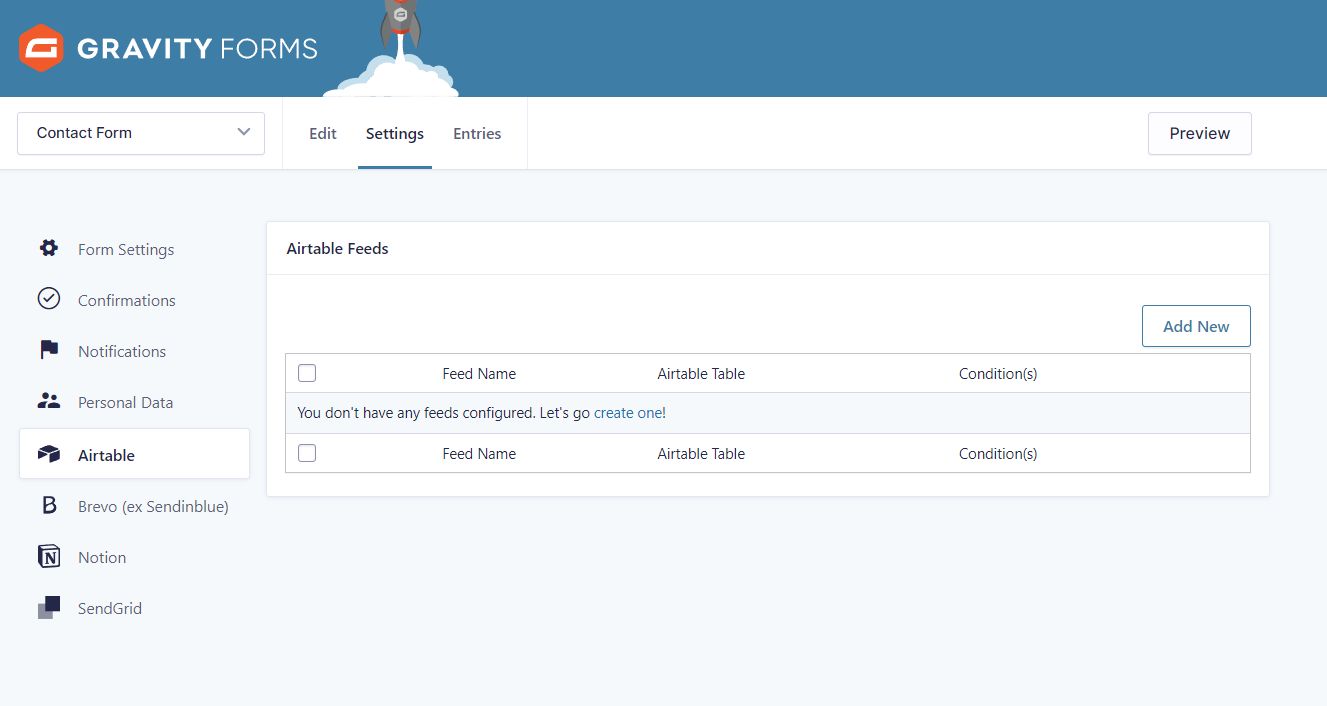
Create a Feed
-
Open the form you want to connect with your Airtable base.
-
In the top, click on Settings, then on Airtable in the dropdown menu**.**
-
In Airtable feeds, click on Add new.
-
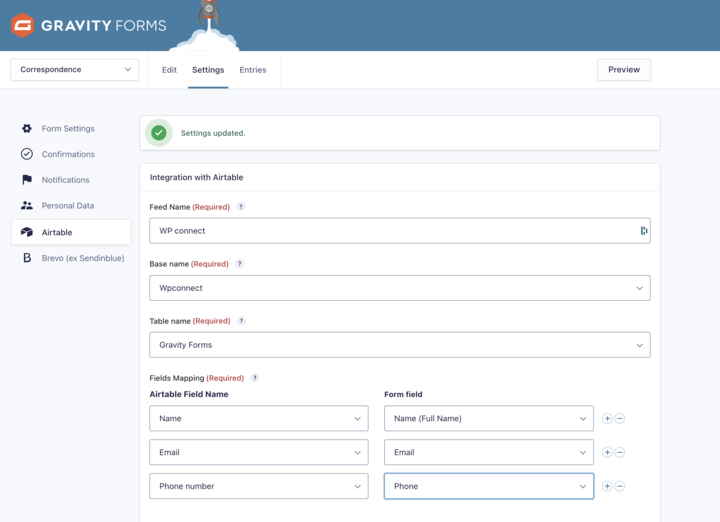
Enter a label for the feed in Feed Name field.
-
Select the base of your choice between those selected when you created your access token in Airtable, in the Base Name field.
-
Select the table of your choice which will receive the data, in Table Name field.
-
Click on Save Settings button.
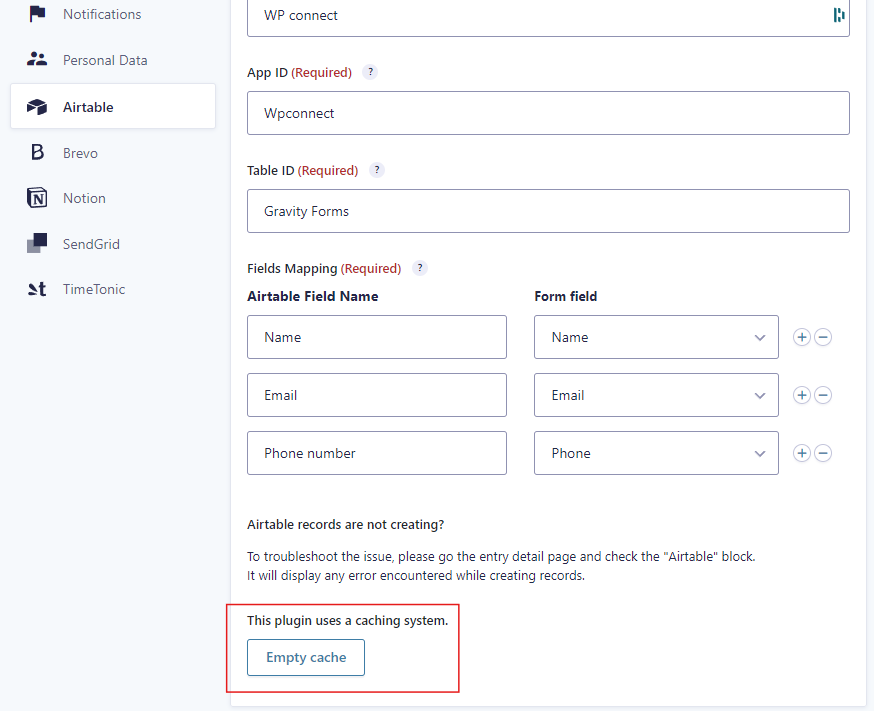
Fields Mapping
Now that you have saved your settings while creating connection between Airtable and your form you will see in your feed a Fields mapping section.
-
In Airtable Field Name, select an Airtable field present in your table.
-
In Form field, select one of your form field present in your form.
-
Click on the + button on the right to connect other Airtable Field Name with Form field.
-
Repeat step 2 & 3.
-
Click on Save Settings button.
Add Conditional Logic (Optional)
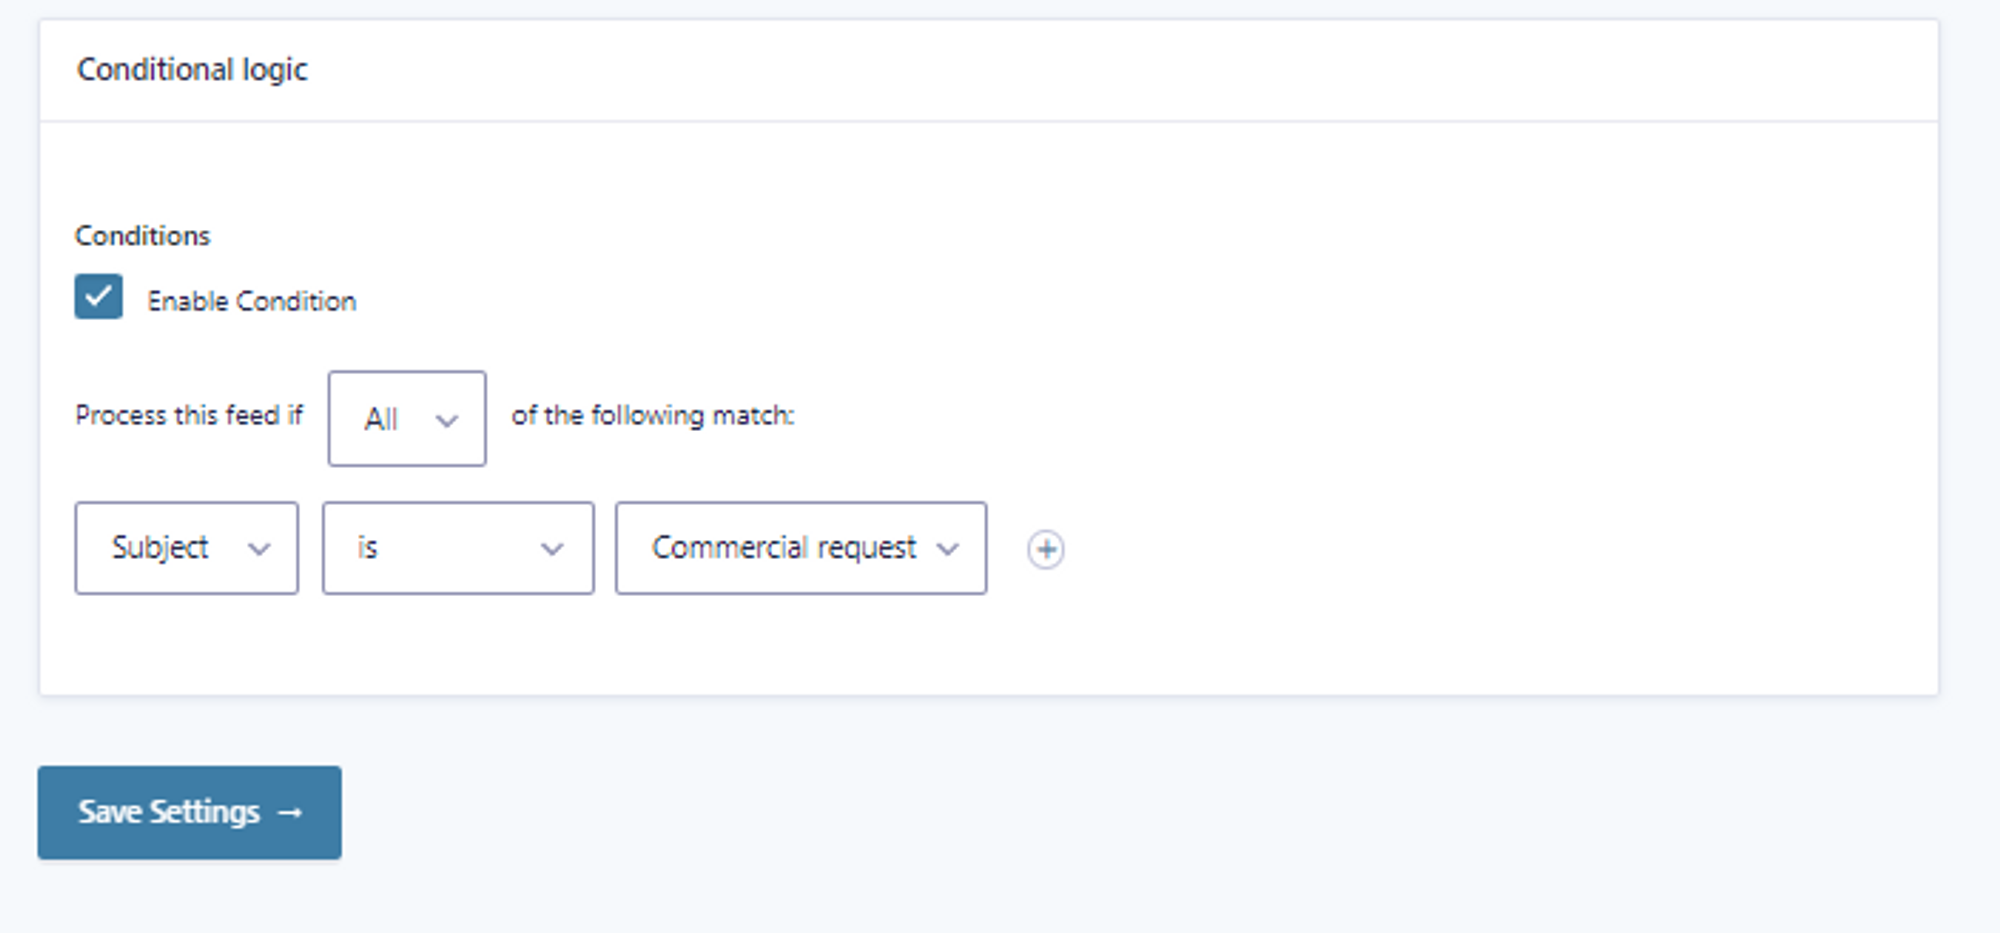
You can finally add conditional logic, so only the contact information of those who meet specific conditions will be sent in Airtable table.
To create a condition, click Enable Condition option.
On the left, you can choose a field from your form and select the criteria that will activate sending to Airtable, for example:
→ Subject IS "Commercial request"
Once you configurated your condition, click on Save Settings button.
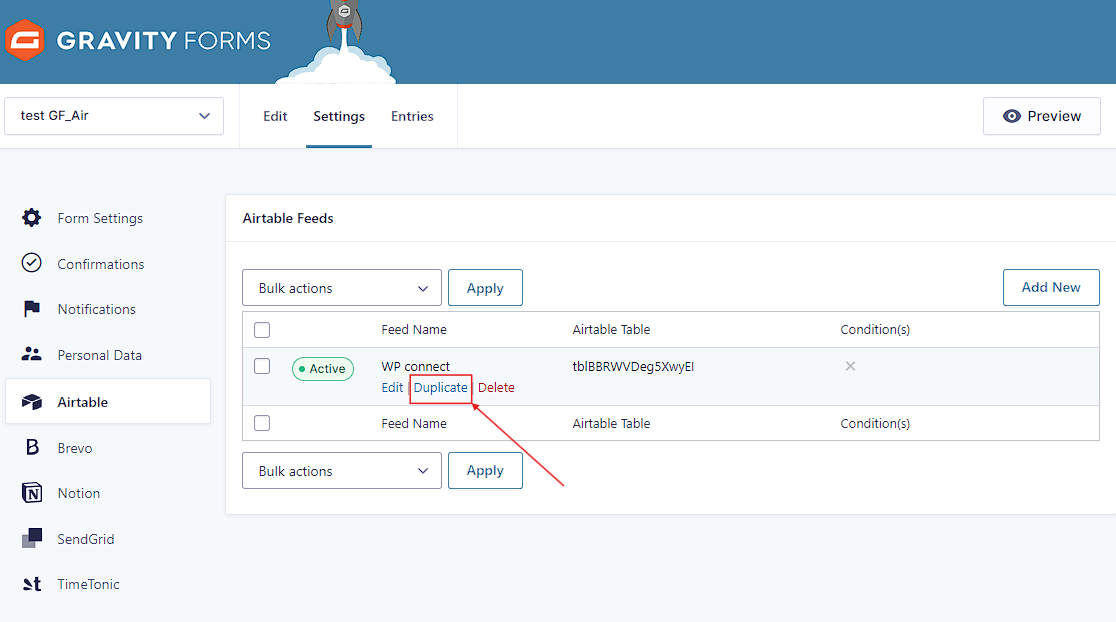
Duplicate a feed
-
In your dashboard, click on Forms menu.
-
Click on Settings link of the form for which you wish to duplicate a feed.
-
In the left options, click on Airtable.
-
In Airtable Feeds, find the feed you want to duplicate.
-
Move your cursor over the feed to reveal and click on the Duplicate link.
-
After that, you will find another feed with the same name, which you can then rename and adjust the settings.
Supported fields
Gravity Forms fields:
-
Single Line Text
-
Paragraph
-
Text
-
Drop Down
-
Number
-
Checkboxes
-
Radio Buttons
-
Name
-
Date
-
Time
-
Phone
-
Address
-
Website
-
Email
-
File
-
List
-
Multi select
-
Consent
Airtable fields:
-
Attachment
-
Date
-
Duration
-
Email
-
Integer
-
Link to another record
-
Long text
-
Url
-
Multiple select
-
Percent
-
Phone
-
Rating
-
Rich text
-
Single line text
-
Single select
Compatibility Table
Troubleshootings
Cache issue
In case of a cache problem, click on Empty Cache button.
After clicking Empty cache, the browser identifies and deletes cached files, such as images and scripts, refreshes the user interface, and during the next load, new resources are downloaded from the server.
Syncing issues
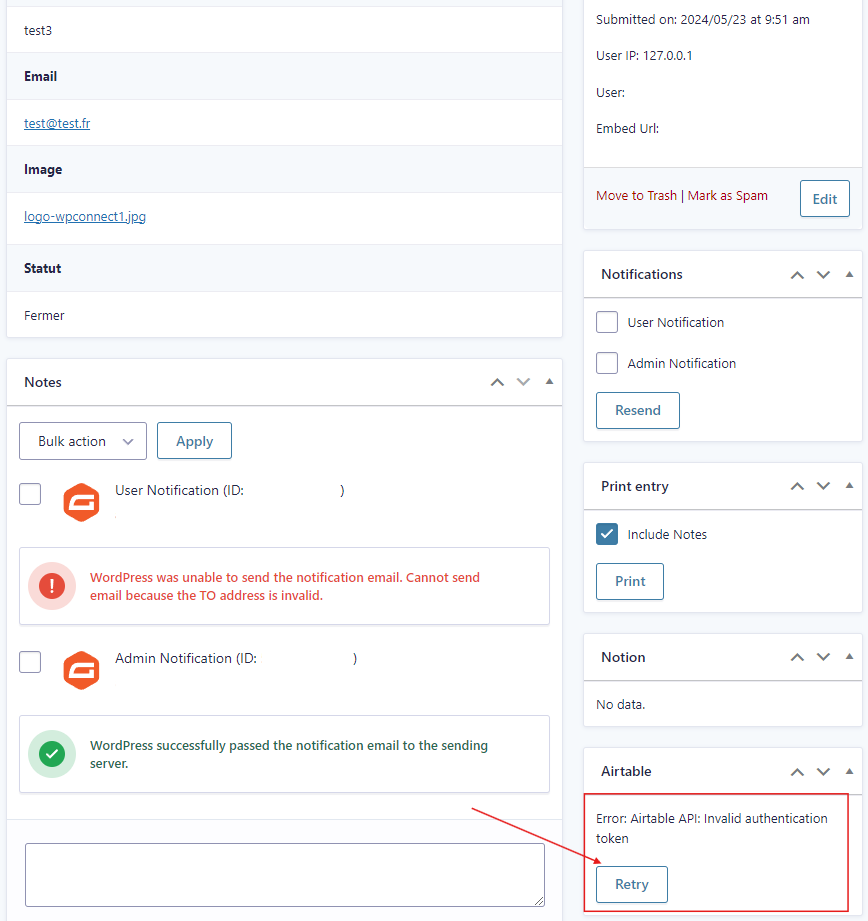
In case of these issues:
-
Open the form entries by clicking on Entries.
-
Select the entry that was not successfully submitted by clicking on View.
-
In the right sidebar, click on the Retry button to manually restart the data submission to Airtable.