How to use Meta Box with Notion WP Sync?
Notion WP Sync is a powerful tool for importing data from Notion into WordPress. While it is not yet fully compatible with all Meta Box Lite field types, it is possible to use Air WP Sync with Meta Box Lite by leveraging custom fields and ensuring the field types match.
Step 1: Setting Up Meta Box Custom Fields or Custom Post Types
Before synchronizing data, you need to create custom fields and, if necessary, Custom Post Types (CPTs) in Meta Box Lite, assign these custom fields to posts or CPTs and make sure you use appropriate field types for these custom fields. Notion WP Sync maps data based on these types.
To create custom fields:
- Go to Meta Box > Custom Fields and click on Add New Field Group button.
- Add a title to your field group.
- Then click on + Add Field button in the Fields tab.
- Select a field type in the list (or search it).
- Click next to the field name to define its parameters: at the very least, you must assign it a Label and an ID.
- In the Settings tab, at least, assign its Location to Post, Page or/and CPT.
- Click on Publish button to save this field group and its custom fields.
For more information, see the Meta Box documentation on creating field groups and custom fields.
📌 Note that the ID (slug) is automatically filled in when the Label is entered, but it is entirely possible to modify the ID. Don’t forget the ID, which you’ll use for mapping.
⚠️ Notion WP Sync doesn’t support all the custom field types offered by Meta Box. Here’s the list of supported fields.
To create a custom post type:
- Go to Meta Box > Post Types and click on Add New Post Type button.
In the General tab, set a Plural name and a Singular name for your post type. The slug is automaticaly filled in, but you can of course modify it. - Enable the basic WordPress fields in the Supports tab.
- Enable the features and taxonomies you need for the post type, in the Features and Taxonomies tabs.
- Click on the Publish button to create the CPT.
For more information, see the Meta Box documentation on creating custom post types and taxonomies.
⚠️ If you’ve created your CPT after your custom fields, don’t forget to add this CPT to the Location of field groups.
Step 2: Importing with Notion WP Sync to Meta Box Field
Once your Meta Box custom fields or CPTs are ready, set up your Notion WP Sync connection to import your Notion data correctly.
- Go to Notion WP Sync > All Connections.
- Click on Add New Connection button to create a new connection.
- Give a title to your connection.
- Fill the Internal integration token field.
- Select your Notion Pages or Database linked to your internal integration token.
Setting Up Your Import
In the Import As… section:
- In the Import as drop-down, select Post.
- In the Post Type drop-down, select Post, Page or the Meta Box post type created before.
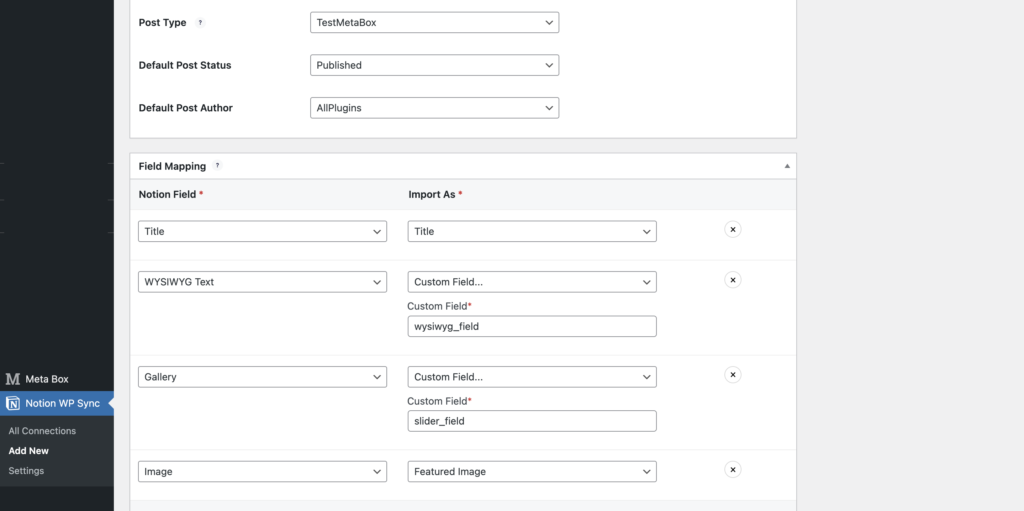
Field Mapping
In the Field Mapping section:
- Choose a Notion field: in the Notion Field side, select your Notion fields from the drop-down menu.
- Select a WordPress field, in the Import As drop-down menu:
- Select basic WordPress fields such as Title, Slug, Category, Featured Image, Taxonomy.
- Or select Custom Field to map with the Meta Box custom field, and type the ID (slug) of Meta Box custom field.
⚠️ Ensure that the field types in Notion match the types of the Meta Box custom fields.
Import and Sync
Once all your connection settings are done:
- Click on the Publish button in the top-right of the connection.
- Click on the Sync Now button in the Actions section of your connection to import and sync all your Notion page or base content into yours posts or your new custom post types.
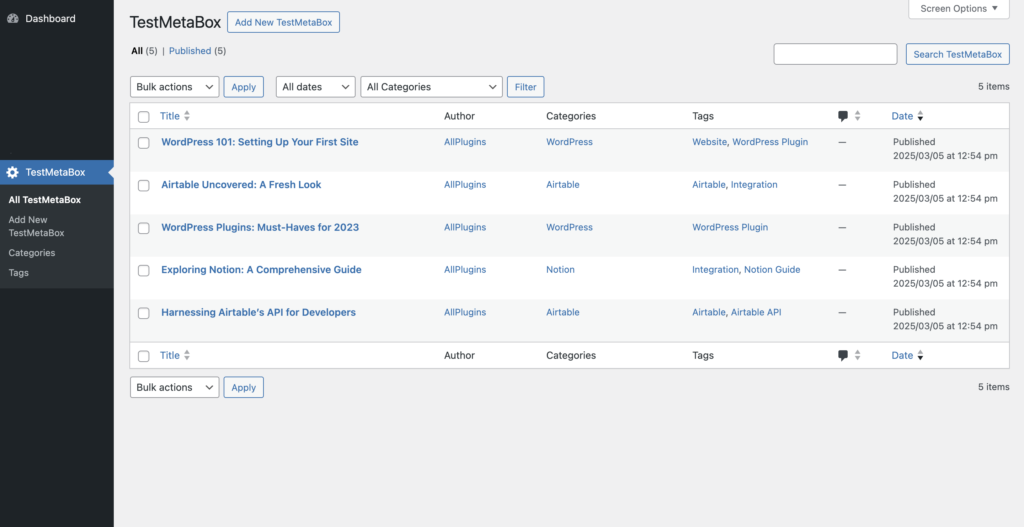
Step 3: Viewing the Imported Data in Meta Box
After the import is complete, you can check how the data appears inside your posts, pages or Meta Box-powered Custom Post Types. For the Meta Box CPT:
- Go to WordPress > Meta Box Post Type and open the imported post type.
- Open a post to verify that all mapped custom fields have been correctly imported.
- If you use Elementor or Gutenberg, you can display the Meta Box custom fields dynamically on the front end.
Supported Meta Box Fields
Notion WP Sync currently supports mapping the following Meta Box field types:
| Meta Box Field Type | Notion Compatible Data Type |
|---|---|
| Text | Text |
| Textarea | Text |
| Email – Text | |
| URL / Oembed | URL – Text |
| WYSIWYG | Text |
| Single Image | Files & media (single file) |
| Checkbox – Switch | Select |
| Select | Select |
| Radio | Select |
| Number | Number |
| Date Picker | Date |
These fields will sync seamlessly if the Notion field type matches the expected Meta Box field type.
Unsupported Meta Box Fields
Currently, Notion WP Sync does not support mapping the following Meta Box fields:
- Checkbox list
- Autocomplete
- Background
- Button
- Button Group
- Color Picker
- Custom HTML
- Datetime Picker
- Fieldset Text
- Google Maps
- Hidden
- Icon
- Image Select
- Key Value
- Open Street Maps
- Password
- Text list
- Time Picker
- Range
- Post
- Sidebar
- Taxonomy
- Taxonomy Advanced
- User
- File, File Advanced, File Input, File Upload
- Image, Image Advanced, Image Upload
- Video
- Divider
- Heading
If your project requires one of these fields or not listed in supported fields, consider using an alternative field type that is supported.
Need Help?
By following these steps, you can seamlessly sync your Notion data with Meta Box custom fields using the Notion WP Sync plugin. This integration keeps your data consistently updated and centrally managed, ensuring efficiency and accuracy.
If you encounter any issues or have questions, feel free to reach out to our support team for assistance. You can also check our full documentation or the other Advanced Articles.
Happy syncing!