TimeTonic WP Sync Documentation
⚠️ IMPORTANT NOTE
TimeTonic WP Sync is a ONE-WAY SYNC – from TimeTonic to WordPress ONLY!
Changes made in WordPress will NOT be synced to TimeTonic, so make sure to manage your data from TimeTonic to ensure everything is updated properly.
Installation & Settings
To install our TimeTonic WP Sync plugin in WordPress, follow the steps below:
- Download the zip archive of plugin on your computer.
- Log in to your WordPress dashboard.
- In the WordPress dashboard, go to Plugins > Add New Plugin.
- Click on Upload plugin button at the top of the page.
- Click on Choose File button and select the plugin file you downloaded in step 1.
- Click on Install Now button.
- Wait for the plugin to be installed, and then click the Activate Plugin button.
After installing and activating the plugin in WordPress, it will appear in the admin menu and will allow access to the connection and configuration settings.
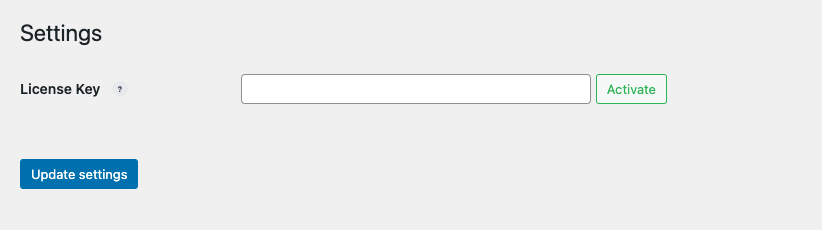
Before creating a connection, you are prompted to enter your license key to validate the plugin installation. To activate this license key, go to TimeTonic WP Sync > Settings.
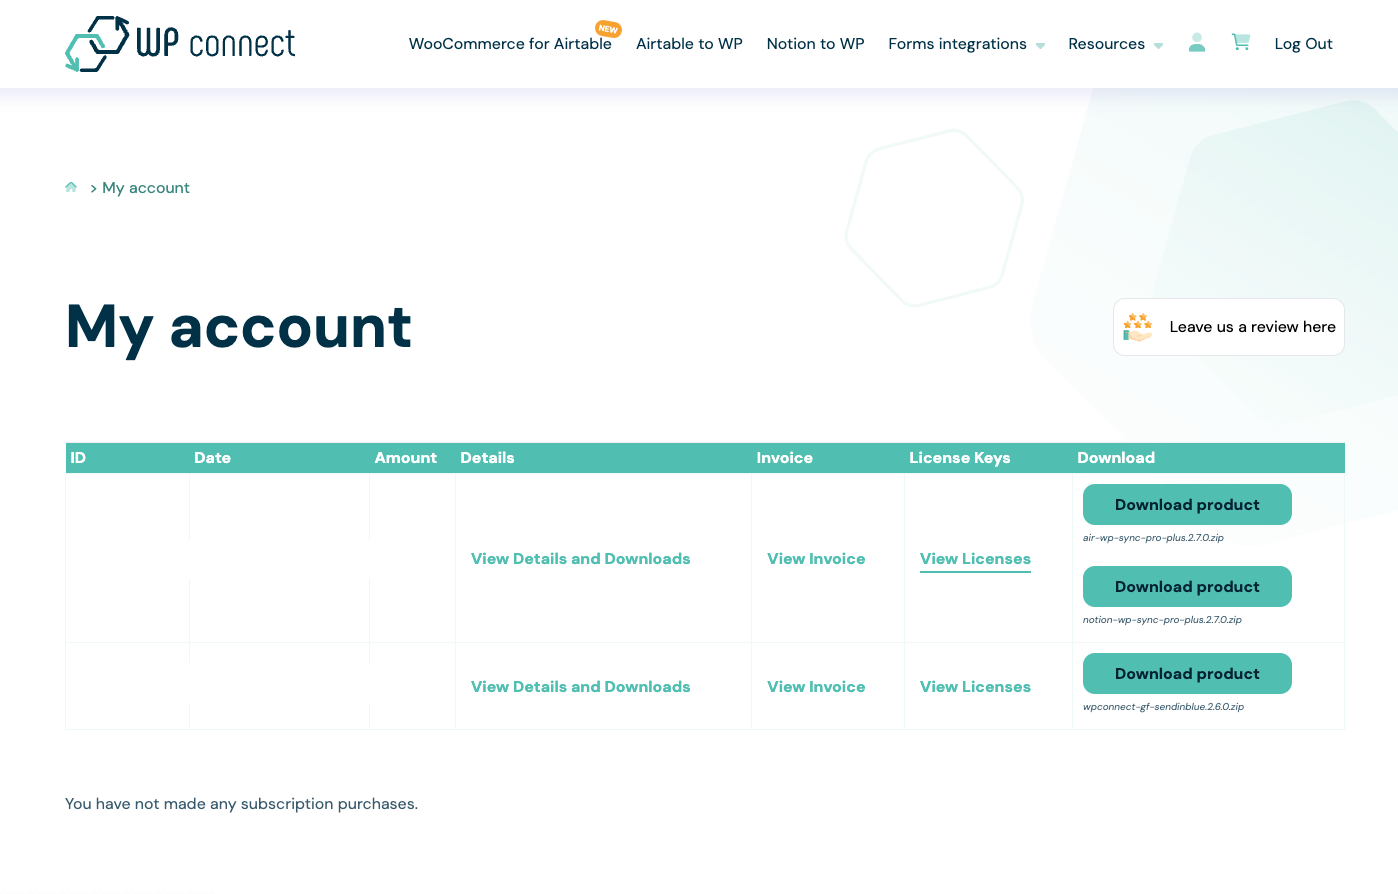
The license key is available in your purchase confirmation email, as well as on wpconnect.co > My Account > License Keys, View Licenses.
You will then be redirected to your product purchase page. Click on the key icon to see the license number appear and copy and paste it into your TimeTonic WP Sync License Key field.
Once the license key is copied into the TimeTonic WP Sync settings, make sure to click the Activate button. If your license key is valid, a green check mark will appear and you will simply need to save the settings by clicking the Update Settings button.
You can then start creating your connections.
Create a connection
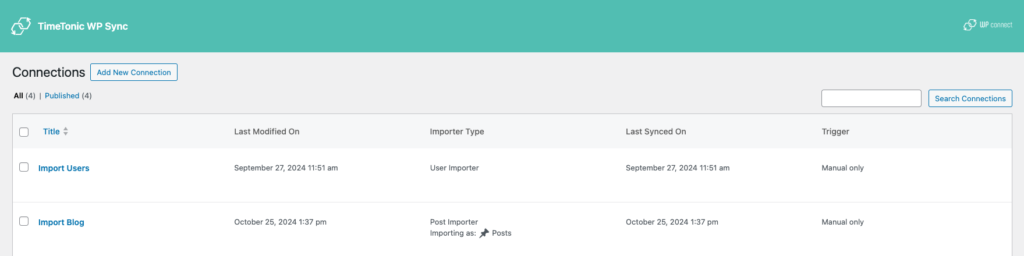
To create a new connection to your TimeTonic account, go to TimeTonic WP Sync > All Connections, click on the Add New Connection button, and enter a Title for your connection.
An API key will be required to connect your account. We recommend retrieving this key from this link. Go to your TimeTonic Account > Settings page, click on the Add New API key button.
Once the token is generated, copy and paste it into the designated field API Key, then also add your User ID in the corresponding field.
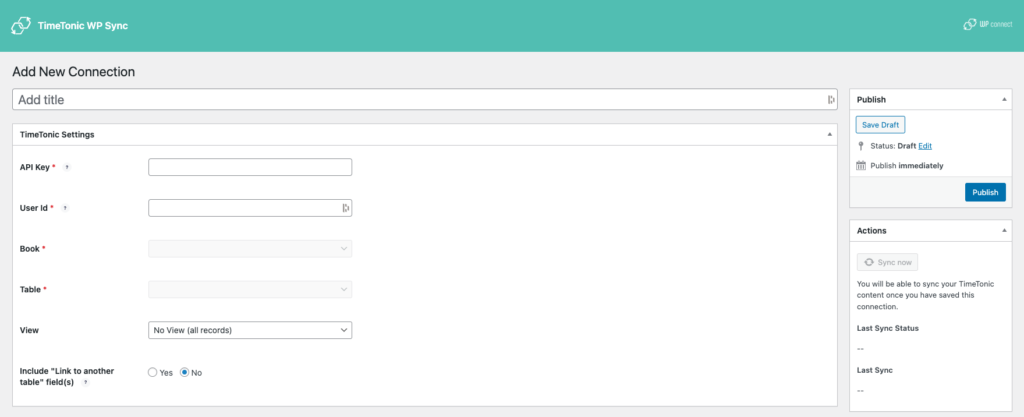
After entering your token, select the Book (Workspace) to import, as well as the Tables or View you want to synchronize. In the near future, you’ll also be able to add formula filters to views to adjust imported data, as in TimeTonic.
⚠️ Reminder: to use a table, you must own it or have admin rights.
Import Settings
You can import your content into multiple formats: Post, Users, or Taxonomies.
Here’s an overview of each type.
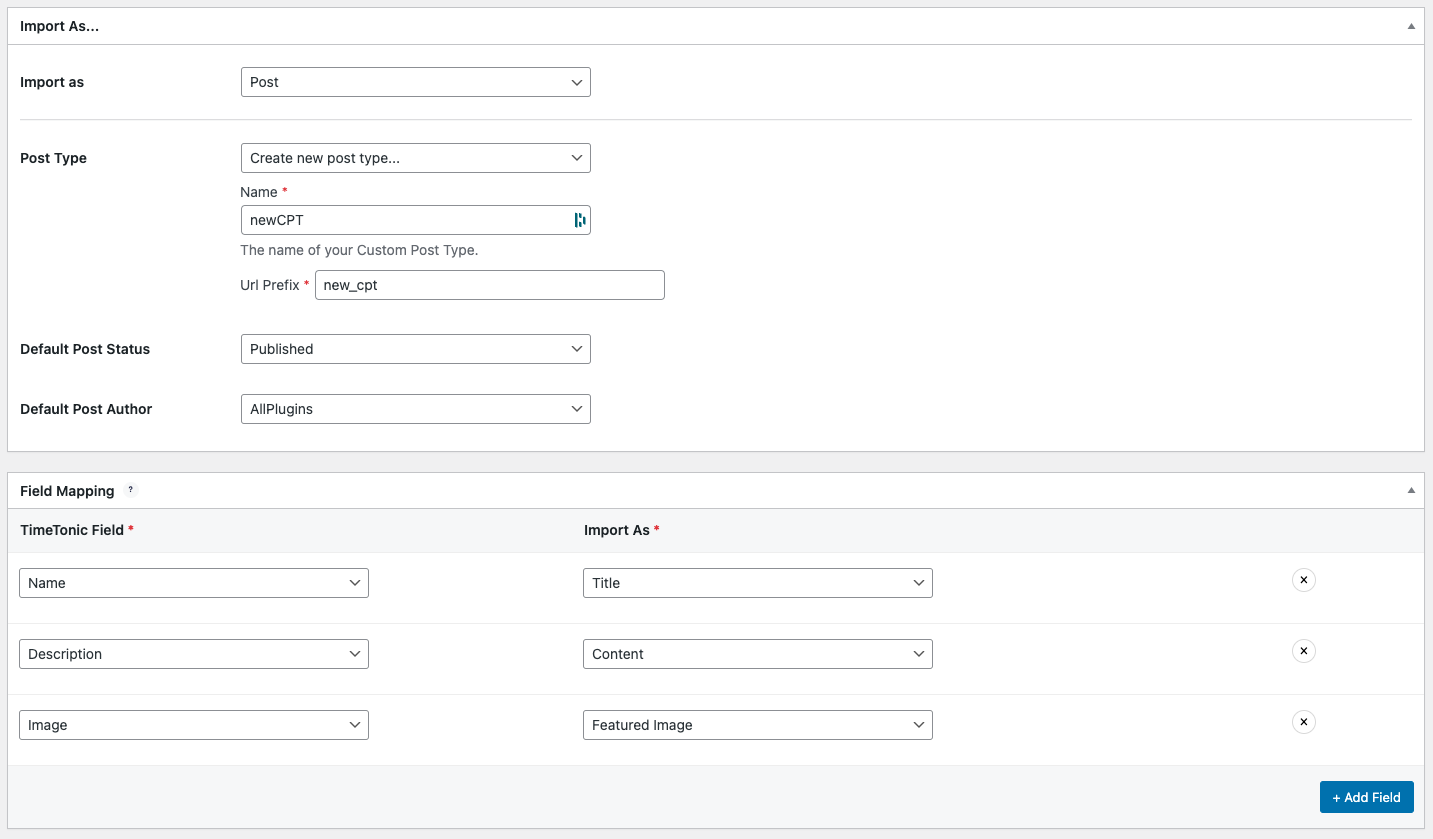
Post Type
You can import your content in several ways: post, page, or custom post type.
Here’s how these three elements work.
Post
A post is content that can be published on a blog or website. Typically used for sharing news or information, posts are displayed chronologically. You can create and manage them in the Posts section of the WordPress dashboard.
Page
A page is static content that is usually part of the site navigation menu. Pages are used to display long-term content, such as “About” or “Contact” pages. You can manage them in the Pages section of the WordPress dashboard.
Custom Post Type (CPT)
A Custom Post Type (CPT) is a specialized content type created by WordPress plugins or themes. CPTs allow you to add structured content like events, products, portfolios, etc.
They are generally used to extend the capabilities of WordPress and add structured content to your site. They are similar to posts and pages in that they can be published on your site and viewed by users, but they have unique tags and characteristics that set them apart.
There are several types of CPTs:
– CPTs created by plugins or themes installed on your WordPress site.
– CPTs that you have created via plugins like Custom Post Type UI or ToolSet.
– CPTs created manually by custom developments.
With the TimeTonic WP Sync plugin, you can create your own Custom Post Types (CPTs) on the fly for imported data.
📌 While the WooCommerce Product CPT appears in the list, it is only available for basic mapping configurations. For full compatibility, check out our Air WP Sync for WooCommerce.
Creating Custom Post Type
For the Custom Post Type that you will create from the TimeTonic WP Sync plugin, you will find the possibility to map the following WordPress fields: Title, Content, Slug, Custom Field.
It also allows you to create your own custom fields.
⚠️ CAUTION: if you decide to change the configuration and no longer use the Custom Post Type created specifically via the TimeTonic WP Sync plugin, this CPT created on the fly will no longer exist in WordPress and the imported content will also no longer be available.
Post Status
Like in WordPress, imported content from TimeTonic can have different status: Published, Draft, Scheduled, Pending, Private.
Each of these status checks the following conditions:
PRIVATE content is only visible to logged-in users with the appropriate permissions
PUBLISHED content is publicly visible on your website
DRAFT content is saved as a work in progress and is not visible to the public
SCHEDULED content is set to be published at a specific date and time in the future
PENDING content is waiting for review or approval before it can be published
📌 If you change the status later in the configuration, the status of already imported content will depend on the import strategy you defined (see Import Strategies section).
Post Author
During the import process, you must choose an author who will be assigned to each imported post. The author must be an existing WordPress user with access to the admin panel, regardless of their role.
⭐️ You can also import users from TimeTonic and assign them as authors
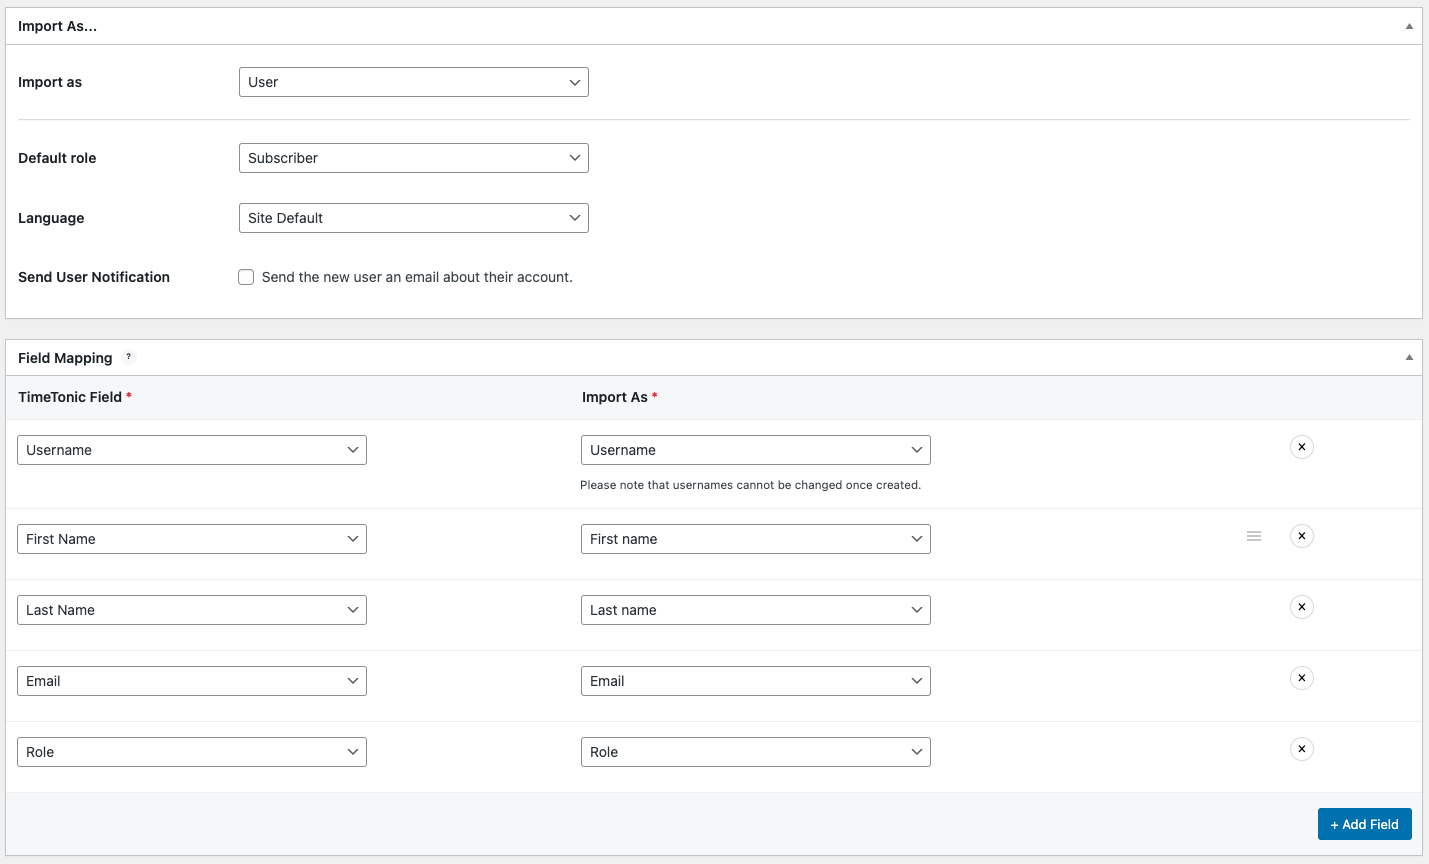
Users Import
TimeTonic WP Sync also allows you to import users directly into WordPress. You can map your TimeTonic fields to user attributes such as:
• Username
• First Name
• Last Name
• Email
• Website
• Biography
• Role (admin, editor, contributor, etc.)
• Language
• Custom Fields
This is particularly useful for team management or membership sites.
Taxonomy Term
You can import taxonomies (categories, tags) to organize your content. By mapping TimeTonic fields to WordPress taxonomies, you can create filters and groups for your posts or CPTs.
Compatible fields for taxonomies:
• Name
• Slug
• Taxonomy Type
• Description
• Parent Category (only for hierarchical taxonomies)
• Custom Fields (e.g., project type, location)
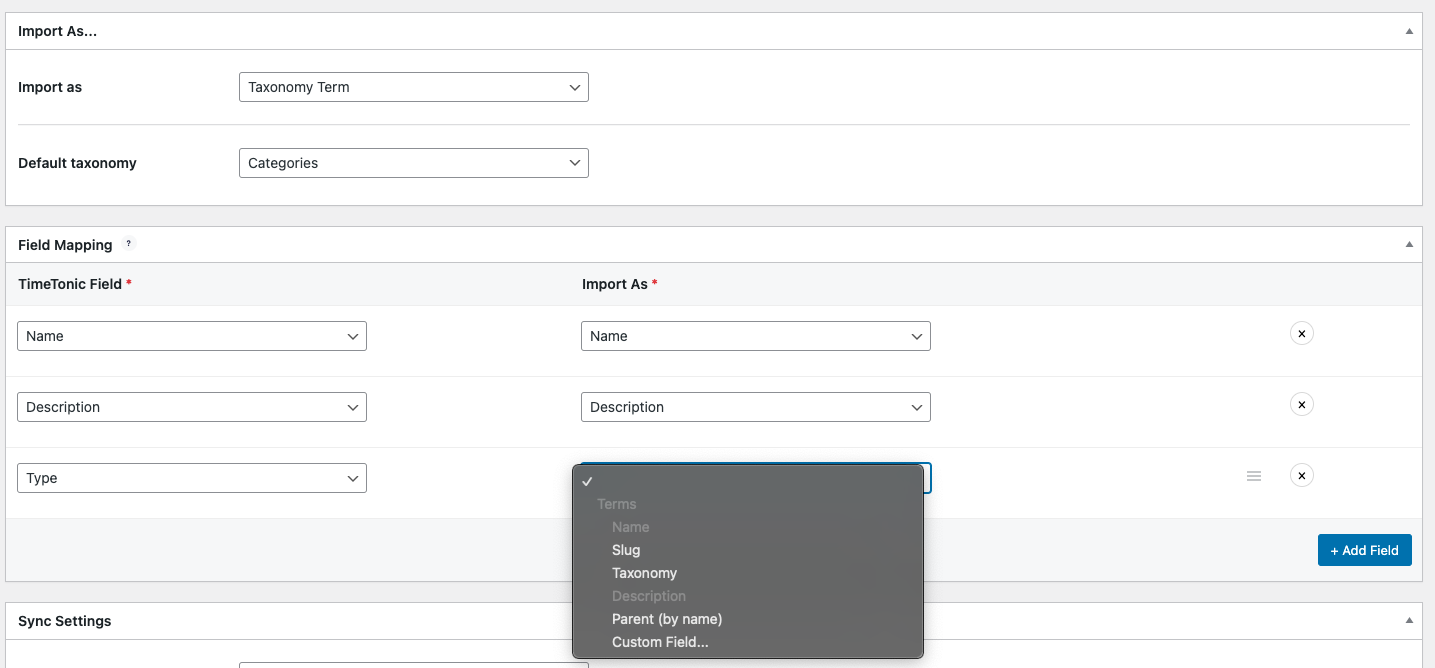
📌 However, for custom taxonomies, only those based on text fields are currently supported. Other field types will be added in future versions of the plugin.
Mapping Settings
You can now link the fields of your TimeTonic database with the WordPress fields.
To do this, click on the Add a field button. Two drop-down lists will appear: one containing the fields of your TimeTonic database and the other the WordPress fields with which you can associate them.
Post
For posts, you can map the following WordPress fields:
Title, Featured Image, Content, Excerpt, Slug, Tags, Categories, or Custom Field.
Page
For pages, you can map the following WordPress fields:
Title, Featured Image, Content, Slug, or Custom Field.
Existing Custom Post Type
For existing Custom Post Types (CPTs), meaning those created by installed plugins or WordPress themes, you can map:
Title, Content, Slug, Taxonomies, or Custom Fields.
Taxonomies allow grouping similar content across multiple CPTs. They can be used to create filters or search functions.
Example for a “Real Estate” CPT:
• Title
• Content
• Slug
• Property Type (taxonomy)
• City (taxonomy)
• Custom Fields
Custom Fields
You can also add specific fields to your content imported from TimeTonic by associating a TimeTonic field with a custom field that you can name. You will find this field in the imported content once the synchronization is complete.
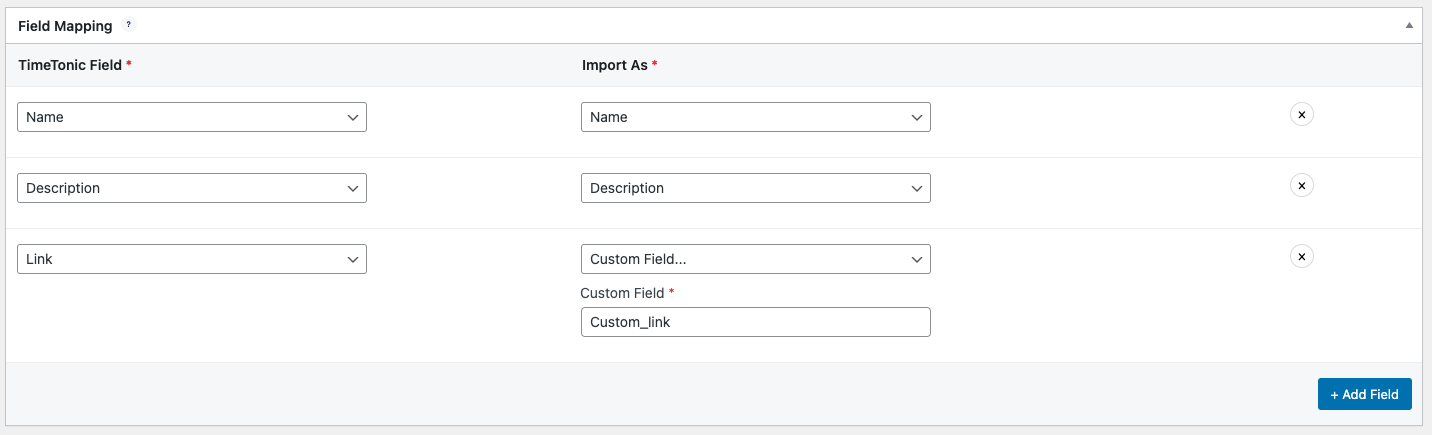
⚠️ If you modify the configuration and delete a custom field created via TimeTonic WP Sync, you will no longer find it in any of the imported content.
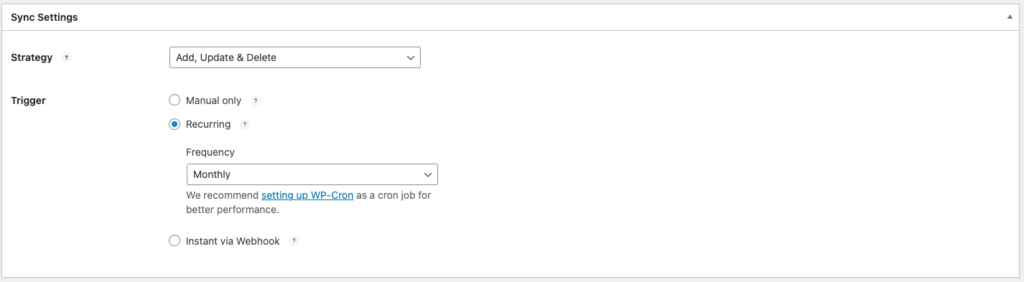
Sync Settings
You can choose the synchronization settings of the TimeTonic WP Sync plugin.
By clicking on Synchronize, you can perform your first synchronization, even if you have not selected the Manual only trigger.
Strategy
There are three import strategies for importing TimeTonic content into WordPress:
• ADD: only adds new content without modifying existing ones.
• ADD/UPDATE: adds new content and updates existing ones if they have been modified in TimeTonic.
• ADD/UPDATE/DELETE: adds new content, updates existing ones, and deletes any removed from TimeTonic.
Trigger
Triggers allow you to control when data is imported from TimeTonic to WordPress. There are three options available:
- MANUAL: It allows you to manually import the data by clicking on the “Sync now” button. This is useful if you need to import data occasionally or want more control over when to import.
- RECURRENT: It allows you to schedule the import of data at regular intervals. You can choose how often the import should occur, such as every 5 minutes, hourly, daily, or weekly. This is useful if you want to regularly update your WordPress site with the latest data entered into TimeTonic.
For better performance, you can set a cron job using WP-Cron: see our tutorial here. - INSTANT: It allows you to import data as soon as it is added or updated in TimeTonic (depending on the selected import strategy). This is useful if you want your WordPress site to be in real-time sync with TimeTonic, but it can also be resource-intensive if you have a large amount of frequently updated data. To do so, you’ll have to create an automation.
Publishing
Once all the parameters have been configured, do not forget to publish your connection by clicking on Publish or Update button in the case of a configuration modification. And, voilà !
If you have chosen a manual synchronization, do not hesitate to click on the Sync now button to synchronize your first contents and see them appear in WordPress.
Elementor, Divi, Beaver Builder and others Page Builders support
If you use Elementor, Divi, Beaver Builder or any Page Builder to create and manage your site, you can use directly the content imported by TimeTonic WP Sync. You will find all the synchronized posts including the existing Custom Post Type and your Custom Post Type created with TimeTonic WP Sync.
Refer to your page builder documentation to enable, use your Custom Post Types and add them to posts loops or single templates.
In the same way, you can use the custom fields to display your data in pages, boxes, widgets or any dynamic elements such as button or tags which give you a high level of personalization!
Supported Fields
TimeTonic supported fields:
- Single line of text
- Multiline Text
- Smart Text
- Number
- Selection
- Checkbox
- Date
- Phone Number
- Attachments
- URL
- Formula
- Link to another table
- Selection (List from another table)
- Automatic Number
WordPress supported fields:
- Title
- Content
- Excerpt
- Slug
- Publication Date
- Featured Image
- Custom Field
- Term Taxonomies
- Status
- Author
Not Supported Fields & Views:
Here is what is not yet supported by our plugin:
TimeTonic Fields:
- Color Selection
- Text Color Selection
- Linked Table Column
- Conditional Text (Text from Another Table)
- Conditional Selection (List from Another Table)
- Comments
- Change History
- Automatic Numbers
- External Form
- Permalink
- QR Code
- Encrypted Field
- Last Modified
- Automatic Document
- Mask
- Contact Information
- Record URL
TimeTonic Views:
- Kanban
- Calendar
- Planner
- Gantt
- Cart
- TCD
Troubleshootings
Make sure you have created your databases and TimeTonic columns names before adding a new connection. If you don’t see it, wait 15 minutes. For performance reasons, your TimeTonic elements are cached for 15 minutes.
If needed, you can access to logs from a FTP server in this folder:
/wp-content/uploads/tmtwpsync-logs
Syncing Issues
Some issues can appear when syncing. Some hosting providers disable a handful of PHP functions to help ensure performant servers.
Server Timeout
If you have a large amount of content to import, the synchronization process will take some time for all the data to synchronize, especially if this is the first sync. You may have what is called a “Server Timeout”. It will depend of the number of rows you wish to import, the size and the number of images but also of the server settings. This is all the more likely to happen if you have opted for a basic hosting offer.
Check with your hosting provider and increase the execution time, allowed memory size and file size to the maximum if needed.
Basic Authentification
In case you have configured a Basic Authentication to protect the access to the site or to some information of the site, the call to WP Cron is then impossible, making the recurrent and instantaneous synchronization impossible.
Cache issues with WP-Cron
WP-Cron needs page loading to trigger and therefore synchronize. In case you use a cache system (WP Rocket or WP Super Cache for example), it is therefore necessary to use a server cron.